Introduction
Mobile Clients
This is the manual for the computer version of Anki. Separate manuals are available for the mobile clients:
- AnkiDroid Manual (Android)
- AnkiMobile Manual (iPhone/iPad)
Quickstart
In a hurry? Jump straight to Getting Started.
Getting Help
Looking for help? Please see Getting Help.
Translations
Volunteers have contributed translations of this manual. The translations may not always be up to date.
- Bahasa Indonesia
- Deutsch
- Español
- Français
- Italiano
- Polski
- Português Brasileiro
- русский язык
- Українська
- العربية
- فارسى
- 日本語
- 简体中文
If you would like to help translate the manual into a different language, please see the translation docs.
Legacy Documentation
Not on the latest version of Anki? Find archives of this manual at the Internet Archive.
For information on old scheduler versions, see this FAQ.
Background
Anki is a program which makes remembering things easy. Because it is a lot more efficient than traditional study methods, you can either greatly decrease your time spent studying, or greatly increase the amount you learn.
Anyone who needs to remember things in their daily life can benefit from Anki. Since it is content-agnostic and supports images, audio, videos and scientific markup, the possibilities are endless. For example:
-
Learning a language
-
Studying for medical and law exams
-
Memorizing names and faces of people
-
Brushing up on geography
-
Mastering long poems
-
Even practising guitar chords!
There are two simple concepts behind Anki: active recall testing and spaced repetition. They are not known to most learners, despite being well-documented in scientific literature. Understanding how these concepts work will make you a more effective learner.
Active Recall Testing
Active recall testing means being asked a question and trying to remember the answer. This is in contrast to passive study, where we read, watch, or listen to something without pausing to consider if we know the answer. Research has shown that active recall testing is far more effective at building strong memories than passive study. There are two reasons for this:
-
The act of recalling something strengthens the memory, increasing the chances we’ll be able to remember it again.
-
When we’re unable to answer a question, it tells us we need to return to the material to review or relearn it.
You have probably encountered active recall testing in your school years without even realizing it. When good teachers give you a series of questions to answer after reading an article, or make you take weekly tests, they are not doing it simply to see if you understood the material or not. By testing you, they are increasing the chances you will be able to remember the material in the future.
A good way to integrate active recall testing into your own studies is to use flashcards. With traditional paper flashcards, you write a question on one side of a card, and the answer on the other side. By not turning the card over until you’ve recalled the answer, you can learn things more effectively than passive observation allows.
Use It or Lose It
Our brains are efficient machines, and they rapidly forget information that doesn’t seem useful. Chances are that you don’t remember what you had for dinner on Monday two weeks ago, because this information is not usually useful. However, if you went to a fantastic restaurant that day and have spent the last two weeks telling people about how great it was, you’re likely to still remember it in vivid detail.
The brain’s “use it or lose it” policy applies to everything we learn. If you spend an afternoon memorizing some science terms, and then don’t think about that material for two weeks, you’ll probably have forgotten most of it. In fact, studies show we forget about 75% of material learned within a 48 hour period. This can seem pretty depressing when you need to learn a lot of information!
However, the solution is simple: review. By reviewing newly-learned information, we can greatly reduce forgetting.
The only problem is that traditionally, reviewing has not been very practical. If you are using paper flashcards, it’s easy to flick through all of them if you only have 30 of them to review, but as the number grows to 300 or 3000, it quickly becomes unmanageable.
Spaced Repetition
The spacing effect was reported in 1885 by a German psychologist called Hermann Ebbinghaus. He observed that we tend to remember things more effectively, if we spread reviews out over time, instead of studying multiple times in one session. Since the 1930s, there have been a number of proposals for utilizing the spacing effect to improve learning, in what has come to be called spaced repetition.
One example was in 1972, when a German scientist called Sebastian Leitner popularized a method of spaced repetition with paper flashcards. By separating the paper cards into a series of boxes, and moving the cards to a different box on each successful or unsuccessful review, it was possible to see at a glance a rough estimate of how well a card was known and when it should be reviewed again. This was a great improvement over a single box of cards, and it has been widely adopted by computerized flashcard software. It is a rather rough approach however, as it cannot give you an exact date on which you should review something again, and it does not work very well with material of varying difficulty.
The biggest developments in the last 30 years have come from the authors of SuperMemo, a commercial flashcard program that implements spaced repetition. SuperMemo pioneered the concept of a system that keeps track of the ideal time to review material and optimizes itself based on the performance of the user.
In SuperMemo’s spaced repetition system, every time you answer a question, you tell the program how well you were able to remember it — whether you forgot completely, made a small mistake, remembered with trouble, remembered easily, etc. The program uses this feedback to decide the optimal time to show you the question again. Because a memory gets stronger each time you successfully recall it, the time between reviews gets longer and longer — so you may see a question for the first time today, then 3 days later, 15 days later, 45 days later, and so on.
This was a revolution in learning, as it meant material could be learned and retained with the absolute minimum amount of effort necessary. SuperMemo’s slogan sums it up: with spaced repetition, you can: “forget about forgetting”.
Why Anki?
While there is no denying the huge impact SuperMemo has had on the field, it is not without its problems. The program is often criticized for being buggy and difficult to navigate. It only runs on Windows computers. It is proprietary software, meaning that end-users cannot extend it or access the raw data. And while very old versions have been made available for free, they are quite limited for modern use.
Anki addresses these issues. There are free clients for Anki available on many platforms, so struggling students and teachers with budgetary constraints are not left out. Anki is open source, with an already flourishing library of add-ons contributed by end-users. It is multi-platform, running on Windows, macOS, Linux/FreeBSD, and some mobile devices. And it is considerably easier to use than SuperMemo.
Anki’s spaced repetition system is based on an older version of the SuperMemo algorithm called SM-2. Recently, a new algorithm called FSRS has been integrated as an alternative to the legacy SM-2 algorithm.
Platform Notes
This section explains the way Anki is installed, and the possible problems you may encounter, depending on your OS:
If you have already installed Anki, you can skip to the Getting Started section.
Windows
Installing & Upgrading Anki on Windows
For instructions on how to install or upgrade Anki on Windows, please see:
Problems
If you encounter any issues when installing or starting Anki, please see the subsections in the table of contents.
Installing & Upgrading Anki on Windows
Requirements
Recent Anki releases require a computer running the 64 bit version of Windows 10 or 11.
- The last Anki release that supported Windows 7 and 8.1 was Anki 2.1.49.
- The last Anki release that supported 32 bit Windows was Anki 2.1.35-alternate.
If you’re on an old machine, you can obtain old releases from the releases page.
Installing
To install Anki:
- Download Anki from https://apps.ankiweb.net.
- Save the installer to your desktop or downloads folder.
- Double-click on the installer to run it. If you see an error message, please see the installation issues page.
- Once Anki is installed, double-click on the new star icon on your desktop to start Anki.
Upgrading
If upgrading from Anki 2.1.6+, there is no need to uninstall the previous version first. All you need to do is close Anki if it is open, and then follow the installation steps above. Your cards will be preserved when you upgrade.
If upgrading from an Anki version before 2.1.6, or switching from the standard to the alternate version or vice versa, we recommend uninstalling the old version first, which will remove Anki’s program data, but not delete your card data.
If you wish to downgrade to a previous version, please make sure you downgrade first.
Add-on Compatibility
Some add-ons may not always work with the latest Anki release. If you upgrade to the latest Anki version and find an add-on you cannot live without stops working, you can download older Anki versions from the releases page.
Problems
If you encounter any issues when installing or starting Anki, please see the following pages:
If you encounter any interface issues when using Anki, please see the following pages:
Windows installation issues
Some error messages you may encounter when installing Anki:
Please also see startup issues.
“Error opening file for writing”
If closing Anki and your browser does not help, please try restarting your computer, then running the installer again.
Antivirus issues
Antivirus programs may sometimes report a false positive.
Windows startup issues
- No error, but app does not appear
- Windows updates
- Windows 7/8
- Video driver issues
- Multiple displays
- Antivirus/firewall software
- Admin access
- Multiple Anki installations present after updating
- Debugging
- If all else fails
No error, but app does not appear
If you start Anki and it fails to appear, without any error message, you can try the following:
- Disconnect multiple/external displays.
- Install the latest Anki version.
- Adjust your decimal separator, if it is not a period.
- Install the old 2.1.35-alternate build of Anki.
Windows updates
When starting Anki, you may receive a message like the following:
- Error loading Python DLL
- The program can’t start because api-ms-win…. is missing
- Failed to execute script runanki
- Failed to execute script pyi_rth_multiprocessing
- Failed to execute script pyi_rth_win32comgenpy
These errors are usually because your computer is missing a Windows update or Windows library.
Please open Windows update, and ensure your system has all updates installed. If any needed to be installed, please restart your device after installing.
Windows 7/8
On Windows 7/8, you may need to manually install extra updates. Please try:
- https://www.microsoft.com/en-us/download/details.aspx?id=48234
- https://aka.ms/vs/15/release/vc_redist.x64.exe
- http://www.catalog.update.microsoft.com/Search.aspx?q=kb4474419
- http://www.catalog.update.microsoft.com/Search.aspx?q=kb4490628
Video driver issues
Please see display issues.
Multiple displays
If you get a LoadLibrary failed with error 126, this may be caused by the toolkit Anki is built on having trouble with multiple displays.
Antivirus/firewall software
Third-party software on your machine may prevent Anki from loading. You can try adding an exception for Anki, or temporarily disabling your antivirus/firewall to see if it helps.
Admin access
Some users have reported that Anki did not run for them until they right-clicked on the Anki icon and chose “Run as administrator”. Anki stores all of its data in your user folder, and should not need administrator privileges, but it’s something you can try if you’ve exhausted other options.
Multiple Anki installations present after updating
If the update process leaves you with multiple Anki installs (such as within
C:\Program Files\Anki and C:\Program Files (x86)\Anki), they may be left in a
non-working state, and Anki may refuse to start without showing an error message.
Try uninstalling all copies of Anki from your computer. To do this, find them in Windows Settings > Apps & features (or Apps > Installed apps) and uninstall, or run uninstall.exe in each Anki program
folder. Afterward, install Anki again.
Debugging
Starting Anki from a terminal may reveal a bit more information about some
errors. After installing the latest Anki version and ensuring all Windows
updates are installed, instead of running Anki directly, press the Windows key (or open the Start menu), type cmd, and launch Command Prompt. When the terminal window opens, paste the following command, and press Enter. (The path will be different if Anki is installed in a location that is not the default.)
%LocalAppData%\Programs\Anki\anki-console.bat
Presumably Anki will fail to open like before, but the output in the terminal window may reveal something about what is causing the problem.
If all else fails
If you are unable to start Anki after trying the above workarounds, you have two remaining options:
- You can try running from Python.
- You can try an older Anki version built with an older toolkit, such as 2.1.35-alternate, or 2.1.15.
Windows Display Issues
- Changing the Driver From the Preferences Screen
- Changing the Driver From the Command Line
- Full Screen
On Windows, there are three ways of content being displayed on screen. The default is software, which is slower, but the most compatible. There are two other options that are faster: OpenGL and ANGLE. They are faster, but they may not work, or may cause display issues such as missing menubars, blank windows, and so on. Which one works best will depend on your computer.
Changing the Driver From the Preferences Screen
In Anki 23.10+, you can change the graphics driver from preferences screen by navigating to Tools → Preferences and then selecting the driver from the dropdown menu.
Changing the Driver From the Command Line
If you run into display issues, you can try switching to software mode via cmd:
echo software > %APPDATA%\Anki2\gldriver6
Or you can do it via PowerShell:
echo software > $env:APPDATA\Anki2\gldriver6
It will not print anything. You can then start Anki again.
To revert to the default behaviour, change software to auto, or delete that file.
Full Screen
Anki 2.1.50+ comes with a full screen mode, but due to various issues, it had to
be disabled while OpenGL is used. Turning on software rendering as described
above will allow the full screen option to be used, though please bear in mind
that rendering performance may suffer.
In Anki 23.10+, full screen mode is supported with the default Direct3D driver.
Copy and paste issues
If you are experiencing problems with copying and pasting, please check if you are running other programs on your computer that monitor the clipboard, such as dictionary programs, clipboard managers or clipping tools. The toolkit Anki uses can have trouble when such programs are running.
Text Size
If you find the text is the wrong size, there are two environmental variables you can try:
-
ANKI_NOHIGHDPI=1 will turn off some of Qt’s high dpi support
-
ANKI_WEBSCALE=1 will alter the scale of Anki’s web views (like the deck list, study screen, etc), while leaving interface elements like the menu bar alone. Replace 1 with the desired scale, such as 1.5 or 0.75.
On Windows you can add these to a batch file to make it easier to start Anki. For example, create a file called startanki.bat on your desktop with the following text:
set ANKI_WEBSCALE=0.75
start "Anki" "%LocalAppData%\Programs\Anki\anki.exe"
After saving, you can double click on the file to start Anki with that setting.
Windows permission problems
Permission Problems
If you receive “access denied” messages, some of Anki’s files may be set to read only mode, meaning Anki is not able to write to them.
To fix the problem, you can do the following:
- in the search area of the start bar, type
cmd.exeand hit Enter - in the window that opens, type the following and hit Enter to see your username:
whoami
- type the following, hitting Enter after each line, and replacing ____ (and keeping the :F part) with your username from the previous command
cd %APPDATA%
icacls Anki2 /grant ____:F /t
That command should fix the permissions on Anki’s data folder, and you should now be able to start the program.
Antivirus/Firewall/Anti-Malware
Some users have experienced “permission denied” or “readonly” errors that were caused by security software installed on their machine. You may need to add an exception for Anki, or try temporarily disabling the software to rule it out as the cause. Some users have reported that simply turning off their software did not fix the problem, and they either had to add an exception for Anki or uninstall the software.
Debugging Permission Problems
If problems persist after you’ve ruled out Antivirus and related programs, have performed the steps above to fix permissions, and don’t use OneDrive, please run the following commands in cmd.exe, pressing Enter after each one.
whoami
cd %APPDATA%
icacls Anki2 /t
Then please copy & paste or screenshot what you see, and post it to us in a support ticket.
macOS
Installing & Upgrading Anki on macOS
For instructions on how to install or upgrade Anki on macOS, please see:
Problems
If you encounter any issues when installing or starting Anki, please see the subsections in the table of contents.
Installing & Upgrading Anki on macOS
Requirements
macOS version requirements are listed on the download page.
If you’re on an old machine, you can obtain the old version from the releases page. The Qt5 builds on 24.11 and earlier support macOS 10.14 and later. If your macOS is between 10.10 and 10.13, you’ll need to use Anki 2.1.35-alternate.
Installing
- Download Anki from https://apps.ankiweb.net.
- Save the file to your desktop or downloads folder.
- Open it, and drag Anki to your Applications folder or desktop.
- Double-click on Anki in the location you placed it.
Upgrading
To upgrade, close Anki if it is open, and then follow the steps above. Drag the Anki icon into the same location you previously stored it, and when prompted, overwrite the old version. Your card data will be preserved.
Homebrew
Homebrew users can install Anki using
brew install --cask anki in their preferred Terminal application.
Upgrading can be done using brew upgrade, and for uninstalling: brew uninstall --cask anki
Add-on Compatibility
Some add-ons may not always work with the latest Anki release. If you upgrade to the latest Anki version and find an add-on you cannot live without stops working, you can download older Anki versions from the releases page.
Problems
If you encounter any issues when installing or starting Anki, please see:
Display Issues on macOS
Change the Video Driver
Changing the Driver From the Preferences Screen
If you’re experiencing display issues or crashes in Anki 23.10+, you can try changing the video driver in the preferences screen by navigating to Anki → Preferences and then selecting the driver from the dropdown menu. After that it is necessary to restart Anki.
Changing the Driver From Terminal.app
Older Anki versions did not provide an option in the preferences, but allowed you to adjust the driver by opening Terminal.app, then pasting the following and hit Enter:
echo software > ~/Library/Application\ Support/Anki2/gldriver6
It will not print anything. You can then start Anki again.
If you wish to switch back to the default, change software to auto, or
remove that file.
eGPUs
If you experience blank screens when using an external graphics card on a Mac, you can Ctrl+click on the Anki app, click Get Info, and enable the prefer eGPU option.
Monitors with Different Resolutions
Please see this forum post.
Linux
Installing & Upgrading Anki on Linux
For instructions on how to install or upgrade Anki on Linux, please see:
Problems
If you encounter any issues when installing or starting Anki, please see the subsections in the table of contents.
Installing & Upgrading Anki on Linux
Requirements
The packaged version requires a recent 64 bit Intel/AMD Linux with glibc 2.36+, and common libraries like libwayland-client and systemd. If you are on a different architecture (e.g ARM/AArch64), or a barebones Linux distro, you will not be able to use the packaged version, but you may be able to use the Python wheels instead.
Debian and derivatives, such as Ubuntu and Chromebooks with Linux enabled, please use the following before installing:
sudo apt install libxcb-xinerama0 libxcb-cursor0 libnss3
If Anki fails to start after installing, you may be missing other libraries.
If you’re on Ubuntu 24.04 and Anki won’t start, please see this thread.
Anki’s build system only supports glibc, so musl-based distros are not currently supported.
Installing
To install Anki:
- Download Anki from https://apps.ankiweb.net to your Downloads folder.
- If zstd is not already installed on your system, you’ll need to install it (e.g
sudo apt install zstd). - Open a terminal and run the following commands, replacing the filename as appropriate.
tar xaf Downloads/anki-2XXX-linux-qt6.tar.zst
cd anki-2XXX-linux-qt6
sudo ./install.sh
On some Linux systems, you may need to use tar xaf --use-compress-program=unzstd.
- You can then start Anki by typing
ankiand hitting Enter. If you encounter any issues, please see the links on the left.
Upgrading
If you were running Anki from a .deb/.rpm/etc in the past, please make sure to remove the system version before installing the package provided here.
If you’re upgrading from a previous package, simply repeat the installation steps to upgrade to the latest version. Your user data will be preserved.
If you wish to downgrade to a previous version, please make sure you downgrade first.
Add-on Compatibility
Some add-ons may not always work with the latest Anki release. If you upgrade to the latest Anki version and find an add-on you cannot live without stops working, you can download older Anki versions from the releases page.
System Qt versions
Anki’s launcher uses the official PyQt builds by default. This makes it easier to install Anki on distros that don’t have the relevant Python/Qt versions, but means that you may not have access certain Qt features provided by your Linux distro, such as certain Qt themes, support for the FCITX input method, etc.
If your Linux distro provides up-to-date Anki packages, you may find using them easiest.
If it doesn’t, advanced users may wish to combine Anki’s launcher with their system’s Qt version. To do this, your system needs to have a Python version Anki supports (soon to be 3.11+), and suitable PyQt libraries (6.2+).
WARNING: This is an experimental feature, and your system’s Qt may fix some bugs while introducing others.
-
Install Python and the relevant PyQt packages. On Ubuntu:
sudo apt install python3-pyqt6.qtwebengine
-
If you previously used the launcher,
rm -rf ~/.local/share/AnkiProgramFiles. -
Untar the launcher, and cd to its folder.
-
Run
touch system_qtto create a system_qt file in that folder. -
Install Anki via ./anki or ./install.sh. In the list of installed packages, you should not see any mention of PyQt6.
Problems
If you encounter any issues when installing or starting Anki, please see the following pages:
- Missing Libraries
- Display Issues
- Blank Main Window
- Linux Distro Packages
- Incorrect GTK Theme
- Wayland
- Input Methods
Missing Libraries
If Anki fails to start, please run it from a terminal with anki. If it says a
library is missing, please install it and try again.
If it complains about no platform being available, please start Anki with the following command line, which should reveal a missing library:
QT_DEBUG_PLUGINS=1 anki
After installing the library with apt-get or similar, repeat the process. You may need to do this a few times before all required libraries are installed.
Display Issues on Linux
Hardware acceleration defaults to on. If you experience blank screens or display issues, you can try enabling software rendering.
Changing the Driver From the Preferences Screen
In Anki 23.10+, you can change the graphics driver from preferences screen by navigating to Tools → Preferences and then selecting the driver from the dropdown menu.
Changing the Driver From the Terminal
echo software > ~/.local/share/Anki2/gldriver6
If you wish to switch back to the default, change software to auto, or
remove that file.
Blank Main Window
Some Linux distros have recently updated glibc. Recent versions break the web toolkit that Anki is built on, causing Anki’s main window to appear blank.
There are two ways to work around this:
- Install the latest Qt6 version of Anki, which uses an updated toolkit:
- Use one of the workarounds posted on the following threads:
- https://forums.ankiweb.net/t/another-blank-main-window-solution-for-linux/32835
- https://forums.ankiweb.net/t/please-use-file-import-popup-on-startup/14695
- https://forums.ankiweb.net/t/setting-disable-seccomp-filter-sandbox-by-default-on-linux/13765
- https://forums.ankiweb.net/t/fedora-35-and-anki-2-1-47-updates-with-blank-anki-window/13431/11
Packages Distributed by Linux Distributions
We have seen a lot of issues caused by the customized versions of Anki distributed by Linux distributions:
- Anki depends on third-party libraries like Qt, and Linux distributions often substitute different versions of those libraries, without testing the impact of those changes.
- Sometimes the version of Anki they distribute is years old, or is an alpha/beta version not intended for stable release. Distributions will often disable the built-in update check as well, to prevent you from being notified of newer versions.
Compiled builds of Anki are available on https://apps.ankiweb.net. Most of the necessary libraries are included, and Anki has been tested to work with these library versions. If you’re experiencing issues with your distro’s version, the first thing you should try is switching to the latest packaged version we provide.
You are welcome to continue using your distro’s version of Anki if you prefer, but if you run into any issues, you will need to report them to your distribution’s package maintainers.
Anki not picking up GTK theme on Gnome/Linux
You can work around this issue by explicitly telling Anki what the GTK theme is. Run the following commands in a terminal:
theme=$(gsettings get org.gnome.desktop.interface gtk-theme)
echo "gtk-theme-name=$theme" >> ~/.gtkrc-2.0
echo "export GTK2_RC_FILES=$HOME/.gtkrc-2.0" >> ~/.profile
Then log out and log back into your computer, and Anki should pick up the GTK theme.
Wayland
From Anki 2.1.48, you can force Anki to use Wayland by defining ANKI_WAYLAND=1 before starting Anki. Wayland may give you better rendering across multiple displays, but it is currently off by default, due to the following issues:
- On some distros, windows are rendered without borders.
- Bringing windows to the front is not possible, so for example, clicking on Add to reveal an existing Add Cards window will not work.
Input Methods on Linux
Fcitx
The standard Anki build includes fcitx support, but it may not work on all distributions. If you are unable to use fcitx, you may want to run Anki from Python wheels instead.
Getting Started
Installing & Upgrading
The Anki ecosystem is made up of Anki, AnkiMobile, AnkiDroid, and AnkiWeb, all of which are linked from our official website.
For instructions on how to install and upgrade Anki for your computer, please read the links below:
Videos
For a quick way to dive into Anki, have a look at these intro videos. Some were made with a previous Anki version, but the concepts are the same.
Key Concepts
Cards
A question and answer pair is called a card. It’s similar to a paper flashcard with a question on the front and answer on the back. However, in Anki, a card doesn’t look like a physical card, and when you show the answer the question remains visible by default. For example, if you’re studying basic chemistry, you might see a question like:
Q: Chemical symbol for oxygen?
After deciding the answer is O, you click the “Show Answer” button, and Anki shows you:
Q: Chemical symbol for oxygen?
A: O
After confirming that you are correct, you tell Anki how well you remembered the answer, and Anki will choose when to show you the card again. For example, Anki might decide to show you the card again in 3 days. In this case, we say the card now has a 3 day interval.
Card States
-
New: Cards that you have downloaded or created yourself, but have never studied before.
-
Learning: Cards that were seen for the first time recently, and are still being learned.
-
Review: Cards that you have finished learning. These cards will be shown again after their delay (interval) has elapsed. There are two types of review cards:
- Young: A young card is one that has an interval of less than 21 days.
- Mature: A mature card is one that has an interval of 21 days or greater.
-
Relearn: Cards that you forgot in the review stage. These cards are returned to the relearning state to be learned again.
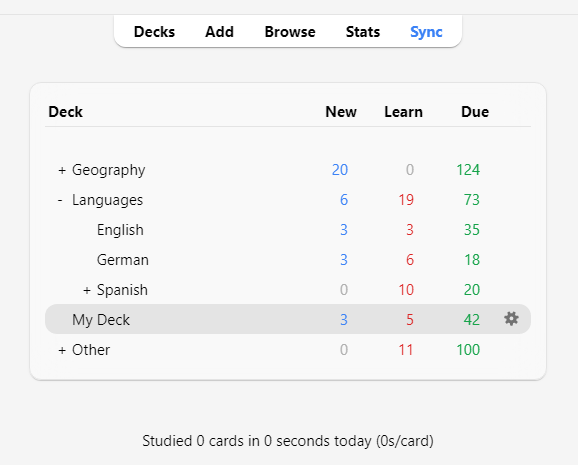
Decks
A deck is a group of cards. You can place cards in different decks to study parts of your card collection instead of studying everything at once. Each deck can have different settings, such as how many new cards to show each day, or how long to wait until cards are shown again.
Decks can contain other decks, which allows you to organize decks into a tree. Anki uses double colons (“::”) to show different levels within the deck tree. For example, a deck called “Chinese::Hanzi” refers to a “Hanzi” deck, which is part of a “Chinese” deck. If you select “Hanzi”, then only the Hanzi cards will be shown; if you select “Chinese”, then all the Chinese cards will be shown, including the Hanzi cards.
To place decks within a tree, you can either name them with double colons between each level, or drag and drop them within the deck list. Decks that have been placed inside another deck are often called “subdecks”, and top-level decks are called “parent decks”.
Anki starts with a deck called “Default”; any cards which have somehow become separated from other decks will go here. Anki will hide the default deck if it contains no cards and you have added other decks. Alternatively, you may rename this deck and use it for other cards.
Decks in the deck list are sorted alphabetically. This can result in a surprising order if your deck names contain numbers. For example, “My Deck 10” will come before “My Deck 9”, as 1 comes before 9. If you want “My deck 9” to appear earlier, you can rename it to “My deck 09”, which appears before “My deck 10”.
Decks are best used to hold broad categories of cards, rather than specific topics such as “food verbs” or “lesson 1”. For more information about this, please see the using decks appropriately section.
For information on how the order of decks affects the order cards are studied in, please see the display order section.
Notes & Fields
When making flashcards, it’s often desirable to make more than one card that relates to the same information. For example, if you’re learning French, and you learn that the word bonjour means hello, you may wish to create one card that shows you “bonjour” and asks you to remember “hello”, and another card that shows you “hello” and asks you to remember “bonjour”. One card is testing your ability to recognize the French word, and the other card is testing your ability to produce it.
When using paper flashcards, your only option in this case is to write out the information twice, once for each card. Some flashcard programs make life easier by providing a feature to flip the front and back sides. This is an improvement over the paper situation, but there are two major downsides:
-
Because such programs don’t track your performance of recognition and production separately, cards will tend not to be shown to you at the optimum time, meaning you forget more than you’d like, or you study more than is necessary.
-
Reversing the question and answer only works when you want exactly the same content on each side. This means it’s not possible to display extra info on the back of each card for example.
Anki solves these problems by allowing you to split the content of your cards up into separate pieces of information. You can then tell Anki which pieces of information you want on each card, and Anki takes care of creating the cards for you, and updating them if you make any edits in the future.
Imagine we want to study French vocabulary, and we want to include a textbook page number on the back of each card. We want our cards to look like this:
Q: Bonjour
A: Hello
   Page #12
And this:
Q: Hello
A: Bonjour
   Page #12
In both cards, we have the same three related pieces of information: a French word, an English meaning, and a page number. If we put them together, they’d look like this:
French: Bonjour
English: Hello
Page: 12
In Anki, this collection of related information is called a note and each piece of information is contained in a field. In this example, the note has three fields: “French”, “English”, and “Page”.
To add and edit fields, click the “Fields…” button while adding or editing notes. For more information on fields, please see the Customizing Fields section.
Card Types
In order for Anki to create cards based on our notes, we need to give it a blueprint that says which fields should be displayed on the front or back of each card. This blueprint is called a card type. Each type of note can have one or more card types; when you add a note, Anki will create one card for each card type.
All card types have two templates, one for the question and one for the answer. In the previous French example, we wanted the back of our recognition card to look like this:
Q: Bonjour
A: Hello
   Page #12
To do this, we can set the answer template to:
Q: {{French}}
A: {{English}}<br>
   Page #{{Page}}
In card templates, field names are wrapped in double curly brackets, like {{French}} or {{English}}. Anki replaces those with the actual text the fields contain. This is called a “Field replacement”. Text not wrapped in double curly brackets appears the same on each card. For example, we won’t need to add “Page #” on every note because the template will add it automatically to every card. The <br> tag is
a special code that tells Anki to move to the next line. For details, see the templates section.
The production card’s templates will also work in a similar way:
Q: {{English}}
A: {{French}}<br>
   Page #{{Page}}
After a card type has been created, every time you add a new note, a card will be created based on that card type. Card types make it easy to keep the formatting of your cards consistent and can greatly reduce the amount of effort involved in adding information. They also mean Anki can ensure related cards don’t appear too close to each other, and they allow you to fix a typing mistake or factual error once and have all the related cards update at once.
To add and edit card types, click the “Cards…” button while adding or editing notes. For more information on card types, please see the Cards and Templates section.
Note Types
Anki allows you to create different types of notes for different material. Each type of note has its own set of fields and card types. It’s a good idea to create a separate note type for each broad topic you’re studying. In the previous French example, we might create a note type called “French” for that. If we wanted to learn capital cities, we could create a note type for that as well, with fields such as “Country” and “Capital City”.
Anki comes with some standard note types included. These note types are provided to make Anki easier for new users, but in the long run it’s recommended you create your own note types specifically for the content you are learning. The standard note types are:
-
Basic
Has “Front” and “Back” fields, and will create one card. Text you enter in “Front” will appear on the front of the card, and text you enter in “Back” will appear on the back of the card. -
Basic (and reversed card)
Like “Basic”, but creates two cards for the text you enter: front→back and back→front. -
Basic (optional reversed card)
Like “Basic”, but has a third field called “Add Reverse”. If you enter any text into that field, a reversed card (back→front) will also be created. For details, see the Cards and Templates section. -
Basic (type in the answer)
This is essentially “Basic”, with an extra text box on the front where you can type your answer in. When you reveal the back, Anki will show you any differences between your input and the actual answer. For details, see the Checking Your Answer section. -
Cloze
A note type that allows you to select text and turn it into a cloze deletion (e.g. “Humans landed on the moon in […]” → “Humans landed on the moon in 1969”). For details, see the cloze deletion section. -
Image Occlusion
Like the cloze note type, but it works with images instead of text, which is especially useful when studying material that heavily relies on images, such as anatomy and geography. For details, please see the Image Occlusion section of the manual.
To add your own note types and modify existing ones, you can use Tools → Manage Note Types from the main Anki window.
Notes and note types are common to your whole collection rather than limited to an individual deck. This means you can use different note types in a single deck, or have cards generated from the same note put into different decks. When you add notes using the Add window, you can select what note type to use and what deck to use, and these choices are completely independent of each other. You can also change the note type of notes after you’ve already created them.
Collection
Your collection is all the material stored in Anki: your cards, notes, decks, note types, deck options, and so on.
Shared Decks
You can watch a video about Shared Decks and Review Basics on YouTube.
The easiest way to get started with Anki is to download a deck of cards someone else has shared:
-
Click the “Get Shared” button at the bottom of the deck list.
-
When you’ve found a deck you’re interested in, click the “Download” button to download a deck package.
-
Double-click the downloaded package to import it into Anki, or go to File → Import.
Note: It’s not currently possible to add shared decks directly to your AnkiWeb account. You need to first import them to the desktop app, AnkiMobile, or AnkiDroid, then synchronize to upload the decks to AnkiWeb.
Creating your own deck is the most effective way to learn a complex subject. Subjects like languages and the sciences can’t be understood simply by memorizing facts — you need explanation and context to learn them effectively. Furthermore, inputting the information yourself forces you to decide what the key points are, leading to a better understanding.
If you are a language learner, you may be tempted to download a long list of words and their translations, but this won’t teach you a language any more than memorizing scientific equations will teach you astrophysics. To learn properly, you might need textbooks, teachers, or exposure to real-world sentences.
Do not learn if you do not understand.
--SuperMemo
Most shared decks are created by people who are learning material outside Anki, such as from textbooks, classes, TV, etc. They select the interesting points from what they learn and put them into Anki. They might not make any effort to add background information or explanations to the cards, because they already understand the material. So when someone else downloads their deck and tries to use it, they might find it very difficult as the background information and explanations are missing.
That is not to say shared decks are useless. If you’re studying textbook ABC and someone has shared a deck of ideas from ABC, that’s a great way to save some time. And for simple subjects that are basically a list of facts, such as capital city names or country flags, you probably don’t need any external material. However, for complex subjects, shared decks should be used as a supplement to external material, not as a replacement for it.
Getting help
Asking good questions
With the exception of AnkiMobile, Anki and its support are provided free of charge, by people who generously volunteer their time. Please bear this in mind when posting - if you are rude and demanding, or have made no effort to solve the problem on your own, people are less likely to want to help you.
Please start by trying to resolve the issue on your own:
- Read the getting started section of the manual, and check out the intro videos.
- If you’ve encountered a bug, please follow these steps.
- Use the search button on this page to search frequently asked questions.
- Use the search button in the manual.
- Use the search button on the forums.
- Google the issue.
If you have tried the above and are still stuck, it’s time to ask for help. When writing a post, please explain the problem you are having clearly, and in detail.
Please avoid vague questions like:
“My Anki doesn’t work, what should I do?”
Instead, please provide as much detail as you can. For example:
“When I double-click on the Anki icon, an error message pops up. I tried searching for the error on Google, but couldn’t find anything useful. I have copied and pasted the error message to the bottom of my post. I followed the steps on the “When problems occur” page, but the error message does not go away. What should I do?“
This is a much better question. It tells us:
- What you have tried.
- What steps you are taking when the problem happens.
- What problems/errors you are getting when things go wrong.
Knowing these things makes it much easier to answer your question.
The user forums use a different login to AnkiWeb, so please create an account there if it’s your first time.
Anki Desktop (the computer version) and AnkiWeb
After reading the above section, please post on the user forums for assistance.
The user forums use a different login to AnkiWeb, so please create an account there if it’s your first time.
AnkiDroid (Android devices)
Please see AnkiDroid’s support page.
AnkiMobile (iPhone/iPad)
Please see AnkiMobile’s support page.
Private questions
For security reports and business enquiries, you can post a private ticket here. If you have a question about Anki, AnkiWeb or AnkiDroid, please use the user forums instead.
Studying
- Decks
- Study Overview
- Questions
- Answer Buttons
- Fuzz Factor
- Editing and More
- Display Order
- Siblings and Burying
- Keyboard Shortcuts
- Falling Behind
When you have found a deck you like or entered some notes in, it’s time to start studying.
Decks
Study in Anki is limited to the currently selected deck as well as any subdecks it contains.
On the decks screen, your decks and subdecks will be displayed in a list. New, Learn, and Due (To Review) cards for that day will be also displayed here.
When you click on a deck, it will become the “current deck”, and Anki will change to the study screen. You can return to the deck list at any time by clicking on “Decks” at the top of the main window. (You can also use the Study Deck action in the menu to select a new deck from the keyboard, or you can press the S key to study the currently selected deck.)
You can click the gears button to the right of a deck to rename or delete the deck, change its options, or export it.
Study Overview
After clicking on a deck to study, you’ll see a screen that shows you how many cards are due today. This is called the “deck overview” screen:
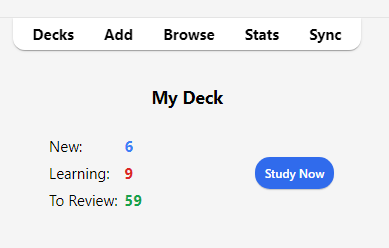
The cards are split into three types: New, Learning, and To Review. If you have Bury siblings activated in your deck options, you may see how many cards will be buried in grey:
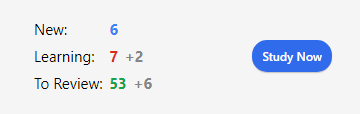
To start a study session, click the Study Now button. Anki will proceed to show you cards until the cards to be shown for the day have run out.
While studying, you can return to the overview by pressing the S key on your keyboard.
Questions
When a card is shown, only the question is shown at first. After thinking about the answer, either click the Show Answer button, or press the Space. The answer will then be shown. It’s okay if it takes you a little while to recall the answer, but as a general rule if you can’t answer within about 10 seconds, it’s probably better to move on and show the answer than keep struggling to remember.
Answer Buttons
After the answer is shown, compare the answer you thought of with the answer that is shown and select any of the following buttons.
-
Again: Select this when your answer is incorrect or when you couldn’t recall the answer. If your answer is partially correct, you should be strict with yourself: if it counts as a fail in a real-life context outside of Anki, then it counts as a fail in Anki as well. You’ll typically use this button about 5-20% of the time.
Keyboard Shortcut: 1
-
Hard: Select this button when your answer is correct, but you had doubts about it or it took a long time to recall.
Keyboard Shortcut: 2
-
Good: Select this when your answer is correct, but it took some mental effort to recall it. When Anki is used properly, this should be the most commonly used button. You’ll typically use this button about 80-95% of the time.
Keyboard Shortcut: 3, Space, Enter
-
Easy: Select this if your answer is correct and it took no mental effort to recall it.
Keyboard Shortcut: 4
If you find it hard to use four answer buttons, you can also use only Again and Good buttons. Use Again for incorrect answers and use Good for correct answers.
Each answer button shows the next time a card will be reviewed again if you select that button. To learn about the settings that control the next review intervals, see the topics Learning Steps, Lapses, FSRS and Advanced in the Deck Options section.
Fuzz Factor
When you select an answer button on a review card, Anki also applies a small amount of random “fuzz” to prevent cards that were introduced at the same time and given the same ratings from sticking together and always coming up for review on the same day.
Learning cards are also given up to 5 minutes of extra delay so that they don’t always appear in the same order, but answer buttons won’t reflect that. It is not possible to turn this feature off.
Editing and More
You can click the Edit button in the bottom left to edit the current note. When you finish editing, you’ll be returned to study. The editing screen works very similarly to the add notes screen.
At the bottom right of the study screen is a button labeled More. This button provides some other operations you can do on the current card or note:
-
Flag Card: Adds a colored marker to the card, or toggles it off. Flags will appear during study, and you can search for flagged cards in the Browse screen. This is useful when you want to take some action on the card at a later date, such as looking up a word when you get home. If you’re using Anki 2.1.45+, you can also rename flags from the browser.
-
Bury Card / Note: Hides a card or all of the note’s cards from review until the next day. (If you want to unbury cards before then, you can click the “unbury” button on the deck overview screen.) This is useful if you cannot answer the card at the moment or you want to come back to it another time. Burying can also happen automatically for cards of the same note.
-
Reset card: Moves the current card to the end of the new queue.
The “Restore original position” option allows you to reset the card back to its original position when you reset it.
The “Reset repetition and lapse count” option, if enabled, will set the review and failure counters for the card back to zero. It does not remove the review history that is shown at the bottom of the card info screen.
-
Set Due Date: Puts cards in the review queue, and makes them due on a certain date.
-
Suspend Card / Note: Hides a card or all of the note’s cards from review until they are manually unsuspended (by clicking the suspend button in the browser). This is useful if you want to avoid reviewing the note for some time, but don’t want to delete it.
-
Options: Edit the options for the current deck.
-
Card Info: Displays statistical information about the card.
-
Previous Card Info: Displays statistical information about the previous card.
-
Mark Note: Adds a “marked” tag to the current note, so it can be easily found in the browser. This is similar to flagging individual cards, but works with a tag instead, so if the note has multiple cards, all cards will appear in a search for the marked tag. Most users will want to use flags instead.
-
Create Copy: Opens a duplicate of the current note in the editor, which can be slightly modified to easily obtain variations of your cards. By default, the duplicate card will be created in the same deck as the original.
-
Delete Note: Deletes the note and all of its cards.
-
Replay Audio: If the card has audio on the front or back, play it again.
-
Pause Audio: Pauses the audio if it is playing.
-
Audio -5s / +5s: Jump backwards / forward 5 seconds in the currently playing audio.
-
Record Own Voice: Record from your microphone for the purposes of checking your pronunciation. This recording is temporary and will go away when you move to the next card. If you want to add audio to a card permanently, you can do that in the edit window.
-
Replay Own Voice: Replay the previous recording of your voice (presumably after showing the answer).
Display Order
Studying will show cards from the selected deck and any decks it contains. Thus, if you select your “French” deck, the subdecks “French::Vocab” and “French::My Textbook::Lesson 1” will be shown as well.
By default, for new cards, Anki gathers cards from the decks in alphabetical order. So in the above example, you would get cards first from “French”, then “My Textbook”, and finally “Vocab”. You can use this to control the order cards appear in, placing high priority cards in decks that appear higher in the list. When computers sort text alphabetically, the “-” character comes before alphabetical characters, and “~” comes after them. So you could call the deck “-Vocab” to make them appear first, and you could call the other deck “~My Textbook” to force it to appear after everything else.
New cards and reviews are gathered separately, and Anki won’t wait until both queues are empty before moving on to the next deck, so it’s possible you’ll be exposed to new cards from one deck while seeing reviews from another deck, or vice versa. If you don’t want this, click directly on the deck you want to study instead of one of the parent decks.
Since cards in learning are somewhat time-critical, they are fetched from all decks at once and shown in the order they are due.
To control the order cards appear in, see Display Order. For more fine-grained ordering of new cards, you can change the order in the browser.
Siblings and Burying
Recall from the basics that Anki can create more than one card for each thing you input, such as a front→back card and a back→front card, or two different cloze deletions from the same text. These related cards are called “siblings”.
When you answer a card that has siblings, Anki can prevent the card’s siblings from being shown in the same session by automatically “burying” them. Buried cards are hidden from review until the clock rolls over to a new day or you manually unbury them using the “Unbury” button that’s visible at the bottom of the deck overview screen. Anki will bury siblings even if the siblings are not in the same deck (for instance, if you use the deck override feature).
You can enable burying from the deck options screen - there are separate settings for new cards and reviews.
Anki will only bury siblings that are new or review cards. It will not hide cards in learning, as time is of the essence for those cards. On the other hand, when you study a learning card, any new/review siblings will be buried.
Also note that a card cannot be buried and suspended at the same time. Suspending a buried card will unbury it. Suspended cards can’t be buried.
Keyboard Shortcuts
Most of the common operations in Anki have keyboard shortcuts. Most of them are discoverable in the interface: menu items list their shortcuts next to them, and hovering the mouse cursor over a button will generally show its shortcut in a tooltip.
When studying, either Space or Enter will show the answer. When the answer is shown, you can use Space or Enter to select the Good button. You can use the 1-4 keys to select a specific ease button. Many people find it convenient to answer most cards with Space and keep one finger on 1 for when they forget.
The “Study Deck” item in the Tools menu allows you to quickly switch to a deck with the keyboard. You can trigger it with the / key. When opened, it will display all of your decks and show a filter area at the top. As you type characters, Anki will display only decks matching the characters you type. You can add a space to separate multiple search terms, and Anki will show only decks that match all the terms. So “ja 1” or “on1 ja” would both match a deck called “Japanese::Lesson1”.
Falling Behind
When you fall behind in your reviews, Anki by default prioritizes cards that have been waiting the longest. This ordering ensures that no cards will be left waiting indefinitely, but it means that if you introduce new cards, their reviews won’t appear until you’ve gotten through your backlog.
When you answer cards that have been waiting for a while, Anki factors in that delay when determining the next time a card should be shown. This means if you are returning to Anki after a long break, you don’t have to start anew and can just start back from where you left.
Adding/Editing
- Adding Cards and Notes
- Adding a Note Type
- Customizing Fields
- Changing Deck / Note Type
- Organizing Content
- Editing Features
- Cloze Deletion
- Image Occlusion
- Editing IO notes
- Inputting Non-Latin Characters and Accents
- Unicode Normalization
Adding Cards and Notes
Recall from the basics that in Anki we add notes rather than cards, and Anki creates cards for us. Click Add in the main window, and the Add Notes window will appear.
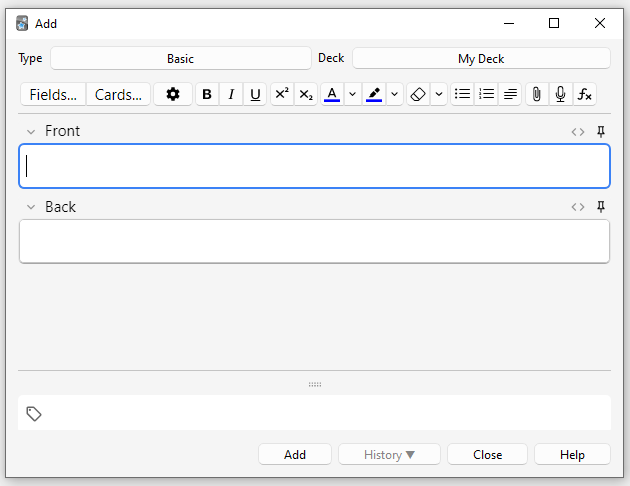
The top left of the window shows us the current note type. If it does not say “Basic,” then you may have added some note types when you downloaded a shared deck. The text below assumes that “Basic” is selected.
The top right of the window shows us the deck cards will be added to. If you would like to add cards to a new deck, you can click on the deck name button and then click Add.
Below the note type, you’ll see some buttons, and an area labelled “Front” and “Back”. Front and Back are called fields, and you can add, remove, and rename them by clicking the “Fields…” button above.
Below the fields is another area labelled “tags”. Tags are labels that you can attach to your notes, to make organizing and finding notes easier. You can leave the tags blank if you wish, or add one or more of them. Tags are separated by a space. If the tags area says
vocab check_with_tutor
…then the note you add would have two tags.
When you have entered text into the front and back, you can click the “Add” button or press Ctrl+Enter (Command+Enter on a Mac) to add the note to your collection. When you do so, a card will be created as well, and placed into the deck you chose. If you would like to edit a card you added, you can click the history button to search for a recently added card in the browser.
For more information on the buttons between the note type and the fields, please see the editor section.
Duplicate Check
Anki checks the first field for uniqueness, so it will warn you if you enter two cards with a Front field of “apple” (for example). The uniqueness check is limited to the current note type, so if you’re studying multiple languages, two cards with the same Front would not be listed as duplicates as long as you had a different note type for each language.
Anki does not check for duplicates in other fields automatically for efficiency reasons, but the browser has a “Find Duplicates” function, which you can run periodically.
Effective Learning
Different people like to review in different ways, but there are some general concepts to keep in mind. An excellent introduction is this article on the SuperMemo site. In particular:
-
Keep it simple: The shorter your cards, the easier they are to review. You may be tempted to include lots of information “just in case,” but reviews will quickly become painful.
-
Don’t memorize without understanding: If you are studying a language, try to avoid large lists of words. The best way to learn languages is in context, which means seeing those words used in a sentence. Likewise, imagine you’re studying a computer course. If you attempt to memorize the mountain of acronyms, you’ll find it very difficult to make progress. But if you take the time to understand the concepts behind the acronyms, learning the acronyms will become a lot easier.
Adding a Note Type
While basic note types are sufficient for simple cards with only a word or phrase on each side, as soon as you find yourself wanting to include more than one piece of information on the front or back, it’s better to split that information up into more fields.
You may find yourself thinking “but I only want one card, so why can’t I just include the audio, a picture, a hint, and the translation in the Front field?” If you’d prefer to do that, that’s fine. But the disadvantage of that approach is that all the information is stuck together. If you wanted to sort your cards by the hint, you wouldn’t be able to do that as it is mixed in with the other content. You also wouldn’t be able to do things such as moving the audio from the front to the back, except by laboriously copying and pasting it for every note. By keeping content in separate fields, you make it much easier to adjust the layout of your cards in the future.
To create a new type of note, choose Tools → Manage Note Types from the main Anki window. Then click “Add” to add a new type of note. You will now see another screen that gives you a choice of note types to base the new type on. “Add” means to base the newly created type on one that comes with Anki. “Clone” means to base the newly created type on one that is already in your collection. For instance, if you’d created a French vocab type already, you might want to clone that when creating a German vocab type.
After choosing OK, you will be asked to name the new type. The subject material that you are studying is a good choice here – things like “Japanese”, “Trivia”, and so on. Once you have chosen a name, close the Note Types window, and you will return to the adding window.
Customizing Fields
To customize fields, click the “Fields…” button when adding or editing a note, or while the note type is selected in the Manage Note Types window.
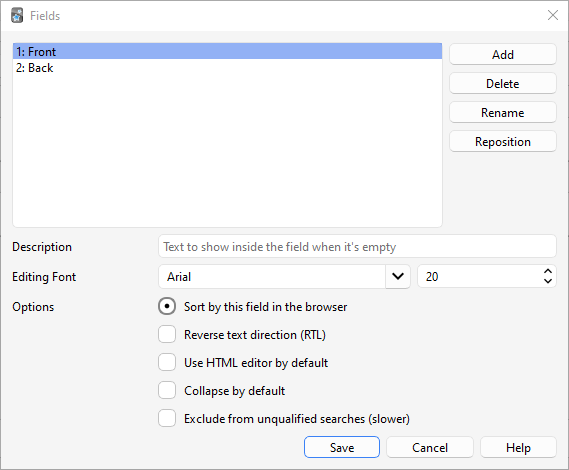
You can add, remove, or rename fields by clicking the appropriate buttons.
To change the order in which the fields appear in this dialog and the add notes dialog, you can use the reposition button, which asks for the numerical position you want the field to have. So if you want to change a field to be the new first field, enter “1”.
Alternatively you can also drag and drop the field names to re-order them. To do that, use your mouse or finger to drag the field to the desired position. An indicator will show you where the field will be moved to.
Do not use “Tags”, “Type”, “Deck”, “Card”, or “FrontSide” as field names, as they are special fields and will not work properly.
The options at the bottom of the screen allow you to edit various properties of the fields to be used when adding and editing the cards. This is not where you customize what appears on your cards when reviewing; for that, please see templates.
-
Editing Font allows you to customize the font and size used when editing notes. This is useful if you want to make unimportant information smaller, or increase the size of non-Latin characters which are hard to read. The changes you make here do not affect how cards appear when reviewing: to do that, please see the templates section. If you have enabled the “type in the answer” function, however, the text you type will use the font size defined here. (For information about how to change the actual font face when typing the answer, please see the checking your answer section.)
-
Sort by this field… tells Anki to show this field in the Sort Field column of the browser. You can use this to sort cards by that field. Only one field can be the sort field at once.
-
Reverse text direction is useful if you are studying languages that display text from right to left (RTL), such as Arabic or Hebrew. This setting currently only controls editing; to make sure the text displays correctly during review, you’ll need to adjust your template.
-
Use HTML editor by default is useful if you prefer to edit the fields directly in HTML.
-
Collapse by default. Fields can be collapsed/expanded. The animation can be disabled in the preferences.
-
Exclude from unqualified searches (slower) can be used if you want the content of a certain field not to appear in unqualified (not limited to a specific field) searches.
After you have added fields, you will probably want to add them to the front or back of your cards. For more information on that, please see the templates section.
Changing Deck / Note Type
While adding, you can click on the top left button to change note type, and the top right button to change deck. The window that opens up will not only allow you to select a deck or note type, but also to add new decks or manage your note types.
Organizing Content
Using Decks Appropriately
Decks are designed to divide your content up into broad categories that you wish to study separately, such as English, Geography, and so on. You may be tempted to create lots of little decks to keep your content organized, such as “my geography book chapter 1”, or “food verbs”, but this is not recommended, for the following reasons:
-
Lots of little decks may mean you end up seeing cards in a recognizable order. On older scheduler versions, new cards can only be introduced in deck order. And if you were planning to click on each deck in turn (which is slow), you will end up seeing all the “chapter 1” or “food verb” reviews together. This makes it easier to answer the cards, as you can guess them from the context, which leads to weaker memories. When you need to recall the word or phrase outside Anki, you won’t always have the luxury of being shown related content first!
-
While less of a problem than it was in earlier Anki versions, adding hundreds of decks may cause slowdowns, and very large deck trees with thousands of items can actually break the display of the deck list in Anki versions before 2.1.50.
Using Tags
Instead of creating lots of little decks, it’s a better idea to use tags and/or fields to classify your content. Tags are a useful way to boost search results, find specific content, and keep your collection organized. There are many ways of using tags and flags effectively, and thinking in advance about how you want to use them will help you decide what will work best for you.
Some people prefer using decks and subdecks to keep their cards organized, but using tags have a big advantage over decks for that: you can add several tags to a single note, but a single card can only belong to one deck, which makes tags a more powerful and flexible categorization system than decks in most cases. You can also organize tags in trees in the same way as you can do for decks.
For example, instead of creating a “food verbs” deck, you could add those cards to your main language study deck, and tag the cards with “food” and “verb”. Since each card can have multiple tags, you can do things like search for all verbs, or all food-related vocabulary, or all verbs that are related to food.
You can add tags from the Edit window and from the Browser, and you can also add, delete, rename, or organize tags there. Please note that tags work at note level, which means that when you tag a card that has siblings, all the siblings will be tagged as well. If you need to tag a single card, but not its siblings, you should consider using flags instead.
Using Flags
Flags are similar to tags, but they will appear during study in the review window, showing a colored flag icon on the upper right area of the screen. You can also search for flagged cards in the Browse screen, rename flags from the browser and create filtered decks from flagged cards, but unlike tags, a single card can have only one flag at a time. Another important difference is that flags work at card level, so flagging a card that has siblings won’t have any effect on the card’s siblings.
You can flag / unflag cards directly while in review mode (by pressing CTRL + 1-7 on Windows or CMD + 1-7 on Mac) and from the Browser.
The “Marked” Tag
Anki treats a tag called “marked” specially. There are options in the review screen and browse screen to add and remove the “marked” tag. The study screen will show a star when the current card’s note has that tag. And cards are shown in a different color in the browse screen when their note is marked.
Note: Marking is mainly left around for compatibility with older Anki versions; most users will want to use flags instead.
Using Fields
For those who like to stay very organized, you can add fields to your
notes to classify your content, such as “book”, “page”, and so on. Anki
supports searching in specific fields, which means you can do a search
for "book:my book" page:63 and immediately find what you’re looking
for.
Custom Study and Filtered Decks
Using custom study and filtered deck you can create temporary decks out of search terms. This allows you to review your content mixed together in a single deck most of the time (for optimum memory), but also create temporary decks when you need to focus on particular material, such as before a test. The general rule is that if you always want to be able to study some content separately, it should be in a normal deck; if you only occasionally need to be able to study it separately (for a test, when under a backlog, etc.), then filtered decks created from tags, flags, marks or fields are better.
Editing Features
The editor is shown when adding notes, editing a note during reviews, or browsing.
![]()
On the top left are two buttons, which open the fields and cards windows.
On the right are buttons that control formatting. Bold, italic and underline work like they do in a word processing program. The next two buttons allow you to subscript or superscript text, which is useful for chemical compounds like H2O or simple mathematical equations like x2. Then, there are two buttons to allow you to change text colour.
The rubber eraser button clears any formatting in the currently selected text — including the colour of the text, whether the selected text is bold, etc. The next three buttons allow creating lists, text alignment and text indent.
You can use the paper-clip button to select audio, images, and videos from your computer’s hard drive and attach them to your notes. Alternatively, you can copy the media onto your computer’s clipboard (for instance, by right-clicking an image on the web and choosing “Copy Image”) and paste it into the field that you want to place it in. For more information about media, please see the media section.
The microphone icon allows you to record from your computer’s microphone and attach the recording to the note.
The Fx button shows shortcuts to add MathJax or LaTeX to your notes.
The […] buttons are visible when a cloze note type is selected.
![]()
The </> button allows editing the underlying HTML of a field.
![]()
Anki 2.1.45+ supports adjusting sticky fields directly from the editing screen. If you click on the pin icon on the right of a field, Anki will not clear out the field’s content after a note is added. If you find yourself entering the same content into multiple notes, you may find this useful. On previous Anki versions, sticky fields were toggled from the Fields screen.
![]()
Most of the buttons have shortcut keys. You can hover the mouse cursor over a button to see its shortcut.
When pasting text, Anki will keep most formatting by default. If you hold down the Shift key while pasting, Anki will strip most of the formatting. Under Preferences, you can toggle “Paste without shift key strips formatting” to modify the default behaviour.
Cloze Deletion
Cloze deletion is the process of hiding one or more words in a sentence. For example, if you have the sentence:
Canberra was founded in 1913.
…and you create a cloze deletion on “1913”, then the sentence would become:
Canberra was founded in [...].
Sometimes sections that have been removed in this fashion are said to be “occluded”.
For more information on why you might want to use cloze deletion, see Rule 5 here.
Anki provides a special cloze deletion type of note, to make creating clozes easy. To create a cloze deletion note, select the Cloze note type, and type some text into the “Text” field. Then drag the mouse over the text you want to hide to select it, and click the […] button. Anki will replace the text with:
Canberra was founded in {{c1::1913}}.
The “c1” part means that you have created one cloze deletion on the sentence. You can create more than one deletion if you’d like. For example, if you select Canberra and click […] again, the text will now look like:
{{c2::Canberra}} was founded in {{c1::1913}}.
When you add the above note, Anki will create two cards. The first card will show:
Canberra was founded in [...].
…on the question, with the full sentence on the answer. The other card will have the following on the question:
[...] was founded in 1913.
You can also elide multiple sections on the same card. In the above example, if you change c2 to c1, only one card would be created, with both Canberra and 1913 hidden. If you hold down Alt (Option on a Mac) while creating a cloze, Anki will automatically use the same number instead of incrementing it.
Cloze deletions don’t need to fall on word boundaries, so if you select “anberra” rather than “Canberra” in the above example, the question would appear as “C[…] was founded in 1913”, giving you a hint.
You can also give yourself hints that don’t match the text. If you replace the original sentence with:
Canberra::city was founded in 1913
…and then press […] after selecting “Canberra::city”, Anki will treat the text after the two colons as a hint, changing the text into:
{{c1::Canberra::city}} was founded in 1913
When the card comes up for review, it will appear as:
[city] was founded in 1913.
For information on testing your ability to type in a cloze deletion correctly, please see the section on typing answers.
From version 2.1.56, nested cloze deletions are supported. For example, the following is valid:
{{c1::Canberra was {{c2::founded}}}} in 1913
The inner cloze is entirely nested within the outer. There is no support for partial overlaps, such as:
[...] founded in 1913 -> Canberra was
Canberra [...] in 1913 -> was founded
with the word “was” appearing in both deletions.
The current implementation can only handle a limited amount of nesting. In Anki 24.11, it is 3 levels. In other versions, the limit is around 8, but Anki may become slow as you approach the limit. It is not possible to extend the limit. If you use this feature, it is recommended you limit yourself to a few levels of nesting.
Prior to version 2.1.56, if you need to create clozes from overlapping text, add another Text field to your cloze, add it to the template, and then when creating notes, paste the text into two separate fields, like so:
Text1 field: {{c1::Canberra was founded}} in 1913

Text2 field: {{c2::Canberra}} was founded in 1913
The default cloze note type has a second field called Extra, that is shown on the answer side of each card. It can be used for adding some usage notes or extra information.
The cloze note type is treated specially by Anki, and cannot be created based on a regular note type. If you wish to customize it, please make sure to clone the existing Cloze type instead of another type of note. Things like formatting can be customized, but it is not possible to add extra card templates to the cloze note type.
Image Occlusion
Anki 23.10+ supports Image Occlusion cards natively. An Image Occlusion (IO) note is a special case of cloze deletion based on images instead of text, and allows you to create cards that hide some parts of an image, testing your knowledge of that hidden information.

Adding an image
To add IO cards to your collection, open the Add screen, click on “Type” and choose “Image Occlusion” from the list of built-in note types. Then, click on “Select Image” to load an image file saved on your computer’s hard drive, or on “Paste image from clipboard” if you have an image copied to the clipboard.
Adding IO cards
After loading an image, the IO editor will open. Click on the icons on the left to add as many areas to your image as you want. There are three basic shapes to choose from:
- Rectangle
- Ellipse
- Polygon
You can also choose between two different IO modes for each note:
- Hide All, Guess One: All areas are hidden and only one area at a time is revealed while learning.
- Hide One, Guess One: Only one area at a time is hidden and will be revealed during learning. The other areas will be visible.

The default IO note type also has standard fields: Header (displayed above the image on the front and back of each card), Back Extra (displayed below the image on the back of each card), and Comments (not displayed on the cards). To access those from the IO editor, click the Toggle Mask Editor button. There you can also view and edit the Tags of the note.
Once you’re done, click on the “Add” button, at the bottom of the screen. Anki will add a card for each shape or group of shapes you added in the previous step, and you can start reviewing them normally.
Editing IO notes
You can edit your IO notes by clicking on “Edit” while reviewing, or directly from the browser. There are several tools that you can use. Of note:
- Select: It allows you selecting one or more shapes to move, resize, delete or group them.
- Zoom: You can freely move the image and zoom in or out using the mouse wheel.
- Shapes (Rectangle, Ellipse or Polygon): Use them to add new shapes / cards.
- Text: It adds text areas to your image. These text areas can be moved, resized or deleted, but no card will be created when you use this tool.
- Undo / Redo.
- Zoom In / Out - Reset zoom.
- Toggle Translucency: Use this tool to temporarily view the hidden areas.
- Delete: Use this tool to delete selected shapes and text areas. Please note that deleting a shape won’t delete its associated card automatically; you will need to use Tools>Empty Cards afterwards, the same as with regular cloze deletions.
- Duplicate.
- Group selection: Use this tool to create a cluster of shapes, which will allow you to move, resize or delete them simultaneously. Please note that two or more single shapes will create only one card once grouped.
- Ungroup selection: Select a group and then click this button to make each shape independent again.
- Alignment: This tool can be used to align your shapes / text areas as desired.
While reviewing IO Cards a “Toggle Masks” button will appear just below the image. This button will temporary clear all shapes of the note when using “Hide All, Guess One” mode.
Inputting Non-Latin Characters and Accents
All modern computers have built-in support for typing accents and non-Latin characters, and multiple ways to go about it. The method we recommend is by using a keyboard layout for the language you want to learn.
Languages with a separate script like Japanese, Chinese, Thai, and so on, have their own layouts specific to that language.
European languages that use accents may have their own layout, but can often be typed on a generic “international keyboard” layout. These work by typing the accent, then the character you want accented - e.g. an apostrophe (´) then the letter a (a) gives á.
Adding international keyboard layouts
Instructions on how to use international keyboards vary depending on the operating system and desktop environment that you are using. To get started, please see the links below.
Windows:
Mac:
Linux:
- Gnome: https://help.gnome.org/users/gnome-help/stable/tips-specialchars.html.en
- KDE Plasma: https://userbase.kde.org/Tutorials/ComposeKey
Adding keyboard layouts for specific languages
Keyboards for specific languages are added in a similar way, but we can not cover them all here. For more information, please try searching on the internet for “input Japanese on a mac”, “type Chinese on Windows 10”, and so on.
For Linux it’s best to look at the wiki pages of your distro, e.g.
Arch Linux and
Debian Linux.
As an example, apt install ibus-anthy on Debian allows you to type hiragana characters.
Right-to-left Languages
If you are learning a right-to-left language, there are lots of other things to consider. Please see this page for more information.
Limitations
The toolkit on which Anki is built has trouble dealing with a few input methods, such as holding down keys to select accented characters on macOS, and typing characters by holding down the Alt key and typing a numeric code on Windows.
Unicode Normalization
Text like á can be represented in multiple ways on a computer, such as
using a specific code for that symbol, or by using a standard a and then
another code for the accent on top. This causes problems when mixing input
from different sources, or using different computers - if your computer
handles keyboard input in one form, but the content is stored in a different
form, it will not match when searching, even though the end result appears
identical.
To ensure content can easily be found in searches, Anki normalizes the text to a standard form. For most users this process is transparent, but if you are studying certain material like archaic Japanese symbols, the normalization process can end up converting them to a more modern equivalent.
If you want character variants preserved, the following in the debug console will turn off normalization:
mw.col.conf["normalize_note_text"] = False
Any content added after that will remain untouched. The trade-off is that you may find it difficult to search for the content if you’re switching between operating systems, or pasting content from mixed sources.
Card Templates
Card templates tell Anki which fields should appear on the front and back of your card, and control which cards will be generated when certain fields have text in them. By adjusting your card templates, you can alter the design and styling of many of your cards at once.
Card templates are covered in some of the intro videos:
The Templates Screen
You can modify card templates by clicking the Cards… button inside the editing screen.
You can switch between Front template, Back template and Styling with Ctrl+1, Ctrl+2, and Ctrl+3.
In Anki, templates are written in HTML, which is the language that web pages are written in. The styling section is CSS, which is the language used for styling web pages.
On the right is a preview of the front and back of the currently selected card. If you opened the window while adding notes, the preview will be based on the text you had typed into the Add Notes window. If you opened the window while editing a note, the preview will be based on the content of that note. If you opened the window from Tools → Manage Note Types, Anki will display each field’s name in parentheses in place of content.
At the top right of the window is an Options button that gives you options to rename or reorder the cards, as well as the following two options:
-
The Deck Override option allows you to change the deck that cards generated from the current card type will be placed into. By default, cards are placed into the deck you provide in the Add Notes window. If you set a deck here, that card type will be placed into the deck you specified, instead of the deck listed in the Add Notes window. This can be useful if you want to separate cards into different decks (for instance, when studying a language, to put production cards in one deck and recognition cards in another). You can check which deck the cards are currently going to by choosing Deck Override again.
-
The Browser Appearance option allows you to set different (perhaps simplified) templates for display in the Question and Answer columns of the browser; see browser appearance for more information.
Field Replacements
- Basic Replacements
- Newlines
- Text to Speech for individual fields
- Text to Speech for multiple fields and static text
- Special Fields
- Hint Fields
- Dictionary Links
- HTML Stripping
- Right To Left Text
- Ruby Characters
- Media & LaTeX
- Checking Your Answer
Basic Replacements
The most basic template looks something like this:
{{Front}}
When you place text within curly brackets, Anki looks for a field by that name, and replaces the text with the actual content of the field.
Field names are case sensitive. If you have a field named Front,
writing {{front}} will not work properly.
Your templates are not limited to a list of fields. You can also include arbitrary text on your templates. For example, if you’re studying capital cities, and you’ve created a note type with a “Country” field, you might create a front template like this:
What's the capital city of {{Country}}?
The default back template will look something like this:
{{FrontSide}}

<hr id=answer>

{{Back}}
This means “show me the text that’s on the front side, then a divider line, and then the Back field”.
The “id=answer” part tells Anki where the divider is between the question and the answer. This allows Anki to automatically scroll to the spot where the answer starts when you press show answer on a long card (especially useful on mobile devices with small screens). If you don’t want a horizontal line at the beginning of the answer, you can use another HTML element such as a paragraph or div instead.
Newlines
Card templates are like web pages, which means a special command is required to create a new line. For example, if you wrote the following in the template:
one
two
In the preview, you’d actually see:
one two
To add a new line, you need to add a <br> code to the end of a line, like so:
one<br>
two
The br code stands for “(line) br(eak)”.
The same applies for fields. If you want to display two fields, one on each line, you would use
{{Field 1}}<br>
{{Field 2}}
Text to Speech for individual fields
This feature requires Anki 2.1.20, AnkiMobile 2.0.56 or AnkiDroid 2.17.
To have Anki read the Front field in a US English voice, you can place the following in your card template:
{{tts en_US:Front}}
On Windows, macOS, and iOS, Anki will use the OS’s built in voices. On Linux, no voices are built in, but voices can be provided by add-ons, such as this one.
To see a list of all available languages/voices, place the following on your card template:
{{tts-voices:}}
If there are multiple voices that support your chosen language, you can specify desired voices in a list, and Anki will choose the first available voice. For example:
{{tts ja_JP voices=Apple_Otoya,Microsoft_Haruka:Field}}
This would use Otoya when on an Apple device, and Haruka when on a Windows PC.
Specifying a different speed is possible in some TTS implementations:
{{tts fr_FR speed=0.8:SomeField}}
Both speed and voices are optional, but the language must be included.
On a Mac, you can customize the available voices:
-
Open the System Preferences screen.
-
Click on Accessibility.
-
Click on Speech.
-
Click on the system voice dropdown, and choose Customize.
Some voices sound better than others, so experiment to choose the one you prefer. Please note that the Siri voice can only be used by Apple apps. Once you’ve installed new voices, you’ll need to restart Anki for the new voices to become available.
On Windows, some voices like Cortana can not be selected, as Microsoft does not make those voices available to other applications.
On a cloze note type, you can make Anki read only the elided sections
using the cloze-only filter, like so:
{{tts en_US:cloze-only:Text}}
The cloze-only filter is supported in Anki 2.1.29+, AnkiMobile 2.0.65+, and AnkiDroid 2.17+.
Text to Speech for multiple fields and static text
This feature requires Anki 2.1.50+, AnkiMobile 2.0.84+, or AnkiDroid 2.17+.
If you want TTS to read multiple fields or static text included in the template, you can use the following:
[anki:tts lang=en_US] This text should be read. Here is {{Field1}} and {{Field2}}[/anki:tts]

This is other text on the template. It is outside of the tags so it should not be read.
Special Fields
There are some special fields you can include in your templates:
The note's tags: {{Tags}}

The type of note: {{Type}}

The card's deck: {{Deck}}

The card's subdeck: {{Subdeck}}

The card's flag: {{CardFlag}}

The type of card ("Forward", etc): {{Card}}

The content of the front template
(only valid in back template): {{FrontSide}}
FrontSide will not automatically play any audio that was on the front side of the card. If you wish to have the same audio play automatically on both the front and back of the card, you’ll need to manually include the audio fields on the back as well.
As with other fields, special field names are case sensitive - you must use
{{Tags}} rather than {{tags}} for example.
Hint Fields
It’s possible to add a field to the front or back of a card, but make it hidden until you explicitly show it. We call this a hint field. Before adding a hint, please bear in mind that the easier you make it to answer a question in Anki, the less likely you are to remember that question when you encounter it in real life. Please have a read about the “minimum information principle” on https://super-memory.com/articles/20rules.htm before proceeding.
First, you’ll need to add a field to store the hint in if you have not already. Please see the fields section if you’re not sure how to do this.
Assuming you’ve created a field called MyField, you can tell Anki to include it on the card but hide it by default by adding the following to your template:
{{hint:MyField}}
This will show a link labeled “show hint”; when you click it, the content of the field will be displayed on the card. (If MyField is empty, nothing will be shown.)
If you show the hint on the question and then reveal the answer, the
hint will be hidden again. If you want to have the hint always revealed
when the answer is shown, you will need to remove {{FrontSide}} from
your back template and manually add the fields you wish to appear.
It is not currently possible to use a hint field for audio — the audio will play regardless of whether you’ve clicked on the hint link.
If you want to customize the appearance or behaviour, you’ll need to implement the hint field yourself. We can not provide any support for doing so, but the following code should get you started:
{{#Back}}
<a class=hint href="#"
onclick="this.style.display='none';document.getElementById('hint4753594160').style.display='inline-block';return false;">
Show Back</a><div id="hint4753594160" class=hint style="display: none">{{Back}}</div>
{{/Back}}
Dictionary Links
You can also use field replacement to create dictionary links. Imagine you’re studying a language and your favourite online dictionary allows you to search for text using a web URL like:
http://example.com/search?q=myword
You could add an automatic link by doing the following in your template:
{{Expression}}

<a href="http://example.com/search?q={{Expression}}">check in dictionary</a>
The template above would allow you to search for each note’s expression by clicking on the link while reviewing. There is a caveat however, so please see the next section.
HTML Stripping
Like templates, fields are stored in HTML. In the dictionary link example above, if the expression contained the word “myword” without any formatting, then the HTML would be the same: “myword”. But when you include formatting in your fields, extra HTML is included. If “myword” was bolded for example, the actual HTML would be “<b>myword</b>”.
This can present a problem for things like dictionary links. In the above example, the dictionary link would end up being:
<a href="http://example.com/search?q=<b>myword</b>">check in dictionary</a>
The extra characters in the link would likely confuse the dictionary site, and you’re likely not to get any matches.
To solve this, Anki provides the ability to strip formatting from fields when they are replaced. If you prefix a field name with text:, Anki will not include any formatting. So a dictionary link that worked even with formatted text would be:
<a href="http://example.com/search?q={{text:Expression}}">check in dictionary</a>
Right To Left Text
If you’re using a language that reads from right to left, you’ll need to adjust the template like so:
<div dir=rtl>{{FieldThatHasRTLTextInIt}}</div>
Ruby Characters
Some languages commonly use annotations above the text to display the pronunciation of characters. These annotations are known as ruby characters. In Japanese, these are known as furigana.
In Anki, you can display ruby characters by using the following syntax:
Text[Ruby]
Suppose the text above is written in MyField. By default, if you simply use
{{Myfield}}, the field will be displayed as is. To properly position the
ruby characters above the text, use the furigana filter in the templates
like so:
{{furigana:MyField}}
Here are some examples:
| Raw Text | Rendered Text |
|---|---|
Text[Ruby] | |
日本語[にほんご] | |
世[よ]の 中[なか] | |
世[よ]の中[なか] |
Notice how the third example has a space before the 中 character. This is necessary to specify that the ruby text applies only to that character. If there was no space, the ruby text will be misplaced above the の character, as shown in the fourth example.
Additional Ruby Character Filters
In addition to the furigana filter, you can also only show certain parts
of the ruby text, with the kana and kanji filters. The kana filter will
only show the ruby text, while the kanji filter removes the ruby text
entirely.
| Raw Text | Field Filter | Rendered Text |
|---|---|---|
日本語[にほんご] | {{furigana:MyField}} | |
日本語[にほんご] | {{kana:MyField}} | にほんご |
日本語[にほんご] | {{kanji:MyField}} | 日本語 |
These names are, again, borrowed from Japanese. The term kana represents the phonetic system used to describe how words are pronounced, whereas the term kanji represents its Chinese characters.
Media & LaTeX
Anki does not scan templates for media references, because it is slow to do so. This has implications for including media on the template.
Static Sounds/Images
If you wish to include images or sounds on your cards that are the same for every card (eg, a company logo at the top of each card):
-
Rename the file so it starts with an underscore, e.g “_logo.jpg”. The underscore tells Anki that the file is used by the template and it should be exported when sharing the deck.
-
Add a reference to the media on your front or back template, like:
<img src="_logo.jpg">
Field References
Media references to fields are not supported. They may or may not display during review, and will not work when checking for unused media, importing/exporting, and so on. Examples that won’t work:
<img src="{{Expression}}.jpg">

[sound:{{Word}}]

[latex]{{Field 1}}[/latex]
Instead, you should include the media references in the field. Please see the importing section for more information.
Checking Your Answer
You can watch a video about this feature on YouTube.
The easiest way to check your answer is to click “Basic” at the top left of the card adding screen, and select “Basic (type in the answer)”.
If you have downloaded a shared deck and would like to type in the answer with it, you can modify its card template. If it has a template like:
{{Native Word}}

{{FrontSide}}

<hr id=answer>

{{Foreign Word}}
To type in the foreign word and check if you are correct, you need to edit your front template so that it looks like this:
{{Native Word}}
{{type:Foreign Word}}
Note that we have added type: in front of the field we want to
compare. Since FrontSide is on the back of the card, the type answer box
will appear on the back as well.
When reviewing, Anki will display a text box where you can type in the answer, and upon hitting Enter or showing the answer, Anki will show you which parts you got right and which parts you got wrong. The text box’s font size will be the size you configured for that field (via the “Fields” button when editing).
This feature does not change how the cards are answered, so it’s still up to you to decide how well you remembered or not.
Only one typing comparison can be used on a card. If you add the above text multiple times, it will not work. It also only supports a single line, so it is not useful for comparing against a field that is comprised of multiple lines.
Anki uses a monospaced font for the answer comparison so that the “provided” and “correct” sections line up. If you wish to override the font for the answer comparison, you can put the following at the bottom of your styling section:
code#typeans { font-family: "myfontname"; }
Which will affect the following HTML for the answer comparison:
<code id=typeans>...</code>
Advanced users can override the default type-answer colors with the css classes “typeGood”, “typeBad” and “typeMissed”. AnkiMobile supports “typeGood” and “typeBad”, but not “typeMissed”.
If you wish to override the size of the typing box and don’t want to
change the font in the Fields dialog, you can override the default
inline style using !important, like so:
#typeans { font-size: 50px !important; }
It is also possible to type in the answer for cloze deletion cards. To
do this, add {{type:cloze:Text}} to both the front and back
template, so the back looks something like this:
{{cloze:Text}}
{{type:cloze:Text}}
{{Extra}}
Note that since the cloze type does not use FrontSide, this must be added to both sides on a cloze note type.
If there are multiple sections elided, you can separate the answers in the text box with a comma.
Type answer boxes will not appear in the “preview” dialog in the browser. When you review or look at the preview in the card types window, they will display.
Type answer boxes will not be displayed when you review your cards on ankiweb.net.
Card Generation
- Reverse Cards
- Card Generation & Deletion
- Selective Card Generation
- Conditional Replacement
- Blank Back Sides
- Adding Empty Notes
- Cloze Templates
Reverse Cards
You can watch a video about reversing cards on YouTube.
If you want to create cards that go in both directions (e.g., both “ookii”→“big” and “big”→“ookii”), you have several options. The simplest is to select the “Basic (and reversed card)” built-in note type. This will generate two cards, one in each direction.
If you want to generate reverse cards for only some of your material (perhaps you only want to take the time to study reverses for the most important material, or some of your cards don’t make sense reversed), you can select the “Basic (optional reversed card)” note type. This note type generates a forward-only card when you fill in only the first two fields; if you additionally enter something in the “Add Reverse” field (like a “y”), Anki will generate a reverse card as well. The contents of this field will never be displayed on a card.
Card Generation & Deletion
Anki will not create cards with empty front sides. Thus if “My Field” was empty, and one card’s front template included only that field, the card would not be created.
When you edit a previously added note, Anki will automatically create extra cards if they were previously blank but no longer are. If your edits have made some cards blank when they previously were not, however, Anki will not delete them immediately, as that could lead to accidental data loss. To remove the empty cards, go to Tools → Empty Cards in the main window. You will be shown a list of empty cards and be given the option to delete them.
Because of the way that card generation works, it is not possible to manually delete individual cards, as they would just end up being recreated the next time the note was edited. Instead, you should make the relevant conditional replacement fields empty and then use the Empty Cards option.
Anki does not consider special fields or non-field text for the purposes of card generation. Thus if your front template looked like the following, no card would be generated if Country was empty:
Where is {{Country}} on the map?
Selective Card Generation
Sometimes you may want to generate extra cards for only some of your material, such as testing your ability to recall the most important words of a set. You can accomplish this by adding an extra field to your note, and adding some text into it (such as “1”) on the notes you want the extra card. Then in the card template, you can make the card’s creation depend on that field being non-empty. For more information on this, please see the conditional replacement section below.
Conditional Replacement
It is possible to include certain text, fields, or HTML on your cards only if a field is empty or not empty. An example:
This text is always shown.

{{#FieldName}}
    This text is only shown if FieldName has text in it
{{/FieldName}}

{{^FieldName}}
    This text is only shown if FieldName is empty
{{/FieldName}}
A real life example is only showing a label if the field is not empty:
{{#Tags}}
    Tags: {{Tags}}
{{/Tags}}
Or say you want to display a specific field in blue on the front of your card if there are extra notes on the back (perhaps the fact that there are notes serves as a reminder that you should spend more time thinking about the answer). You can style the field as follows:
{{#Notes}}
    <span style="color:blue;">
{{/Notes}}

{{FieldToFormat}}

{{#Notes}}
    </span>
{{/Notes}}
You can also use conditional replacement to control which cards are generated. This works since Anki will not generate cards which would have a blank front side. For example, consider a card with two fields on the front:
{{Expression}}
{{Notes}}
Normally a card would be generated if either the expression or notes field had text in it. If you only wanted a card generated if expression was not empty, then you could change the template to this:
{{#Expression}}
    {{Expression}}
    {{Notes}}
{{/Expression}}
And if you wanted to require both fields, you could use two conditional replacements:
{{#Expression}}
    {{#Notes}}
        {{Expression}}
        {{Notes}}
    {{/Notes}}
{{/Expression}}
Keep in mind that this only works when you place the conditional replacement code on the front of the card; if you do this on the back, you will simply end up with cards with a blank back side. Similarly, since this works by checking if the front field would be empty, it is important to make sure you wrap the “entire” front side in the conditional replacement; for instance, the following would not work as expected:
{{#Expression}}
    {{Expression}}
{{/Expression}}
{{Notes}}
Blank Back Sides
Card generation only looks at the front side of the card. For example, if you have a front template:
{{Field 1}}
and a back template:
{{Field 2}}
Then a card will be generated if Field 1 is non-empty. If Field 2 is empty, the card will still be generated, and you will get a blank back side.
If you wish to avoid a blank back side, you will need to place a required field on the front template as a conditional, like so:
{{#Field 2}}
    {{Field 1}}
{{/Field 2}}
This will ensure the card is generated only if both Field 2 and Field 1 are non-empty.
Adding Empty Notes
When you add a new note in Anki, if the card templates and note fields combine to produce no cards, a blank card will be created using the first template. This allows you to add material even if it’s incomplete, and modify it or the template later to make it valid. If you don’t wish to keep an empty note, you can remove it with the Empty Cards function.
Cloze Templates
Please see the cloze deletion section for background info.
The cloze note type functions differently from regular note types. Instead of a customizable number of card types, it has a single type which is shared by all cloze deletions on a note.
As mentioned in the card generation section above, generation of regular cards depends on one or more fields on the question being non-empty. Cloze deletion note types are generated differently:
-
Anki looks on the front template for one or more cloze replacements, like {{cloze:FieldName}}.
-
It then looks in the FieldName field for all cloze references, like {{c1::text}}.
-
For each separate number, a card will be generated.
Because card generation functions differently for cloze deletion cards, {{cloze:…}} tags can not be used with a regular note type - they will only function properly when used with a cloze note type.
Conditional generation provides a special field so you can check which card you are rendering. If you wanted to display the “hint1” field on the first cloze, and “hint2” field on the second cloze for example, you could use the following template:
{{cloze:Text}}

{{#c1}}
    {{Hint1}}
{{/c1}}

{{#c2}}
    {{Hint2}}
{{/c2}}
Styling & HTML
- Card Styling
- Image Resizing
- Field Styling
- Audio Replay Buttons
- Text Direction
- Other HTML
- Browser Appearance
- Platform-Specific CSS
- Installing Fonts
- Night Mode
- Fading and Scrolling
- Javascript
Card Styling
You can watch a video about styling cards on YouTube. The video shows Anki 2.0’s interface, but the concepts are largely the same.
The styling section of the Cards screen can be accessed by clicking the “Styling” button next to the “Back Template” button. In that section, you can change the background color of the card, the default font, the text alignment, and so on.
The standard options available to you are:
font-family
The name of the font to use on the card. If your font has spaces in it
like “MS Unicode”, then you need to surround the font name in double
quotes as in this sentence. It is also possible to use multiple fonts on
one card; for information on that, please see below.
font-size
The size of the font in pixels. When changing it, make sure you leave px
at the end.
text-align
Whether the text should be aligned in the center, left, or right.
color
The color of the text. Simple color names like “blue”, “lightyellow”,
and so on will work, or you can use HTML color codes to select arbitrary
colors. Please see this webpage for more
information.
background-color
The color of the card background.
Any CSS can be placed in the styling section – advanced users may wish to do things like add a background image or gradient, for example. If you’re wondering how to get some particular formatting, please search the web for information about how to do it in CSS, as there is a great deal of documentation available.
The styling is shared between all cards, which means that when you make an adjustment it will affect all cards for that note type. It is also possible to specify card-specific styling, however. The following example will use a yellow background on all cards except the first one:
.card {
  background-color: yellow;
}
.card1 {
  background-color: blue;
}
Image Resizing
Anki shrinks images to fit the screen by default. You can change this by adding
the following to the bottom of your styling section (outside of the default
.card { ... }):
img {
  max-width: none;
  max-height: none;
}
AnkiDroid sometimes has trouble scaling images to fit the
screen. Setting maximum
image dimensions using css should fix this, but seems to be ignored as of
AnkiDroid 2.9. A fix is to append !important to each style directive, for
example:
img {
  max-width: 300px !important;
  max-height: 300px !important;
}
If you try to change the style for images and find that the star that appears on marked cards is affected (for instance, it becomes way too large), you can target it with the following:
img#star {
  ...;
}
You can explore the styling of cards interactively by using Chrome:
https://addon-docs.ankiweb.net/porting2.0.html#webview-changes
Anki 2.1.50+ supports image resizing within the editor natively.
Field Styling
The default styling applies to the whole card. You can also make certain fields or part of the card use a different font, color, and so on. This is particularly important when studying foreign languages, as Anki will sometimes be unable to correctly display characters unless an appropriate font has been chosen.
Say you have an “Expression” field, and you want to give it the OSX Thai font “Ayuthaya”. Imagine your template already reads:
What is {{Expression}}?

{{Notes}}
What we need to do is wrap the text we want to style in some HTML. We will put the following in front of the text:
<div class=mystyle1>
And the following behind it:
</div>
By wrapping the text like the above, we tell Anki to style the wrapped text with a custom style called “mystyle1”, which we will create later.
Thus if we wanted the entire “What is …?” expression to use the Thai font, we would use:
<div class=mystyle1>What is {{Expression}}?</div>

{{Notes}}
And if we wanted only the expression field itself to use the Thai font, we’d use:
What is <div class=mystyle1>{{Expression}}</div>?

{{Notes}}
After we’ve edited the template, we now need to move to the Styling section between the templates. Before editing it, it should look something like:
.card {
  font-family: arial;
  font-size: 20px;
  text-align: center;
  color: black;
  background-color: white;
}
Add your new style to the bottom, so it looks like:
.card {
  font-family: arial;
  font-size: 20px;
  text-align: center;
  color: black;
  background-color: white;
}

.mystyle1 {
  font-family: ayuthaya;
}
You can include any styling you want in the style. If you wanted to increase the font size too, you’d change the mystyle1 section to look like:
.mystyle1 {
  font-family: ayuthaya;
  font-size: 30px;
}
It’s also possible to bundle custom fonts with your deck, so you don’t need to install them on your computer or mobile device. Please see the installing fonts section for more info.
Audio Replay Buttons
When audio or text to speech is included on your cards, Anki will show buttons you can click on to replay the audio.
If you prefer not to see the buttons, you can hide them in the preferences screen.
You can customize their appearance in your card styling, for example, to make them smaller and colored, you could use the following:
.replay-button svg {
  width: 20px;
  height: 20px;
}
.replay-button svg circle {
  fill: blue;
}
.replay-button svg path {
  stroke: white;
  fill: green;
}
Text Direction
If you use a language that is written right-to-left, such as Arabic or Hebrew,
you can add the CSS direction property to the .card section for correct display during review:
.card {
  direction: rtl;
}
This will change the direction of the entire card. You can change the direction of only certain fields by wrapping their references in some HTML:
<div dir="rtl">{{Front}}</div>
To change the direction of fields in the editor, please see the editing section.
Other HTML
Your templates can contain arbitrary HTML, which means that all the layout possibilities used on internet web pages can also be used on your cards. Things like tables, lists, images, links to external pages and so on are all supported. With tables for example, you could change the layout so that the front and back of a card appear on the left and right instead of the top and bottom.
Covering all of HTML’s features is outside the scope of this manual, but there are plenty of good introductory guides to HTML available on the web if you’d like to learn more.
Browser Appearance
If your card templates are complex, it may be difficult to read the question and answer columns (called “Front” and “Back”) in the card list. The “browser appearance” option allows you to define a custom template to be used only in the browser, so you can include only the important fields and change the order if you desire. The syntax is the same as in standard card templates.
When using this option, if the text in the question column is repeated at the beginning of the answer column, Anki will display the text only in the question column. For example, if the question column text is “People in Ladakh speak”, and the answer is “People in Ladakh speak Ladakhi”, the answer column will only display “Ladakhi”, omitting the rest.
Platform-Specific CSS
Anki defines some special CSS classes that allow you to define different styling for different platforms. The example below shows how to vary the font depending on where you’re reviewing:
/* Windows */
.win .example {
  font-family: "Example1";
}
/* macOS */
.mac .example {
  font-family: "Example2";
}
/* Linux desktops */
.linux:not(.android) .example {
  font-family: "Example3";
}
/* both Linux desktops, and Android devices */
.linux .example {
  font-family: "Example4";
}
/* both Android and iOS */
.mobile .example {
  font-family: "Example5";
}
/* iOS */
.iphone .example,
.ipad .example {
  font-family: "Example6";
}
/* Android */
.android .example {
  font-family: "Example7";
}
And in the template:
<div class="example">{{Field}}</div>
You can also use properties like .gecko, .opera, and .ie to select particular browsers when using AnkiWeb. Please see http://rafael.adm.br/css_browser_selector/ for a full list of options.
Installing Fonts
You can install fonts directly to Anki. This is useful if you’re using Anki on a work or school computer where you don’t have permission to install new fonts, or if you’re using Anki on a mobile device.
Anki supports the most widely used font formats, such as TrueType (.ttf), OpenType (.otf), Web Open Font Format (.woff) and others.
Add Font to Media Folder
Once you have downloaded a supported font, such as “Arial.ttf”, you have to add it to the media folder.
-
Rename the file, adding an underscore at the start, so it becomes like “_arial.ttf”. Adding an underscore will tell Anki that this file will be used on a template, and should not be deleted when checking for unused media.
-
In your computer’s file browser, go to your Anki Folder, and then a folder called “User 1” (or your profile name if you’ve renamed/added profiles).
-
Inside the folder, you should see a folder called collection.media. Drag the renamed file to that folder.
Update Template to Use That Font
After the font has been added to the media folder, you need to update the template.
-
Click Add at the top of the main screen, and then select the note type you want to change with the top left button.
-
Click Cards.
-
In the styling section, add the following text to the bottom (after the last “}” character), replacing “_arial.ttf” with the name of the file you copied into your media folder:
@font-face {
  font-family: myfont;
  src: url("_arial.ttf");
}
Only change the “arial” part, not the “myfont” part.
After that, you can either change the font for the entire card, or for individual fields. To change the font for the entire card, simply locate the font-family: line in the .card section and change the font to “myfont”. To change the font for only certain fields, please see the Field Styling instructions above.
Please make sure the filenames match exactly. If the file is called arial.TTF and you write arial.ttf in your card templates, it will not work.
Night Mode
You can customize the way templates appear when night mode is enabled in the preferences screen.
If you wanted a lighter grey background, you could use something like:
.card.nightMode {
  background-color: #555;
}
If you have a “myclass” style, the following would show the text in yellow when night mode is enabled:
.nightMode .myclass {
  color: yellow;
}
Fading and Scrolling
Anki will automatically scroll to the answer by default. It looks for an HTML element with id=answer, and scrolls to that. You can place the id on a different element to adjust the scrolling position, or remove the id=answer to turn off scrolling.
The question side of a card fades in by default. If you wish to adjust this delay, you can place the following at the top of your front card template:
<script>
  qFade = 100;
  if (typeof anki !== "undefined") anki.qFade = qFade;
</script>
100 (milliseconds) is the default; set to 0 to disable fading.
Javascript
As Anki cards are treated like webpages, it is possible to embed some Javascript on your cards via the card template. For a good reference please read this post in the forums.
Because Javascript is an advanced feature and so many things can go wrong, Javascript functionality is provided without any support or warranty. We can not provide any assistance with writing Javascript, and can not guarantee any code you have written will continue to work without modification in future Anki updates. If you are not comfortable addressing any issues you encounter on your own, then please avoid using Javascript.
Each Anki client may implement card display differently, so you will need to test the behaviour across platforms. A number of clients are implemented by keeping a long running webpage and dynamically updating parts of it as cards are reviewed, so your Javascript will need to update sections of the document using things like document.getElementById() rather than doing things like document.write().
Functions like window.alert may not be available. Anki will write javascript errors to the terminal, so you’ll need to view the console to see them. To debug issues with JavaScript, you can use Chrome’s inspector.
Checks and Errors
When you save changes to a note type or export a deck, Anki 2.1.45+ checks for some common errors. These errors will cause issues later on when anyone studies the affected cards, so Anki won’t let you proceed before you have fixed them.
Basics
Please see Key Concepts before reading further.
Most of the errors below will require you to modify your note type/card template. To do so:
- Open the Browse screen, and look at the items on the left.
- Locate the note type mentioned in error message. You can use the search bar at the top left if necessary.
- Click on the note type, to show its cards/notes on the right.
- Click the Cards… button at the top of the editing area to open the templates screen.
Specific Issues
Template Syntax Error
This kind of error indicates an incorrect usage of the field replacement syntax.
You can correct mistakes on the template by opening the card templates screen:
- On the computer version, edit a problem card, and then click on the Cards… button
- On AnkiMobile, while viewing a problem card in the study screen, tap the cog/gear, then Card Template.
When you correct a mistake, it will update all cards of that type - you do not need to make the same change for every card that uses the template.
What needs changing will depend on the message you are getting.
Found ‘{{Field}}’, but there is no field called ‘Field’
This indicates your template includes the name of a field that doesn’t exist. To fix the problem, locate the {{Field}} inside the card template, and remove it.
Missing }} in {{Field
This message is shown when {{ is found in the template without a matching }}. For example, if you have
{{Field
then this needs to be changed to
{{Field}}
Missing {{/Field}}
This means Anki found {{#Field}} or {{^Field}} in your card template, without a matching {{/Field}}. Removing {{#Field}} or {{^Field}} from the template will fix the error.
Found {{/One}}, but expected {{/Two}}
Conditional replacements need to be closed in the same order they are opened. For example, the following template is incorrect:
{{#One}}
  {{#Two}}
    {{Three}}
  {{/One}}
{{/Two}}
To fix the problem, the template should be changed like so:
{{#One}}
  {{#Two}}
    {{Three}}
  {{/Two}}
{{/One}}
Found {{/Field}}, but missing ‘{{#Field}}’ or ‘{{^Field}}’
Closing tags must be matched by opening tags. For example, the following is invalid, because there is no {{#Two}} or {{^Two}} at the start:
  {{Field}}
{{/Two}}
It can be fixed by removing the closing tag:
{{Field}}
Identical Front Sides
You have Anki configured to create two identical questions for each input. This can happen if you add a new card type without making any adjustments to it. Identical cards double your workload, and make Anki’s scheduling less effective.
To fix this, open the templates screen, and select one of the duplicates at the top. Then use the button on the top right to remove the selected card type. This will delete all the duplicate cards/notes that were using the card type as well.
Front of Card is Blank
Anki displays cards by combining the fields you’ve entered with a template that says which fields should appear on the front and back of your cards. If you receive a message that a card has a blank front, it means either none of the fields included on your front template have any text in them, or you have fields that have text, but none are included on the front template. You can fix this problem by editing the card on the computer version, clicking on Cards…, and checking to make sure at least one field with some text on it is included on the front template. You can add extra fields with the Add Field button.
If you are using the Cloze note type, please make sure you’ve included one or more cloze deletions in the Text field, e.g. {{c1::some cloze-deleted text}}.
If you’re using the type-in-the-answer functionality, please make sure you’ve included another field on the front side as well.
No Cloze Filter on Cloze Note Type
A Cloze note type’s front and back templates should have a cloze filter. If one is missing, you will need to add it back so that Anki can create cloze cards correctly.
Single empty cards
When making clozes, each cloze number is turned into a separate card. For example, the following will create three cards:
{{c1::This}} is a {{c2::sample}} {{c3::sentence}}.
If you you later edit the text, and either remove or change a cloze number, the previously created card may become blank. For example:
{{c1::This}} is a {{c2::sample}}
and
{{c1::This}} is a {{c2::sample}} {{c1::sentence}}.
are both changes that would make card 3 blank. When you view card 3, you’ll see a message indicating that the card is blank, and can be cleaned up with the Empty Cards function. You can access that function via the Tools menu of the computer version’s main window, and use it to remove blank cards. Please check the reported empty cards first, and if in doubt, create a backup with the File>Export menu item before proceeding.
All cloze cards empty
If you accidentally modify your card template, it may prevent any cloze deletions from appearing. If that has happened, please edit one such problem card, and note down the name of the first field - it is usually called “Text”. Then, please:
-
Click on the Cards… button
-
Replace the front text with
{{cloze:Text}} -
Replace the back text with the same.
If your field was called something other than Text, replace Text with the name of the field.
Preferences
The preferences are available from the Tools menu on Windows/Linux, or the Anki menu on a Mac.
Appearance
General
Language
Change your display language. You can help to improve translations here
User Interface
Theme
Dark (night) mode will make Anki’s interface dark, and will cause cards to be shown as white text on a
black background. Some card templates may need to be modified to work
properly with this option enabled - please see night mode styling for more information.
From 2.1.50+ there is an option to switch to day or night mode automatically.
User interface size
If you find that the interface elements are too small for you, you can
try to increase this setting.
Reset Windows Sizes
This will reset all windows sizes and locations to the default settings.
Video driver
Anki’s libraries need a video driver to draw content on the screen.
Due to different hardware and software configurations, the driver that
works best on your machine may vary. Software tends to be slower, but will
work on some systems where the other options do not.
Note: If you’re on Windows, please check this page as well.
Distractions
These options allow you to remove some unnecessary elements from the screen during reviews. You can:
- Hide the top and bottom bar during reviews.
- Enable the “minimalist” mode, making the interface more compact/less fancy.
- Reduce motion, to disable some transitions/animations.
- Switching between native styling and the Anki theme (only on Mac/Linux).
Review
Scheduler
Next day starts at
Controls when Anki should start showing the next day’s cards. The default
setting of 4AM ensures that if you’re studying around midnight, you won’t have
two days’ worth of cards shown to you in one session. If you stay up very late
or wake up very early, you may want to adjust this to a time you’re usually
sleeping. Note that the start of the next day is relative to your current timezone.
Also note that any cards that cross a day boundary will appear at the start of
the day they are scheduled for, just like review cards do.
Learn ahead limit
Tells Anki how to behave when there is nothing left to study in the current deck
but cards in learning. The default setting of 20 minutes tells Anki that cards
should be shown early if they have a delay of less than 20 minutes and there’s
nothing else to do. If you set this to 0, Anki will always wait the full delay,
showing the congratulations screen until the remaining cards are ready to be
reviewed.
Timebox time limit
Timeboxing is a technique to help you focus by dividing a longer activity (such
as a 30 minute study session) into smaller blocks. If you set the timebox time
limit to a non-zero number of minutes, Anki will periodically show you how many
cards you’ve managed to study during the prescribed time limit.
Review
Show play buttons on cards with audio
Whether a clickable (re)play button will be shown in the study screen
for cards with audio.
Interrupt current audio when answering
Whether a currently playing audio file should be stopped when answering
a card.
Show remaining card count
Disable this option to hide the card count at the bottom of the screen.
Show next review time above answer buttons
Useful to know how far in the future your cards are being pushed.
Spacebar (or enter) also answers card
Defines whether a press on Space or Enter answers cards.
Editing
Editing
Paste clipboard images as PNG
By default Anki pastes images on the clipboard as JPG files, to save disk space.
You can use the option to paste as PNG images instead. PNG images support
transparent backgrounds and are lossless, but they usually result in much larger
file sizes.
Paste without Shift strips formatting
By default, formatting like bold and colors are kept when pasting,
unless the Shift key is held down. This option reverses the behaviour.
Default deck
Controls how note types and decks interact. The default of “When adding, default
to current deck” means that Anki saves the last-used note type for each deck and
selects it again then next time you choose the deck (and, in addition, will
start with the current deck selected when choosing Add from anywhere). The other
option, “Change deck depending on note type,” saves the last-used deck for each
note type (and opens the add window to the last-used note type when you choose
Add). This may be more convenient if you always use a single note type for each
deck.
The last used deck/note type is updated when you add a card. If you change the deck and close the add window without adding a card, it won’t be saved.
Browsing
Default search text
Allows you to customize the starting search text in the browser (eg, to start
with “deck:current”).
Ignore accents in search (slower)
When enabled, simple text searches automatically ignore accents.
Syncing
This tab contains options related to syncing with AnkiWeb.
Synchronisation
Synchronize audio and images too
When enabled, media will also be synced with AnkiWeb.
Automatically sync on profile open/close
Disable this if you don’t want an automatic sync with AnkiWeb when opening / closing a profile.
Periodically sync media
On next sync, force changes on one direction
When this option is enabled, the next sync will
ask you whether you wish to upload or download. This is useful if
you have made some changes accidentally, and wish to overwrite them
with an older version that is on AnkiWeb.
AnkiWeb Account
When logged in, clicking on Log Out will log you out.
Self-hosted Sync Server
For info on the custom sync server option, see this section.
Backups
Please see this section of the manual.
Deck Options
- Presets
- Subdecks
- Daily Limits
- New Cards
- Lapses
- Display Order
- Burying
- Audio
- Timers
- Auto Advance
- Easy Days
- FSRS
- Advanced
Deck options primarily control the way Anki schedules cards. It is recommended that you spend a few weeks with the defaults to get a feel for how Anki works before you start adjusting the options. Please make sure you understand the options before changing them, as mistakes can reduce Anki’s effectiveness.
On your computer, do any of the following to open deck options:
- Click the gear icon on the Decks screen.
- Select a deck on the Decks screen, and then click Options at the bottom of the screen.
- Click More > Options while in review mode.
- Press O while in review mode.
Here are some community posts about deck options that have been contributed in the past:
Presets
Anki allows you to share options between different decks, to make it easier to update options in many decks at once. To do this, options are grouped into presets. If you change an option in a preset, the change is applied to all decks that use the same preset. All newly created decks use the “Default” preset.
To change the options in one deck but not other decks, click the arrow icon in the top right of the Deck Options window. You can do the following:
- Save: Save all modifications you’ve made in deck options.
- Add Preset: Add a new preset for this deck, with the default options.
- Clone: Clone your current preset, which is useful if you want to modify some of the options but keep the rest as they are.
- Rename: Change the name of the current preset.
- Delete: Delete the current preset. This will make your next sync a one-way sync.
- Save to All Subdecks: Like Save, but also assigns the selected preset to all subdecks of the currently selected deck.
Deck options are not retroactive. For example, if you change an option that controls the delay after failing a card, cards that you failed before changing this option will still have the old delay, not the new one.
Subdecks
If your deck has subdecks, and you wish one or more subdecks to have different settings to the parent decks, you can assign those subdecks to different presets. When Anki shows a card, it will check which subdeck the card is in, and use the options for that deck. There are two exceptions:
- The New cards/day and Maximum reviews/day limits of a subdeck affect the number of cards that can be gathered from that subdeck. But the total number of cards you see during your study session is controlled by the limits of the deck you select to study.
- The display order options are taken from the deck you select to study, not the deck of the current card.
For example, let’s say you have this collection:
- Deck A (Preset 1)
  - Deck A::Subdeck B (Preset 2)
Preset 1 and Preset 2 are identical, with two exceptions:
- Preset 1:
- Learning steps:
1m 10m - New/review order:
Mix with reviews
- Learning steps:
- Preset 2:
- Learning steps:
20m 2h - New/review order:
Show after reviews
- Learning steps:
If you choose to study Subdeck B:
- Learning steps for all new cards will be
20m 2h(Preset 2 applies). - All new cards will be shown after reviews (Preset 2 applies).
If you choose to study Deck A:
- Learning steps for new cards in Deck A will be
1m 10m(Preset 1 applies). - Learning steps for new cards in Subdeck B will be
20m 2h(Preset 2 applies). - All new cards will be mixed with reviews (Preset 1 applies).
Daily Limits
New Cards/Day
This option controls how many new cards can be introduced each day you open the program. If you study fewer than the limit, or miss a day, the next day the counts will be back to their original setting: you won’t be given more cards than your limit allows.
When studying a deck that has subdecks inside it, the limits set on each subdeck control the maximum number of cards drawn from that particular deck. The selected deck’s limits control the total number of cards that will be shown.
For earlier versions, see this FAQ page.
Studying new cards will temporarily increase the number of reviews you need to do a day, as newly-learned material needs to be repeated a number of times before the delay between repetitions can increase appreciably. If you are consistently learning 20 new cards a day, you can expect your daily reviews to be roughly about 200 cards/day. You can decrease the reviews required by introducing fewer new cards each day until your review burden decreases. More than one Anki user has excitedly studied hundreds of new cards over their first few days of using the program, and then has become overwhelmed by the reviews required.
Maximum Reviews/Day
Allows you to set an upper limit on the number of review cards to show each day. When this limit is reached, Anki will not show any more review cards for the day, even if there are more waiting. If you study consistently, this setting can help to smooth out occasional peaks in due card counts, and can save you from a heart attack when returning to Anki after taking a week off. When reviews have been hidden due to this option, a message will appear in the congratulations screen, suggesting you consider increasing the limit if you have time.
When studying a deck that has subdecks inside it, the review limit behaves similarly to the new card limit.
Anki includes any learning cards that have crossed the day boundary (interday learning cards) in the review count, so those learning cards will be subject to the review limit.
Per-Deck Daily Limits
It is possible to use the same preset for different decks, with customized limits for each of them. This eliminates the need to create cloned presets just for that purpose, and makes it easier to set custom limits on subdecks.
Anki provides three options for daily limits:
- Preset: applies to all the decks using a preset.
- This deck: specific to a particular deck.
- Today only: specific to a particular deck, and temporary.
New Cards Ignore Review Limit
By default, the review limit also applies to new cards, and no new cards will be shown when the review limit has been reached. If this option is enabled, new cards will be shown regardless of the review limit.
If you have a backlog of overdue review cards, it is recommended that you stop introducing new cards until you catch up with that backlog. Continuing to introduce new cards when you’re already behind can make the backlog worse.
Limits Start From Top
By default, the daily limits of a higher-level deck do not apply if you select one of its subdecks. A parent deck can have a new card limit of 10 cards/day and its subdecks can have a new card limit of 20 cards/day. The limits set on parent deck do not affect the number of new cards you can study from its subdeck.
When this option is enabled, the limits set on higher-level decks also apply to their subdecks when a subdeck is selected. In the previous example, you will be able to study only 10 new cards from the subdecks instead of 20 new cards.
This option can be useful if you wish to study individual subdecks, while enforcing a total limit on cards all the subdecks.
New Cards
The options here only affect new cards and learning cards. Once a card has graduated (that is, gone through all the learning steps), the options in this section no longer apply to the card.
Learning Steps
Controls the number of learning repetitions, and the delay between them. One or more delays, separated by spaces must be entered. Each time you click Good during review, the card moves to the next step. Each time you click Again, the card goes back to the first step.
For example, let’s say that your learning steps are 1m 10m 1d.
- When you click Again, the card goes through the first step, and is shown again 1 minute later.
- When you click Good on a new card or after the 1 minute step, it moves to the next step, and is shown again in 10 minutes.
- When you click Good on a card after the 10 minute step, it is delayed until the next day.
- When you click Good on the card the next day, it graduates and becomes a review card. The card is shown again after the delay configured by the graduating interval.
The Hard button works differently depending on which step you’re on.
- When you’re on the first step, the Hard button shows a delay of
6m. The6mdelay is the average of first two steps:1mand10m.- Exception: When there’s only one learning step, the Hard button shows a delay 1.5 times that step. This delay is at most 1 day longer than the learning step.
- When you’re on any other step, the Hard button repeats that step.
If there’s nothing else to study, Anki will show learning cards up to 20 minutes early by default. To turn this off or change the amount of time to look ahead, see Preferences.
Day Boundaries
Anki treats small steps and steps that cross a day boundary differently. With small steps, the cards are shown as soon as the delay has passed, in preference to review cards and new cards. This is done so that you can answer the card as closely to your requested delay as possible. In contrast, if the step crosses a day boundary, the delay is automatically converted to days. For example, if next day starts after 5 hours and the delay is 6 hours, Anki converts the delay to 1 day.
Graduating Interval
The number of days to wait before showing a card again, after the Good button is used on the final learning step. This means that it is the first interval after the learning card graduates. Please see the example from earlier in this section.
Easy Interval
The number of days to wait before showing a card again, after the Easy button is used on it.
The Easy button turns learning cards into a review cards regardless of which step you’re on, and assigns them the delay you have configured in this option. Easy interval should always be at least as long as the graduating interval, and typically a few days longer.
Insertion Order
Controls whether Anki should add new cards into the deck randomly, or sequentially. When you change this option, Anki will re-sort the decks in the current preset.
On recent Anki versions, you should leave this option set to Sequential, and adjust the display order instead.
Lapses
When you click Again on a review card, it is called a lapse. The options listed here affect such lapsed cards.
Relearning Steps
The same as learning steps, but for lapsed cards. When you fail a review card (press Again), the card goes through relearning steps, before it becomes a review card again.
If you leave the steps blank, the card will skip relearning, and will be assigned a new interval of 1 day by default.
Minimum Interval
Specifies a minimum number of days a card should wait after it finishes relearning. The default is one day, meaning once relearning is finished, it will be shown again the next day.
Leeches
Control the way Anki handles leeches. For details, see the leeches section.
Display Order
The options in this section are taken from the deck you select to study, not the deck of the currently displayed card.
Some further information about display order is available in the studying section.
New Card Gather Order
Controls how Anki gathers new cards from a deck. The options are:
-
Deck: Gathers cards from each subdeck in order, starting from the top. Cards from each subdeck are gathered in ascending position. If the daily limit of the selected deck is reached, gathering may stop before all subdecks have been checked. This order is fastest in large collections, and allows you to prioritize subdecks that are closer to the top.
Decks/subdecks are always ordered alphabetically, so you can give them a numeric prefix like 001 to control the order they appear in. You can also use
_and~as a prefix to place items at the top or bottom.Although position order depends initially on the insertion order option, you can manually reposition cards in different ways.
-
Deck, then random notes: Gathers cards from each subdeck in order, starting from the top. Cards from each subdeck are gathered from randomly selected notes.
-
Ascending position: Gathers cards by ascending position (due #), which is typically the oldest-added first.
-
Descending position: Gathers cards by descending position (due #), which is typically the latest-added first.
-
Random notes: Gathers cards from randomly selected notes.
-
Random cards: Gathers cards in a random order.
New Card Sort Order
Controls how the new cards are sorted after they have been gathered. The options are:
-
Card type, then order gathered: Shows cards in order of card type number. Cards of each card type number are shown in the order they were gathered. If you have sibling burying disabled, this ensures all front→back cards are seen before any back→front cards. This order is useful if you don’t want sibling cards to appear too close to each other.
-
Order gathered: Shows cards exactly as they were gathered. If sibling burying is disabled, this typically results in all sibling cards appearing one after the other.
-
Card type, then random: Shows cards in order of card type number, but shuffles the cards of each card type number. This order is useful if you don’t want sibling cards to appear too close to each other, but still want the cards to appear in a random order.
-
Random note, then card type: Picks notes at random, then shows all of their siblings in order.
-
Random: Fully shuffles the gathered cards.
New/Review Order
Whether new cards should be mixed in with review cards, shown before them, or shown after them.
Interday Learning/Review Order
Whether (re)learning cards that cross a day boundary should be mixed in with review cards, shown before them, or shown after them. Because learning cards tend to be harder than review cards, some users prefer to see them at the end (getting the easy stuff done first), or at the start (allowing more time to review forgotten ones).
Review Sort Order
Controls how the review cards are sorted. The options are:
-
Due date, then random: The default order prioritizes cards that have been waiting longer, and it’s the recommended order when you are up to date, or when you only have a small backlog. If you have taken an extended break or have fallen behind in your reviews, you may want to consider changing the sort order temporarily.
-
Due date, then deck: This also prioritizes cards that have been waiting longer, and then shows review cards for each subdeck in turn.
-
Deck, then due date: Shows review cards for each subdeck in turn. This order is generally not recommended, as having material appear consistently in the same order makes it easier to guess the answer based on context, and leads to weaker memories.
-
Ascending intervals: Shows cards with shorter intervals first.
-
Descending intervals: Shows cards with longer intervals first.
-
Ascending ease: Shows more difficult cards first.
-
Descending ease: Shows less difficult cards first.
-
Relative overdueness: Shows cards that you’re more likely to have forgotten first. This is generally recommended if you have a large backlog that may take some time to get through, and you want to reduce the chances of forgetting more cards.
When using the SM-2 algorithm, overdueness is determined by comparing how overdue cards are, and how long their interval is. For example, a card with a current interval of 5 days that is overdue by 2 days, will display before a card with a current interval of 10 days that is overdue by 3 days.
When FSRS is enabled, this sort order is removed; the FSRS equivalent is Ascending retrievability, which is calculated based on each card’s retrievability (probability of recall) and the desired retention in the preset.
Burying
When Anki gathers cards, it first gathers intraday learning cards, then interday learning cards, then review cards, and finally new cards. This affects how burying works:
- If you have all burying options enabled, the sibling that comes earliest in that list will be shown. For example, a review card will be shown in preference to a new card.
- Siblings later in the list can not bury earlier card types. For example, if you disable burying of new cards, and study a new card, it will not bury any interday learning or review cards, and you may see both a review sibling and new sibling in the same session.
The options are:
- Bury new siblings: Whether other new cards of the same note (e.g. reverse cards, adjacent cloze deletions) will be delayed until the next day.
- Bury review siblings: Whether other review cards of the same note will be delayed until the next day.
- Bury interday learning siblings: Whether other learning cards of the same note that crossed a day boundary will be delayed until the next day.
For more info about burying cards, please see this section of the manual.
Audio
-
Don’t play audio automatically: By default, Anki automatically plays any audio you have on cards. If you turn on this option Anki will not play audio until you press the replay audio key, R or F5.
-
Skip question when replaying answer: Controls whether audio from the question side is played when you use replay action on the answer side. Note that, Anki does not automatically play audio from the
{{FrontSide}}field. This option does not influence the behaviour of automatic play.
Timers
Anki monitors how long it takes you to answer each card, so that it can show you how long was spent studying each day. The time taken does not influence scheduling.
Internal Timer
- Maximum answer seconds: The default limit is 60 seconds. If you take longer than that, Anki assumes you have walked away from your computer or have been distracted, and caps the recorded time at 60 seconds, so that you don’t end up with inaccurate statistics.
- This internal timer runs from when the question is shown until you press a button to grade your answer. If you consistently spend longer than 60 seconds on a card, you may want to consider either raising this limit, or even better, making your cards simpler.
On-screen Timer
- Show on-screen timer: On the Study screen, show a timer that counts the time you’re taking to study each card. (This timer will stop when it reaches the Maximum answer seconds set for the internal timer.)
- Stop on-screen timer on answer: Whether the on-screen timer should continue running from when you show the answer until you press a button to grade your answer. This option does not impact the time that is recorded for your statistics.
Auto Advance
Requires Anki 23.12 or later. Auto Advance allows you to automatically take some actions after a certain amount of time has passed. To use it, you must first set a non-zero time in Seconds to show question for and/or Seconds to show answer for. Then, in the study screen, use the Auto Advance action from the More button to start advancing.
Easy Days
If you want to spend less time on Anki on some days of the week, such as Sundays, this feature can help you do that. After the interval is calculated, it will be adjusted by a small amount to change the due date. Note that setting all days to “Reduced” or “Minimum” will result in the same workload as setting all days to “Normal”. This feature works with both FSRS and the legacy SM-2 algorithm. Changing your Easy Days configuration doesn’t retroactively change existing intervals and will only affect future intervals. Simply put, you will not see immediate changes in the number of due cards.
FSRS
The Free Spaced Repetition Scheduler (FSRS) is an alternative to Anki’s legacy SuperMemo 2 (SM-2) algorithm. By more accurately determining how much information you are likely to forget, it can help you remember more material in the same amount of time.
When you turn on FSRS, some new options become available, and SM-2 specific options, such as Graduating interval, Easy bonus, etc. are hidden. This option is shared by all presets.
Before Enabling
- Please ensure all of your Anki clients support FSRS. Anki 23.10, AnkiMobile 23.10, and AnkiWeb all support it. AnkiDroid supports it in 2.17+. If one of your clients doesn’t support it, things will not work correctly.
- If you previously used the “custom scheduling” version of FSRS, please make sure you clear out the custom scheduling section before enabling FSRS.
A Short Guide
- Enable FSRS under the “FSRS” section, at the bottom of the deck options page. FSRS can only be enabled globally; you cannot enable it for some presets and disable it for others.
- Ensure that all your learning and re-learning steps are shorter than 1d and can be completed on the same day. 23h is not recommended even though it’s less than one day because you won’t be able to finish this step on the same day as your first review. Steps such as 10m or 30m are good.
- Click the “Optimize” button under the “FSRS parameters” field. If you see a message that says “The FSRS parameters currently appear to be optimal”, that’s fine.
- Choose a value of desired retention: the proportion of cards recalled successfully when they are due. This is the most important setting in FSRS. Higher retention leads to shorter intervals and more reviews per day. The default is 90%, which offers a good balance of retention and workload. Above 90% the workload increases very quickly, and above 97% the workload can be overwhelming. You can use “Compute minimum recommended retention” to help you choose the value of desired retention. Parameters and desired retention are preset-specific, you can make multiple presets with different parameters and desired retention.
FSRS can adapt to almost any habit, except for one: pressing “Hard” instead of “Again” when you forget the information. When you press “Hard”, FSRS assumes you have recalled the information correctly (though with hesitation and a lot of mental effort). If you press “Hard” when you have failed to recall the information, all intervals will be unreasonably high. So, if you have this habit, please change it and use “Again” when you forget the information.
Regarding add-on compatibility, as a general rule of thumb, if an add-on affects intervals and scheduling in some way, it shouldn’t be used with FSRS.
Desired Retention
Desired retention controls how likely you are to remember cards when they are scheduled for a review.
The default value of 0.90 will schedule cards so you have a 90% chance of remembering
them when they come up for review again. This should normally translate to remembering around 90% cards when they are reviewed, and only failing around 10%.
Here is a graph that shows how adjusting this value will affect your workload:

The exact shape of the graph is different for everyone. However, there are two patterns that hold true for all:
-
As desired retention approaches 1.0, the workload increases drastically. Imagine you have a card with a 90% chance of remembering it after 100 days. If your desired retention is
0.90, you’ll review the card again in 100 days. But if your desired retention is0.95, you’ll need to review it after 46 days instead. This means that the intervals of your cards almost halve at0.95desired retention and you need to review cards twice as frequently compared to0.90desired retention. At0.97, the interval will be 27 days (you’ll have to review your cards 3.7x as frequently). At0.99, the interval will be only 9 days (you’ll have to review your cards more than 10x more frequently than with the defaults). -
As desired retention decreases, you’ll forget a greater percentage of your cards, and those cards will need to be reviewed again. Eventually, you’ll get to a point where the forgotten cards contribute more to your workload than you gain from the longer delays. Also, keep in mind that forgetting material frequently is demotivating.
For these reasons, we suggest you be conservative when adjusting this
number, and recommend you keep it lower than 0.97 and higher than the minimum recommended retention.
FSRS Parameters
FSRS parameters affect how cards are scheduled. Do not change the parameters manually or copy them from someone else.
Optimize FSRS Parameters
The FSRS optimizer uses machine learning to learn your memory patterns and find parameters that best fit your review history. To do this, the optimizer requires several reviews to fine-tune the parameters.
When you click the Optimize button, FSRS will analyze your review history, and generate parameters that are optimal for your memory and the content you’re studying. If you have decks that vary wildly in subjective difficulty, it is recommended to assign them separate presets, as the parameters for easier decks will be different from harder decks. There is no need to optimize your parameters frequently: once every month is sufficient.
By default, parameters are calculated from the review history of all decks using the current preset. You can optionally adjust the search before optimizing the parameters, if you’d like to change which cards are used for optimization.
You can also optimize the parameters for all of your presets at once by clicking on Optimize All Presets.
Evaluate FSRS Parameters
You can use the Evaluate button to see metrics that show how well the parameters fit your review history. Smaller numbers indicate a better fit to your review history.
Log loss doesn’t have an intuitive interpretation. RMSE (bins) can be interpreted as the average difference between the predicted probability of recalling a card (R) and the actual probability measured from your review history. For example, RMSE=5% means that, on average, FSRS is off by 5% when predicting R. You don’t need to understand these metrics to use FSRS.
Note that log loss and RMSE (bins) are not perfectly correlated, so two decks may have similar RMSE values but very different log-loss values, or the other way around.
By default, log loss and RMSE (bins) are calculated from all decks using the current preset. You can optionally adjust the search before evaluating the parameters, if you’d like to change which cards are used for evaluation.
Reschedule Cards on Change
This option controls whether the due dates of cards will be changed when you enable FSRS, change desired retention, or change the parameters. The default is not to reschedule cards: future reviews will use the new scheduling, but there will be no immediate change to your workload. If rescheduling is enabled, the due dates of cards will be changed. Depending on your desired retention, it will often result in a large number of cards becoming due, so this option is not recommended when first switching from SM-2.
Use this option sparingly, as it will add a review entry to each of your cards, and increase the size of your collection.
If you’re first switching from SM-2 and still wish to use this option, we recommend you first create a backup, enable FSRS with rescheduling, and then if needed, you can undo or restore from the backup.
Compute Minimum Recommended Retention
Compute minimum recommended retention (CMRR) attempts to find the desired retention value that leads to the most material learned, in the least amount of time. The calculated number can serve as a reference when deciding what to set your desired retention to. You may wish to choose a higher desired retention, if you’re willing to trade more study time for a greater retention rate. However, setting your desired retention lower than the minimum is not recommended, as you’ll spend more time studying than necessary, due to increased forgetting.
The Simulator
You can use the simulator to get an estimate of your workload, either in reviews per day or in minutes of studying per day.
- Days to simulate controls the duration of the simulated study history.
- Additional new cards to simulate controls whether the simulator should simulate more cards than this preset already has. For example, if you currently have 100 cards under this preset, and you set Additional new cards to simulate to 50, the simulator will simulate a total of 150 cards. This can be useful if you plan to create more new cards in the future.
- New cards/day and Maximum reviews/day control how many new cards will be learned each day and the maximum number of reviews per day.
- Maximum interval controls the maximum interval length (in days).
To make the simulation as realistic as possible, the simulator takes into account the real memory states (difficulty, stability, retrievability) of your cards. It also uses your FSRS parameters and the value of desired retention, therefore changing them will affect the simulation.
Learning and Relearning Steps
(Re)learning steps of 1 day or greater are not recommended when using FSRS. The main reason they were popular with the legacy SM-2 algorithm is because repeatedly failing a card after it has graduated from the learning phase could reduce its ease a lot, leading to what some people called “ease hell”. This is not a problem that FSRS suffers from. By keeping your learning steps under a day, you will allow FSRS to schedule cards at times it has calculated are optimal for your material and memory. Another reason not to use longer learning steps is because FSRS may end up scheduling the first review for a shorter time than your last learning step, leading to the Hard button showing a longer time than Good.
We also recommend you keep the number of learning steps to a minimum. Evidence shows that repeating a card multiple times in a single day does not significantly contribute to long-term memory, so your time is better spent on other cards or a shorter study session.
In the latest version of Anki you can let FSRS control short-term scheduling by leaving the (re)learning steps field empty. This is an experimental feature. Note that just because FSRS-5 can give you intervals shorter than one day doesn’t necessarily mean that it will. Your Again interval can be one day long, or even longer.
Add-On Compatibility
Some add-ons can cause conflicts with FSRS. As a general rule of thumb, if an add-on affects a card’s intervals, it shouldn’t be used with FSRS. A list of commonly used add-ons and their FSRS compatibility can be found in Add-on Compatibility.
More
Several frequently asked questions about FSRS have been answered in its FAQ.
For more info on FSRS, please check:
Advanced
Maximum Interval
The maximum number of days a review card will wait before it’s shown again. When reviews have reached the limit, Hard, Good and Easy will all give the same delay. The shorter you set this, the greater your workload will be. The default is 100 years; you can decrease this to a smaller number if you’re willing to trade extra study time for higher retention.
Historical Retention
This setting is hidden unless FSRS is turned on.
When some of your review history is missing, FSRS needs to fill in the gaps. By default, it will assume that when you did those old reviews, you remembered 90% of the material. If your old retention was appreciably higher or lower than 90%, adjusting this option will allow FSRS to better approximate the missing reviews.
Your review history may be incomplete for two reasons:
- Because you’re using the Ignore cards reviewed before option.
- Because you previously deleted review logs to free up space, or imported material from a different SRS program.
The latter is quite rare, so unless you’re using the former option, you probably don’t need to adjust this setting.
Ignore Cards Reviewed Before
If set, cards reviewed before the provided date will be ignored when optimizing FSRS parameters. This can be useful if you imported someone else’s scheduling data, or have changed the way you use the answer buttons.
Starting Ease
Controls the ease that cards start out with. It is set when a card graduates from learning for the first time. It defaults to 2.50, meaning that once you have finished learning a card, answering Good on subsequent reviews will increase the delay by approximately 2.5x (e.g. if the last delay was 10 days, the next delay would be around 25 days). Based upon how you rate the card in subsequent reviews, the ease may increase or decrease from its starting value.
Easy Bonus
An extra multiplier applied to the interval when a review card is answered Easy. With the default value of 1.30, Easy will give an interval that is 1.3 times the Good interval (e.g. if the Good interval was 10 days, the Easy interval would be around 13 days).
Interval Modifier
An extra multiplier that is applied to all reviews. At its default of 1.00 it does nothing. If you set it to 0.80, intervals will be generated at 80% of their normal size (so a 10 day interval would become 8 days). You can thus use the multiplier to to make your reviews less or more frequent.
For moderately difficult material, the average user should find they remember approximately 90% of mature cards when they come up for review. You can find out your own performance by opening the graphs/statistics for a deck and looking at the Answer Buttons graph - mature retention is the correct% on the right side of the graph. If you haven’t been studying for long, you may not have any mature cards yet. As performance with new cards and younger cards can vary considerably, it’s a good idea to wait until you have a reasonable amount of mature reviews before you start drawing conclusions about your retention rate.
On the SuperMemo website, they suggest that you can find an appropriate multiplier for a desired retention rate. Their formula boils down to:
log(desired retention%) / log(current retention%)
Imagine we have a current retention rate of 85% and we want to increase it to 90%. We’d calculate the modifier as:
log(90%) / log(85%) = 0.65
You can use Google to calculate this.
If you enter the resulting 65% into the interval modifier, you should find over time that your retention moves closer to your desired retention.
One important thing to note however is that the trade-off between time spent studying and retention is not linear: we can see here that to increase our retention by 5 percentage points, we would have to study 35% more frequently. If the material you are learning is very important then it may be worth the extra effort – that is, of course, something you will need to decide for yourself. If you are simply worried that you are forgetting too much, then you may find investing more time at the initial learning stage, or using mnemonics will give you more gain for less effort.
One final thing to note is that Anki forces a new interval to be at least 1 day longer than it was previously, so that you do not get stuck reviewing with the same interval forever. If your goal is to repeat a card once a day for multiple days, you can do that by setting more learning mode steps, instead of by adjusting this modifier.
Hard Interval
The multiplier applied when you use the Hard button. The percentage is relative to the previous interval, e.g. with a default of 1.20, a card with a 10-day interval will be given 12 days.
New Interval
The multiplier applied when you use the Again button on a review card. The default 0.00 means that a review card’s delay is reset to zero when you forget it (which then becomes 1 day after the minimum interval is applied).
If changed from the default, it is possible for forgotten cards to preserve part of their previous delay. For example, if a card had a 100 day interval, and you set the New Interval to 0.20, the new interval would be 20 days.
While preserving part of the interval may seem to make sense, SuperMemo has observed that preserving part of the delay can actually be counter-productive. For this reason, we recommend you leave it on the default setting.
Custom Scheduling
You can have more control over Anki’s scheduling of cards by using your own JavaScript in the custom scheduling field. This is a global option, so code entered here applies to every preset.
Here is an example custom scheduling script. Note that, for Qt5 versions of Anki, the code needs to be transpiled.
// print the existing states
console.log(
  JSON.stringify(states, null, 4)
);

// load the debugger if the web inspector is open
debugger;

// if the hard button is a learning step, make it
// a 123 minute delay
if (states.hard.normal?.learning) {
  states.hard.normal.learning.scheduledSecs = 123 * 60;
}

// apply the same change in a rescheduling filtered deck
if (states.hard.filtered?.rescheduling?.originalState?.learning) {
  states.hard.filtered.rescheduling.originalState.learning.scheduledSecs =
    123 * 60;
}

// increase ease factor by 0.2 when Easy used on a review
if (states.good.normal?.review) {
  states.easy.normal.review.easeFactor =
    states.good.normal.review.easeFactor + 0.2;
}
You can also see FSRS custom scheduling code as an example.
The various scheduling states of cards are described in SchedulingStates.
Syncing with AnkiWeb
- Intro Videos
- Setup
- Automatic Syncing
- Button Color
- Media
- Conflicts
- Merging Conflicts
- AnkiWeb Data Deletion
- Firewalls
- Proxies
AnkiWeb is a service that allows you to keep your collection synchronized across multiple devices, and to study online. Please sign up for a free account before following the steps below.
Intro Videos
For a quick introduction to syncing, please check out the syncing intro videos.
Setup
To start syncing your collection across devices, click the sync button (the top right one on the main screen, or press Y on your keyboard. You’ll be prompted for your AnkiWeb ID and password, which you created in the signup process.
When you synchronize your collection for the first time, Anki will ask you if you want to upload or download. If you have cards on your computer and your AnkiWeb account is empty, choose Upload to send your data to AnkiWeb. If you have cards on AnkiWeb from another device, and no cards on your computer, choose Download to replace the empty local collection with the cards that are on AnkiWeb. If you have different cards on both devices, more work is required to avoid losing data.
Once the initial one-way sync is completed, Anki will be able to merge changes from multiple locations with a few exceptions.
If you have multiple people using Anki on one machine and have created a profile for each user, each user will need to create their own AnkiWeb account to sync with. If you attempt to synchronize multiple profiles with a single AnkiWeb account, you will lose data.
Automatic Syncing
Once syncing is enabled, Anki will automatically sync each time your collection is closed or opened. If you would prefer to synchronize manually, you can disable automatic syncing in Anki’s preferences.
Button Color
The sync button will change to blue when a normal sync is required, and red when a full sync is required.
Media
You can watch a related video on this topic.
Anki will synchronize any sounds and images used by your notes. It will notice when media has been added, removed or replaced in your media folder, but will not notice if you have made edits to existing files. To get your edits synced, you need to add, remove or replace a file as well.
One-way syncs (where you’re prompted to upload or download) have no influence over how media syncs - media changes are always merged.
To prevent accidental data loss, deletions will only sync to other devices if they are made after media is fully in sync. If you delete files before your device is fully in sync, and the deleted files are already on AnkiWeb, they will be downloaded the next time you sync.
If you have accidentally deleted media files, and want to restore them, open the preferences and log out. The next time you sync, Anki will restore any deleted files, if they are available on AnkiWeb still.
If you’re running Anki off a USB flash drive, you should use an NTFS file system, as Anki may not be able to detect media changes on a FAT32 filesystem.
Conflicts
You can watch a related video on this topic.
Under normal circumstances, reviews and note edits can be merged, so if you review or edit on two different devices before syncing, Anki will preserve your changes from both locations. If the same card has been reviewed in two different locations, both reviews will be marked in the revision history, and the card will be kept in the state it was when it was most recently answered.
There are certain changes that Anki is unable to merge. These mainly relate to the format of notes: things like adding a new field, or removing a card template. When you perform an operation that can’t be merged, Anki will warn you, and give you the option of aborting the operation. If you choose to continue, you’ll be asked to choose whether to keep the local copy or the copy on AnkiWeb when your collection is next synchronized.
If certain problems are detected while syncing, it will also force a one-way sync. If you find this consistently happening, please post on our support site.
When a one-way sync is required, you need to choose whether you wish to keep the collection on your local device, or the collection on AnkiWeb. If changes have been made on both ends, only changes on one end can be preserved.
If you choose Upload, the content on your local device will be sent to AnkiWeb. You then need to sync your other devices, and choose Download to have them grab a copy of that content.
If you choose Download, it will replace any local changes you’ve made with the data that is on AnkiWeb.
Once all devices are in sync, future syncs will return to the normal behaviour of merging changes from both ends.
If you wish to force a full upload or download (for example, because you accidentally deleted a deck on one side and want to restore the deck rather than having its deletion synchronized), you can check the “On next sync, force changes in one direction” box in Tools > Preferences > Network, then sync as usual. (You’ll be given the option to choose which side you want to use.)
Forcing a one way sync only affects card syncing - media is synced as normal. If you have files that you want to remove from AnkiWeb, please ensure your client is fully in sync first. After syncing is up to date, any files you remove (e.g. via the Check Media function) will be removed from AnkiWeb on the following sync.
Merging Conflicts
Because the first sync can only sync changes in one direction, if you have added different content to different devices or profiles before setting syncing up, content on one device will be lost if you overwrite it with the content from the other device. With some work, it is possible to manually merge data into a single collection.
Start by taking a backup on each device/profile, in case something goes wrong. With the computer version you can use File > Export to export “all decks” with scheduling information and media files included, and save the file somewhere safe. In AnkiMobile, the Add/Export button on the decks list screen will let you export all decks with media.
Next, if one of your devices is a mobile device, synchronize it first. If there’s a conflict, choose Upload to overwrite any existing data on AnkiWeb with the data from your mobile device. If both devices/profiles are on your computer, synchronize the device/profile with the most number of decks first.
Now return to the other device/profile. If automatic syncing is enabled, a message may pop up asking if you want to upload or download. Click the cancel button - we don’t want to sync yet.
Once you’re looking at the deck list, click the cog icon next to the
first deck, and choose Export. Export the content with scheduling
information and media included, and save the .apkg file somewhere. Now
you’ll need to repeat this for each top-level deck.
Once all top-level decks have been exported, click the sync button at the top right, and choose Download, which will overwrite the local content with the content you synced from your other device.
You can now use File > Import to import the .apkg files you exported
earlier, which will merge the exported content with the existing
content, so everything will be in one place.
AnkiWeb Data Deletion
As AnkiWeb is a free service, we need to periodically delete unused account data to keep costs down. If you haven’t accessed your account or synced in the last 6 months, the data on your account might get deleted.
What Gets Deleted
Only your data stored on AnkiWeb is deleted. Your account itself will remain and can be used again.
Any cards you have stored on your computer, phone or tablet will remain on those devices. Items shared from your account, including decks and add-ons will also remain on AnkiWeb.
Returning to AnkiWeb
Once your deck data has expired, it is not possible for us to recover your data from AnkiWeb, but you may be able to recover it if you have a local copy or a backup.
Avoiding Data Deletion
Each time you visit ankiweb.net, or use the synchronization feature in Anki, AnkiMobile or AnkiDroid, your account will automatically be marked as active.
If your account has been inactive for 6 months or more, and you used the service for a week or longer, we will send you an email notifying you that deletion is pending. If you’d like to keep your account active, please log in to ankiweb.net and study a card, or sync one of your devices within 30 days.
Firewalls
Anki needs to be able to make outbound HTTPS connections to sync. It must be able to connect to ankiweb.net, sync.ankiweb.net, sync2.ankiweb.net, and so on. These domains may change over time, and the IP addresses they point to may also change, so we recommend you allow wildcard access to *.ankiweb.net to reduce the chance of the firewall rules needing to be updated in the future.
If you have a firewall on your machine, you should add an exception for Anki. If you are on a work or school network, please contact your network administrator for assistance - it is not something we can help you with.
Proxies
If you need a proxy to access the internet, Anki should automatically pick up your system proxy settings if you’re on Windows or macOS, and will honour the HTTP_PROXY environment variable if you’re on another platform.
Anki will only be able to pick up your system settings if a proxy is manually configured, and does not require a password. If your system uses automatic proxy setup, or uses a proxy that requires a username and password, you will need to manually tell Anki the proxy configuration.
To tell Anki your proxy settings, define a HTTPS_PROXY environmental variable that points to the proxy server. It will look like:
http://user:pass@proxy.company.com:8080
If your username or password contains an @ (e.g user@workdomain.com),
you need to change it to %40, like so:
http://user%40workdomain.com:pass@proxy.company.com:8080
Anki 2.0 expects to find HTTP_PROXY instead of HTTPS_PROXY.
To set environmental variables on Windows, please see https://www.google.com/search?q=windows+set+environmental+variable
If you’re on a Mac, please see http://stackoverflow.com/questions/135688/setting-environment-variables-in-os-x
Heavily locked down networks that intercept secure connections and present their own certificates may cause Anki to throw up SSL errors. In such environments, you may be able to work around the errors using this add-on.
An alternative solution is to install a local proxy server, and point that proxy server at your normal proxy server. You can then tell Anki to use the local proxy, which will redirect requests to the proxy you normally use.
Profiles
If more than one person wants to use Anki on your computer, you can set up a separate profile for each user. Each user profile has their own collection, and own program settings. Add-ons are shared across profiles. Profiles are configured by going to the File menu and choosing “Switch Profile”.
Only a single profile can be synced to an AnkiWeb account. If you have different users on your computer, each user will need to set up a separate AnkiWeb account for their profile. If you attempt to link two or more profiles to the same AnkiWeb account, you will overwrite the data from one profile with the data from the other.
Profiles are primarily intended to be used by different people, and are not recommended for splitting up your own content. If you have created multiple profiles for yourself, the best option is to merge them into a single profile. You can do so by exporting one deck from profile A, and then importing it into profile B, repeating for any other decks in profile A, until everything is in profile B.
AnkiDroid does not support profiles.
Profiles window
From the Profiles window (accessible via File>Switch Profile from the main window), you can:
- Open / Add / Rename / Delete user profiles.
- Quit the program.
- Restore an automatic backup.
- Downgrade your collection, which is necessary if you want to open it with an earlier Anki release. If you skip this step, you may get an error message when opening your collection in an older Anki version, and you will need to return to this version, downgrade, then try again.
Browsing
- Table Modes
- Sidebar
- Search Box
- Card/Note Table
- Editing Area
- Menus and Actions
- Find and Replace
- Finding Duplicates
The Browse window allows you to search through your cards and notes, and edit them. It is opened by clicking Browse in the main window, or by pressing B. It is comprised of three sections: the sidebar on the left, the card/note table on the top right, and the editing area on the bottom right. By positioning the mouse between two sections, it is possible to click and drag to expand one section and shrink the other.
Table Modes
Anki 2.1.45+ offers two modes: either cards or notes are shown in the data table. You can change the current mode by clicking the switch at the top, to the left of the search area, or pressing Ctrl+Alt+T or Cmd+Opt+T. The switch also indicates if Cards or Notes are currently shown.
Note: For the sake of simplicity, this manual generally assumes the Cards mode to be the active one. Whenever selecting/finding/etc. “cards” is mentioned, the reader may substitute it for “cards or notes depending on the active mode”.
Sidebar
The sidebar on the left allows quick access to common search terms. On Anki 2.1.45+, it also provides a searchbar, facilities to edit tags and decks, and a choice of two different tools, which are discussed in the following sections. You can switch tools using the toolbar at the top of the sidebar or the shortcuts Alt+1/2.
Search Tool

With this tool, the sidebar behaves as in previous versions: Clicking on an item will search for it.
You can hold down Ctrl (Command on Mac) while clicking in order to append the clicked item to the current search with an AND condition, instead of starting a new search. If you wanted to show learning cards that were also in the German deck for instance, you could click on “Learning”, then Ctrl-click on “German”.
You can hold down Shift to create an OR search instead of an AND. For example, you could click one deck, then Shift-click another to show cards from either of the decks in the same view.
You can hold down Alt (Option on Mac) in order to reverse the
search (prepend a -): for example, to show all cards in a current deck that
do not have a certain tag. Alt/Option can be combined with
either Ctrl or Shift (e.g. clicking with Ctrl+Alt
will result in adding a new search term that is negated).
On Anki 2.1.39+, you can also hold down both Ctrl and
Shift together when clicking a search term to replace all occurrences of the
same kind of search with the new one.
Let’s say you had previously typed in a complicated search expression like
deck:Swahili (is:due or tag:important)
and now want to perform the same search for your Urdu deck. You can hold down
Ctrl+Shift while clicking the Urdu deck in the sidebar to obtain the
following search expression:
deck:Urdu (is:due or tag:important).
Selection Tool
The Selection tool allows for selecting multiple items at the same time by holding down Ctrl or Shift while clicking. It also enables drag-and-drop to reorder decks and tags.
Here is an example: Say you have the tags Math, Calculus, and Algebra.
Click on the Calculus tag, then Ctrl-click on the Algebra tag. Now both
tags are selected, click and drag any of the two onto the Math tag to make them
both children of this tag. Behind the scene, Anki has renamed the two tags to
Math::Calculus and Math::Algebra respectively and updated your notes accordingly.
Another use case for selecting multiple items is searching: If you right-click on a selection of items, you can choose Search > All/Any Selected. This can be combined with keyboard modifiers as described in Search Tool to append the resulting search to the current search.
Saved Searches
If you regularly search for the same thing, you can save the current search by right-clicking the topmost item in the sidebar, choosing “Save Current Search” and typing in a name. You can also drag and drop any sidebar item onto this area to add an equivalent saved search, effectively pinning it at the top.
Editing Items
You can delete or rename tags, decks, and saved searches directly from the sidebar, from the right-click menu, or by using a shortcut key (Del and F2 on Windows). Deletion even works for multiple items at once (see Selection Tool).
Finding Items
To find a certain item in the sidebar tree, type part of its name into the searchbar at the top.
Search Box
Above the card list is a search box. You can type in various things there to search for cards. For information on the search syntax, see Searching.
Card/Note Table
The table’s rows represent cards or notes that match the current search. When you click on a row, the corresponding note will be shown in the bottom section.
Rows
If you drag the mouse or hold Ctrl or Command to select multiple rows, the editor will be temporarily hidden. Various operations (such as changing the deck) can operate on multiple cards or notes at once, independent of the active mode. Therefore in Cards mode, a note is considered to be selected if any of its cards is selected, and in Notes mode, a card is considered to be selected if its note is selected.
Other operations (like showing card information) only operate on a single card or note. This is called the current card or note, which is usually the one that was last selected or clicked. In Cards Mode, again, the current note is the note of the current card and in Notes mode, the current card is the first card of the current note.
The background colour will change depending on the card and note. In Cards mode, the first match will be used:
- if the card is flagged, use the flag colour,
- if the card is suspended, yellow,
- if the card’s note is marked, purple.
In Notes mode, colour is only applied to marked notes.
For more information about marked notes and suspended cards, see Editing and More.
Columns
The columns are configurable: right click on one (or Ctrl-click on a Mac) to choose which columns you’d like to see. You can drag columns to reorder them. Clicking on a column will sort by that column; click again to reverse the sort order. Note that you cannot sort by the Question and Answer columns.
All columns are available for both Cards and Notes mode but sometimes with slightly different names and data. The following table lists the behaviours for both modes.
| Column | Cards mode | Notes mode |
|---|---|---|
| Answer | The back side of the card in one line with the question stripped. You can also choose a custom format in the card type editor instead. | The same as in Cards mode, only for the first card of the note. |
| Card(s) | The name of the card’s template. | The number of cards the note has. |
| Card Modified | The last time changes were made to the card (e.g. when you reviewed the card and the review history and interval were updated). | The last time changes were made to one of the note’s cards. |
| Created | The same as in Notes mode for the card’s note. | The date the note was created. |
| Deck | The name of the deck the card is in. | The number of different decks the note’s cards are in, or the deck name if all cards are in the same deck. |
| Due | The due date for cards in review or (re)learning, and the position in the new card queue for new cards. The line is wrapped in brackets if the card is suspended or buried. Sorting is done by type and only then by date or position. | The due date for the note’s next due review or (re)learning card that is not suspended, buried or in a filtered deck. |
| (Avg.) Ease | The card’s ease if it is not new. | The average ease for the note’s cards that are not new. |
| (Avg.) Interval | The card’s interval if the card is in review or relearning. | The average interval for the note’s cards that are in review or relearning. |
| Lapses | How often the card was rated “Again”. | The total lapses for all cards of the note. |
| Note | The same as in Notes mode for the card’s note. | The name of the note’s note type. |
| Note Modified | The same as in Notes mode for the card’s note. | The last time the note (e.g. the content of a field) was edited. |
| Question | The front side of the card in one line. You can also choose a custom format in the card type editor instead. | The same as in Cards mode, only for the first card of the note. |
| Reviews | How often the card has been reviewed. | The total review count for all cards of the note. |
| Sort Field | The same as in Notes mode for the card’s note. | The content of the note’s field that is defined as the note type’s sort field. Only this one field can be displayed and sorted by. You can change the sort field by clicking Fields… in the editing area. |
| Tags | The same as in Notes mode for the card’s note. | The note’s tags. |
Editing Area
The bottom right area displays the note of the currently selected row. For more information about cards and notes, see Getting Started. For more information on formatting buttons, see Editing.
You can see a preview of what the currently selected card would look like when reviewing by clicking the Preview button at the top of the editing area. Note that this will not display any type-the-answer fields on your cards, which makes it easier to preview the cards quickly. In Notes mode, the preview is shown for the first card of the selected note.
Menus and Actions
At the top of the browser window, you find a toolbar with various menus which in turn offer various actions that can be performed in the browser.
Edit
| Name | Action |
|---|---|
| Undo | Revert the most recently performed operation. |
| Select All | Select all rows displayed. |
| Select Notes | Show only the currently selected notes and select all rows. |
| Invert Selection | Select those rows not selected, and deselect the currently selected rows. |
| Create Filtered Deck | Show the filtered deck dialog and set the current browser search as a filter. Use Alt / Option to set the second filter instead. |
Notes
Most of the following actions operate on the selected notes. They are also available through a context menu when a selected row is right-clicked in Notes mode. In Cards mode, they can be found in a submenu of the context menu.
| Name | Action |
|---|---|
| Add Notes | Open the Add dialog. |
| Create Copy | Open a duplicate of the current note in the editor, which can be slightly modified to easily obtain variations of your cards. By default, the duplicate card will be created in the same deck as the original. |
| Export Notes | Open the Export dialog. |
| Add Tags | Add provided tags to all selected notes. |
| Remove Tags | Enter tags and remove them from all selected notes. |
| Clear Unused Tags | Remove all tags from the sidebar that are not used by any notes. |
| Toggle Mark | If the current note is marked (i.e., has the Marked tag), unmark all selected notes. If the current is not marked, mark all selected notes. |
| Change Note Type | Convert the selected notes from one type to another. For example, imagine you have a Russian note type and a Computer note type, and you accidentally added some computer-related text into a Russian note. You can use this option to fix that mistake. The scheduling of cards is not affected. Changing the type of a note requires a one-way sync. |
| Find Duplicates | Open the Duplicates dialog. |
| Find and Replace | Open the Find and Replace dialog. |
| Manage Note Types | Open the Note Types dialog. |
| Delete | Delete all selected notes and their cards. It is not possible to remove individual cards, as individual cards are controlled by the templates. |
Cards
The following actions operate on the currently selected cards. They are also available through a context menu when a selected row is rightclicked in Cards mode. In Notes mode, they can be found in a submenu of the context menu.
| Name | Action |
|---|---|
| Change Deck | Move currently selected cards to a different deck. |
| Set Due Date | Turns cards into review cards if they are new, and makes them due on a certain date. This can be useful for moving cards forward or back a few days when your study schedule is interrupted. Entering a range like 60-90 will make the selected cards due between 60 and 90 days from now. New cards will have their interval set to the same delay, but review cards will be rescheduled without changing their current interval, unless an exclamation mark (!) is included at the end of the range. Note that the answer time is not recorded when manually scheduling cards, since the action can be performed even outside of review, and Anki isn’t aware of which card may or may not be shown at the time. |
| Reset | Move currently selected cards to the end of the new queue. The existing review history is preserved. In 2.1.50+, there are options to restore the original card position, and to reset the card’s lapse and repetition counters. |
| Reposition | Change the order new cards will appear in. You can find out the existing positions by enabling the due column, as described in the table section above. If you run the reposition command when multiple cards are selected, it will apply increasing numbers to each card in turn. By default the number increases by one for each card, but this can be adjusted by changing the “step” setting. The Shift position of existing cards option allows you to insert cards between currently existing ones, pushing the currently existing ones apart. For instance, if you have five cards and you want to move 3, 4, and 5 between 1 and 2, selecting this setting would cause the cards to end up in the order 1, 3, 4, 5, 2. By contrast, if you turn this option off, 1 and 2 will get the same position number (and it will thus be unpredictable which of the cards with the same number comes up first). Please note that when enabled, any card with a higher position will be modified, and all of those changed cards will need to be sent the next time you sync. |
| Toggle Suspend | Suspend or unsuspend all selected cards, depending on whether the current card is suspended or not. |
| Flag | Toggle the flags of all selected cards. Whether a flag is added or removed depends on whether the current card has the chosen flag. |
| Info | Show various information about the current card, including its review history. For more information, see Card Info. |
Go
This menu exists to provide keyboard shortcuts to jump to various parts of the browser, and to go up and down the card list.
Find and Replace
This dialog allows for replacing text on notes. As described above, it is available from the toolbar and the table’s context menu.
The first input field is for the text that is going to be replaced, the second one for the replacement. Next, there is a dropdown menu that allows you to specify where Anki should look for text to replace: in a note’s tags (requires Anki 2.1.45+), in all fields, or just in a specific field (only fields belonging to a selected note will be listed).
By default, only selected notes will be affected. If you want to lift that restriction, you can untick the “selected notes only” checkbox (requires Anki 2.1.45+).
The regular expression option allows you to perform complex replacements. For example, assume there is the following text in a field:
<img src="pic.jpg" />
We use these settings:

(Note that on Anki versions prior to 2.1.28, you would need to replace ${1}
with \1.)
Then the assumed field content will change to:
pic.jpg
A full discussion on regular expressions is outside the scope of this document. There are a number of syntax guides available on the web:
- For Anki 2.1.28+, see https://docs.rs/regex/latest/regex/index.html#syntax.
- For older Anki versions, see http://docs.python.org/library/re.html.
Finding Duplicates
You can use the Notes > Find Duplicates option to search for notes that have the same content. When you open the window, Anki will look at all of your note types and present a list of all possible fields. If you want to look for duplicates in the Back field, you’d select it from the list and then click Search.
By default, it will search in all note types that have the field you provided. This differs from the duplicate check when you add cards manually, which is limited to a single note type.
The Optional filter text box allows you to narrow down where Anki will look for duplicates. If you only want to search for duplicates in the “French Vocab” and “French Verbs” note types, you would enter:
"note:french vocab" or "note:french verbs"
Or you might want to look only for duplicates in a particular deck, so you could use:
"deck:myDeck"
The search syntax is the same as used when searching in the browser. For more information, see Searching.
You can click one of the links in the search results list to display the duplicate notes in that set. If the search brings up a large number of duplicates, you may wish to instead click the Tag Duplicates button, which will tag all matching notes with duplicate. You can then search for this tag in the browser and handle them all from the same screen.
Filtered Decks & Cramming
- Custom Study
- Home Decks
- Creating Manually
- Order
- Steps & Returning
- Due Reviews
- Reviewing Ahead
- Rescheduling
- Catching Up
When you study a regular deck in Anki, only a limited number of cards are shown: the cards Anki thinks you are about to forget, and a daily limit of new cards. This is generally useful, as it ensures you don’t spend more time studying than necessary. But sometimes it can be useful to step outside of these normal limits, such as when you need to review for a test, focus on particular material, and so on. To make this possible, Anki provides a different type of deck called a “filtered deck”.
Filtered decks offer a lot of possibilities. They can be used for previewing cards, cramming cards before a test, studying particular tags, catching up on a backlog with a particular sort order, reviewing ahead of schedule, going over the day’s failed cards, and more.
Custom Study
The easiest way to create a filtered deck is with the Custom Study button, which appears at the bottom of the screen when you click on a deck. It offers some convenient preset filters for common tasks like reviewing the cards that you have failed that day. It will create a filtered deck called “Custom Study Session” and automatically open it for you.
If an existing “Custom Study Session” deck exists, it will be emptied before a new one is created. If you wish to keep a custom study deck, you can rename it from the deck list.
Here is a summary of each of the options:
Increase today’s new card limit
Add more new cards to the deck you are currently studying. Note that
unlike other options, this does “not” create a new filtered deck, it
modifies the existing deck.
Increase today’s review card limit
If not all reviews due today were shown because of the daily review limit,
this option allows you to show more of them. As with the new cards
option, this modifies the existing deck.
Review forgotten cards
Show all the cards, for which you’ve answered Again (1) within the number of days
you specify.
Review ahead
Show cards that will be due in the near future (the number of days you
specify). This is useful for working through some of your older cards
before a vacation, but it will not help with cards you have learned
recently. Please see the reviewing ahead section
below for more info.
Preview new cards
Show cards that you have recently added, without converting them to
review cards as they are answered.
Study by card state or tag
Select a certain number of cards from the current deck to study. You can
choose to select new cards only, due cards only, or all cards; after you
click “Choose Tags”, you can also limit the selected cards by tags. If
you wish to see all the cards in the deck (for instance, to study before
a big test), you can set the number of cards to more than the number of
cards in the deck.
Home Decks
When a card is moved to a filtered deck, it retains a link to the deck, from which it came. That previous deck is said to be the card’s “home deck”.
Cards automatically return to their home deck after they are studied in the filtered deck. This can be after a single review, or after multiple reviews, depending on your settings.
It is also possible to move all cards back to their home decks at once:
-
The “Empty” button in the study overview moves all cards in the filtered deck back to their home deck, but does not delete the empty filtered deck. This can be useful if you want to fill it again later (using the Rebuild button).
-
Deleting a filtered deck does the same thing as “Empty” does, but also removes the emptied deck from the deck list. No cards are deleted when you delete a filtered deck.
Creating Manually
Advanced users can create filtered decks with arbitrary search strings (or “filters”), instead of relying on the preset filters. To create a filtered deck manually, choose Create Filtered Deck from the Tools menu.
When you click the Build button, Anki finds cards that match the settings you specified, and temporarily moves them from their existing decks into your new filtered deck for study.
If you wish to fetch cards again using the same filter options (for instance, if you want to study all cards with a particular tag every day), you can use the Rebuild button at the bottom of the deck’s overview screen.
The search area controls what cards Anki will gather. All of the searches possible in the browser are also possible for filtered decks, such as limiting to tags, finding cards forgotten a certain number of times, and so on. Please see the searching section of the manual for more information on the different possibilities.
Filtered decks cannot pull in cards that are suspended, buried, or already in a different filtered deck. For this reason, a search in the browser may reveal cards that do not end up in the filtered deck.
The limit option controls how many cards will be gathered into the deck. The order you select controls both the order cards are gathered in, and the order they will be reviewed in. If you select “most lapses” and a limit of 20 for example, then Anki will show you only the 20 most lapsed cards.
The enable second filter option allows you to create a filtered deck comprised of two different searches, so that you can, for example, include due cards with one order, and a smaller amount of new cards with a different order.
Order
The “cards selected by” option controls the order that cards will appear in. If the maximum number of cards you select is lower than the number of cards that match the filter criteria, Anki will exclude the cards at the end of this sorted list first.
Oldest seen first
Display those cards first, that you haven’t seen in reviews for the longest
time.
Random
Randomize the order of all cards that match the filter criteria (use no
set order).
Increasing intervals
Display cards that have the smallest interval first.
Decreasing intervals
Display cards that have the largest interval first.
Most lapses
Display those cards first, that you have failed the most times.
Order added
Display cards that you added first (i.e. those cards that have the earliest
creation date).
Order due
Display cards with the earliest due date first.
Latest added first
Display cards that you have most recently added to the deck first.
(This is the opposite of “Order added”.)
Relative overdueness
Display cards that you’re most likely to have forgotten first. This is useful if
you have a large backlog that may take some time to get through, and you want to
reduce the chances of forgetting more cards.
When using the SM-2 algorithm, overduessness is determined by comparing how overdue cards are, and how long their interval is. For example, a card with a current interval of 5 days that is overdue by 2 days, will display before a card with a current interval of 10 days that is overdue by 3 days.
When using FSRS, overdueness is calculated based on on each card’s retrievability, and the desired retention in the deck preset.
Steps & Returning
By default, Anki will use the steps of a card’s home deck. If a new card would normally be reviewed twice when being learned, the same thing will happen when you study it in a filtered deck. To learn about how (re)learning steps work, see Deck Options section.
Cards return to their home deck when (re)learning is complete. Thus if you have 3 learning steps, a new card will return to its home deck upon three presses of “Good” or a single press of “Easy”.
Filtered decks with rescheduling disabled show 4 buttons. The Again, Hard, and Good buttons have configurable delays. The Easy button removes cards from the filtered deck.
Due Reviews
If the filtered deck includes cards that were due for review, they will be shown like they would have been in their original deck: they appear in the review card count at the bottom of the screen, and there are four choices for how well you remembered. Upon a correct answer, the card will be moved back to its home deck, and its next delay adjusted using the home deck’s settings. If you forget the card, it will be shown according to the relearning steps defined in the home deck.
Reviewing Ahead
If your search included cards that are not due, Anki will show the reviews ahead of time.
Anki uses a special algorithm for these reviews that takes into account how early you are reviewing. If the cards were almost due to be shown, they will be given a new delay similar to what they would have received if you had reviewed them on time. If the cards are reviewed soon after they were scheduled however, their new delay will be similar to their previous delay. This calculation works on a sliding scale.
Because reviewing a card shortly after it is scheduled has little impact on scheduling (e.g. a card due tomorrow with a one day interval will remain due tomorrow if reviewed early), the “review ahead” custom study setting is not appropriate for repeated use. If used to go through a week’s worth of cards before a trip, the mature cards will be rescheduled into the future and the new cards will remain at small intervals, because you don’t know them well enough for them to be rescheduled further. If you review ahead again the next day, all you’ll end up doing is going through those same new cards again, to little benefit.
Rescheduling
By default, Anki will return cards to their home decks with altered scheduling, based on your performance in the filtered deck.
To change this behaviour, turn off Reschedule cards based on my answers. When this is turned off, cards are shown in a simple “preview mode”, and when they are returned to their original deck, they are returned exactly as they started.
Catching Up
Filtered decks can be useful for catching up when you’ve fallen behind in your reviews. One Anki user describes the way they use the filtered decks to catch up as follows:
I did this for a backlog of 800 cards with filtered subdecks. Worked
very well for me.

Just Due filter with: "is:due prop:due>-7"

Over Due filter with: "is:due prop:due<=-7"

The Just Due deck will then contain cards that became due in the past
week. That's the deck you should study every day as it gets the cards
that become due regularly. With this you can study as if there weren't
any backlog.

The Over Due deck will contain your backlog — cards which you didn't
study in time. You can study them the same way you would study new
cards. They go back into the regular cards, so the number of overdue
will never grow as long as you keep your Just Due deck in check.

How long it takes depends on how many overdue cards you study each day
in addition to the ones that become due regularly. You can still motor
through them when you feel like it - or you can do a specific number per
day like you would for new cards. Up to you.
Searching
- Simple searches
- Limiting to a field
- Tags, decks, cards and notes
- Ignoring accents/combining characters
- Regular expressions
- Card state
- Flags
- Card properties
- Recent Events
- Matching special characters
- Object IDs
- Custom Data
- Other Searches
Anki’s Browse screen and the Filtered Deck feature use a common method of searching for specific cards/notes. This method can also be used to adjust the scope of FSRS optimization.
Simple searches
When you type some text into the search box, Anki finds matching notes and displays their cards. Anki searches in all fields of the notes, but does not search for tags (see later in this section to search for tags). Some examples:
dog
searches for “dog” - will match words like “doggy” and “underdog” too.
dog cat
finds notes that have both “dog” and “cat” on them, such as “raining
cats and dogs”.
dog or cat
finds notes with either “dog” or “cat”.
dog (cat or mouse)
finds notes with “dog” and “cat”, or “dog” and “mouse”.
-cat
finds notes without “cat”.
-cat -mouse
finds notes with neither “cat” nor “mouse”.
-(cat or mouse)
same as the above.
"a dog"
finds notes with the exact sequence of characters “a dog” in them, such
as “atta dog”, but not “dog a” or “adog”.
-"a dog"
finds notes without the exact sequence of characters “a dog” in them.
d_g
finds notes with d, <one character>, g, like dog, dig, dug, and so on.
d*g
finds notes with d, <zero or more characters>, g, like dg, dog, dung,
etc.
w:dog
searches for the word “dog” as opposed to a sequence of characters - will match “dog”, but not “doggy”
or “underdog”. Requires Anki 2.1.24+, AnkiMobile 2.1.61+, or AnkiDroid 2.17+. Note that
formatting changes may be interpreted as word boundaries, e.g. searching
for w:exam will match example, as the “exam” part of example is in bold format.
w:dog*
will match “dog” and “doggy”, but not “underdog”.
w:*dog
will match “dog” and “underdog”, but not “doggy”.
Things to note from the above:
-
Search terms are separated by spaces.
-
When multiple search terms are provided, Anki looks for notes that match all of the terms - an implicit
andis inserted between each term. On Anki 2.1.24+, AnkiMobile 2.0.60+, and AnkiDroid 2.17+ you can be explicit if you like (dog and catis the same asdog cat), but older Anki versions will treatandas just another word to search for. -
You can use
orif you only need one of the terms to match. -
You can prepend a minus sign (
-) to a term to find notes that don’t match the term. -
You can group search terms by placing them in parentheses, as in the
dog (cat or mouse)example. This becomes important when combining OR and AND searches — in the example, with the parentheses, it matches either “dog cat” or “dog mouse”, whereas without them it would match either “dog and cat” or “mouse”. -
Anki is only able to search within formatting in the sort field you’ve configured. For example, if you add “example” to one of your fields, with the “exa” part in bold, this will not be matched when searching for
exampleunless that field is the sort field. If a word is not formatted, or the formatting does not change in the middle of the word, then Anki will be able to find it in any field. -
Standard searches are case insensitive for Latin characters - a-z will match A-Z, and vice versa. Other characters such as Cyrillic are case sensitive in a standard search, but can be made case insensitive by searching on a word boundary or regular expression (
w:,re:).
Limiting to a field
You can also ask Anki to match only if a particular field contains some text. Unlike the previous search examples, searching in fields requires an exact match by default.
front:dog
finds notes with a Front field of exactly “dog”. A field that says “a
dog” will not match.
"animal front:a dog"
finds notes where the “Animal Front” field is exactly “a dog”. The double quotes are
mandatory: see later in this section.
front:*dog*
finds notes where the Front field contains dog somewhere.
front:
finds notes that have an empty Front field.
front:_*
finds notes that have a non-empty Front field.
front:*
finds notes that have a Front field, empty or not.
fr*:text
finds notes in a field starting with “fr”. Requires Anki 2.1.24+, AnkiMobile 2.1.60+, or AnkiDroid 2.17+.
Tags, decks, cards and notes
tag:animal
finds notes with the tag “animal”, or subtags like “animal::mammal”.
tag:none
finds notes with no tags.
tag:ani*
finds notes with tags starting with “ani”.
deck:french
find cards in a top-level deck called “French”, or its subdecks like “French::Words”. It will not match subdecks with that name, such as “Languages::French”.
deck:french::words
find cards in the “French::Words” subdeck.
deck:french -deck:french::*
finds cards in “French”, but not its subdecks.
deck:"french words"
searching when the deck name has a space.
"deck:french words"
same as earlier.
deck:filtered
filtered decks only.
-deck:filtered
normal decks only.
preset:"Default"
cards in all decks that use the “Default” deck options preset.
Requires Anki 23.10+, AnkiMobile 23.10+ or AnkiDroid 2.17+.
card:forward
finds cards created by a card type named “Forward”.
card:1
searches for cards by card type number, e.g. to find the second cloze
deletion for a note, you’d use card:2
note:basic
searches for cards created with a note type named “Basic”.
Ignoring accents/combining characters
Requires Anki 2.1.24+, AnkiMobile 2.0.60+ or AnkiDroid 2.17+.
You can use nc: (nc stands for “no combining”) to make Anki ignore combining characters. For example:
nc:uber
matches notes with “uber”, “über”, “Über” and so on.
nc:は
matches “は”, “ば”, and “ぱ”.
Searches that ignore combining characters are slower than regular searches.
Regular expressions
Anki 2.1.24+, AnkiMobile 2.0.60+ and AnkiDroid 2.17+ support searching in notes with “regular expressions”, a standard and powerful way of searching in text.
Start a search with re: to search using regular expressions. To make things easier, Anki will
treat the following as raw input, so bear in mind the rules listed there.
Some examples:
"re:(some|another).*thing"
finds notes that have “some” or “another” on them, followed by 0 or more characters, and then “thing”.
re:\d{3}
finds notes that have 3 digits in a row.
Regular expressions can also be limited to a specific field. Please note that unlike the normal searches in a specific field, regular expressions in fields don’t require an exact match:
front:re:[a-c]1
matches uppercase or lowercase a1, B1 or c1 that occurs anywhere in the “Front” field.
front:re:^[a-c]1$
same as the previous example, but will not match if any other text falls before or after a1/b1/c1.
Anki 2.1.50+ supports regular expressions for tags:
tag:re:^parent$
finds notes with the exact tag “parent”, disregarding any child tags like “parent::child”.
"tag:re:lesson-(1[7-9]|2[0-5])"
finds notes with tags “lesson-17” through “lesson-25”.
For more information on regular expressions, see this website.
Some things to be aware of:
- The search is case-insensitive by default; use
(?-i)at the start to turn on case sensitivity. - Some text like spaces and newlines may be represented differently in HTML - you can use the HTML editor in the editing screen to see the underlying HTML contents.
- For the specifics of Anki’s regex support, see the regex crate documentation.
Card state
is:due
review cards and learning cards waiting to be studied.
is:new
new cards.
is:learn
cards in learning.
is:review
reviews (both due and not due) and lapsed cards.
is:suspended
cards that have been automatically or manually suspended.
is:buried
cards that have been either automatically or
manually buried.
is:buried-sibling
cards that have been buried automatically.
is:buried-manually
cards that have been manually buried.
Cards that have lapsed fall into several of the previous categories, so it may be useful to combine different search terms to get more precise results:
is:learn is:review
cards that have lapsed and are awaiting relearning.
-is:learn is:review
review cards, not including lapsed cards.
is:learn -is:review
cards that are in learning for the first time.
Flags
flag:1
cards with a red flag.
flag:2
cards with an orange flag.
flag:3
cards with a green flag.
flag:4
cards with a blue flag.
flag:5
cards with a pink flag.
flag:6
cards with a turquoise flag.
flag:7
cards with a purple flag.
Card properties
prop:ivl>=10
cards with interval of 10 days or more.
prop:due=1
cards due tomorrow.
prop:due=-1
cards due yesterday that haven’t been answered yet.
prop:due>=1
all cards due in the future, including tomorrow.
prop:due<=-1
all overdue cards.
prop:due>=-1 prop:due<=1
cards due yesterday, today and tomorrow.
prop:reps<10
cards that have been answered less than 10 times.
prop:lapses>3
cards that been lapsed more than 3 times.
prop:ease!=2.5
cards easier or harder than default ease.
The following searches require Anki 23.10+ and FSRS enabled:
prop:s>21
cards with stability greater than 21 days.
prop:d>0.3
cards with difficulty greater than 0.3.
prop:r<0.9
cards with retrievability less than 0.9.
Recent Events
Added
added:1
cards added today.
added:7
cards added in the last 7 days.
The check is made against card creation time rather than note creation time, so cards that were generated within the time frame will be included even if their notes were added a long time ago.
Edited
edited:n
cards where the note text was added/edited in the last n days.
This requires Anki 2.1.28+ or AnkiMobile 2.0.64+.
Answered
rated:1
cards answered today.
rated:1:2
cards answered Hard (2) today.
rated:7:1
cards answered Again (1) in the last 7 days.
rated:31:4
cards answered Easy (4) in the last 31 days.
Anki 2.1.39+ supports rating searches over 31 days.
Note that, to search for cards answered at a particular day, rated:n -rated:(n-1) might not work every time. Use the following instead:
prop:rated=0
cards answered today.
prop:rated=-1
cards answered one day ago.
prop:rated=-7
cards answered 7 days ago.
First Answered
Requires Anki 2.1.45+.
introduced:1
cards answered for the first time today.
introduced:365
cards answered for the first time within the last 365 days.
Matching special characters
If you’re using a version earlier than Anki 2.1.36 the following searches may not work.
As shown in the previous section, some characters like *, _ and " have a
special meaning in search. If you need to locate those characters in a search,
you need to tell Anki not to treat them specially. This is called “escaping a character” and is primarily done by using double quotes and backslashes.
-
Space
To match something that includes spaces, enclose the"entire term"in double quotes. If it is a colon search, you also have the option to only quote thepart:"after the colon". -
And/Or
To search for these words, wrap them with double quotes. For example,dog "and" catsearches for “dog”, “cat” and the word “and”. If you wrap the entire search term with quotes like in the previous example, you do not need to escapeandoror. -
",*and_
Add a backslash before these characters to treat them literally. For example,_will match any single character, but\_matches only an actual underscore. -
\
Because a backslash is used to remove the special meaning from other characters, it too is treated specially. If you need to search for an actual backslash, use\\instead of\. -
(and)
You can search for parentheses by enclosing the entire term in quotes, by using a backslash, or both at the same time. For example,"(text)",\(text\)and"\(text\)"are all equivalent searches, and search for(text). -
-
Starting a search term with-usually inverts it:-dogmatches everything except dog for example. If you instead wish to include an actual hyphen, you can either use a backslash, or include the text in quotes. For example,\-freeor"-free"will match “guilt-free” and “cruelty-free”. -
:
Colons have to be escaped using backslashes unless they are preceded by another, unescaped colon. For example,w:3:30searches for “3:30” on word boundary and doesn’t require you to use a backslash. However, if you don’t use a colon search, the colons need to be escaped like this:3\:30. -
&,<, and>
&,<, and>are treated as HTML when searching in Anki, and as such, searches containing them don’t work as expected. However, you can search for them by using their corresponding HTML entity names (&for&,<for<, and>for>). For example, searching&textsearches for a note with&textin a field.
Raw input
Text preceded by certain keywords (like re:) will be treated as raw input. That is,
the characters listed above largely lose their special meaning. In such a context, only
a minimum of escaping is required to prevent ambiguity:
-
Double quotes (
") must be escaped. -
Spaces and unescaped parentheses require the search term to be quoted.
-
The search term must not end in an odd number of backslashes.
Object IDs
nid:123
the note with note id 123.
cid:123,456,789
all cards with card ids 123, 456, or 789.
Note and card IDs can be found in the card info dialog in the browser. These searches may also be helpful when doing add-on development or otherwise working closely with the database.
Custom Data
Anki allows small amounts of custom data to be stored on cards, enabling advanced use cases such as custom schedulers. One of the notable applications of this feature was in earlier implementations of FSRS. In Anki 23.10+, there are some ways to search it:
has-cd:v
cards having the property v in custom data.
prop:cdn:d>5
cards with the value of d in custom data (usually refers to difficulty in FSRS) greater than 5.
prop:cds:v=reschedule
cards with the string v in custom data equal to reschedule.
Other Searches
prop:due=1 is:learn
interday learning cards due for tomorrow.
prop:due=0 is:learn -introduced:1
interday learning cards due today.
prop:resched=0
cards rescheduled today, either using Set due date or Reschedule cards on change.
Importing
Anki can import text files, packaged Anki decks created by the export feature, Mnemosyne 2.0 .db files, and SuperMemo .xml files. To import a file, click the File menu and then “Import”.
Text Files
Any plain text file that contains fields separated by commas, semicolons or tabs can be imported into Anki, provided some conditions are met.
-
The files must be plain text (myfile.txt). Other formats like myfile.xls, myfile.rtf, myfile.doc must be saved as a plain text file first.
-
The files must be in UTF-8 format (see below).
-
Anki determines the number of fields in the file by looking at the first (non-commented) line. If some of the later records in the file contain fewer fields, Anki will treat the missing fields as if they were blank. If some of your records contain extra fields, the extra content will not be imported.
-
Anki tries to guess which field separator (commas, tabs, etc.) your file uses. If it guesses wrongly, you can change it in the import options window and preview the results. Or you can add file headers to force a specific field separator.
Fields in your text file can be mapped to any field in your notes, including the tags field. You can choose which field in the text file corresponds to which field in the note when you import.
When you import a text file, you can choose what deck to put the cards in. Keep in mind that if you have the deck override option set for one or more of your templates, the cards will go to that deck rather than the one you’ve selected.
This is an example of a valid file with three fields:
apple;banana;grape
first field;second field;third field
There are two ways to include newlines or the field separator in fields.
Escape the characters by placing the contents of the field in quotation marks:
hello;"this is
a two line answer"
two;this is a one line field
"this includes a ; (semicolon)";another field
Because quotes are used to mark where a field begins and ends, if you wish to include them inside your field, you need to replace a single doublequote with two doublequotes to “escape” them from the regular handling, like so:
field one;"field two with ""escaped quotes"" inside it"
When you use a spreadsheet program like Libreoffice to create the CSV file for you, it will automatically take care of escaping double quotes.
Use HTML new lines:
hello; this is<br>a two line answer
two; this is a one line one
You need to turn on the Allow HTML in fields in the import dialog for HTML newlines to work.
Escaped multi-lines will not work correctly if you are using cloze deletions that span multiple lines. In this case, please use HTML newlines instead.
You can also include tags in another field and select it as a tags field in the import dialog:
first field;second field;tags
This is an example of a valid file where the first line is ignored (#):
# this is a comment and is ignored
foo bar;bar baz;baz quux
field1;field2;field3
Spreadsheets and UTF-8
If you have non-Latin characters in your file (such as accents, Japanese and so on), Anki expects files to be saved in a “UTF-8 encoding”. The easiest way to do this is to use the free LibreOffice spreadsheet program instead of Excel to edit your file, as it supports UTF-8 easily, and also exports multi-line content properly, unlike Excel. If you wish to keep using Excel, please see this doc for more information.
To save your spreadsheet to a file Anki can read with LibreOffice, go to File > Save As, and then select CSV for the type of file. After accepting the default options, LibreOffice will save the file and you can then import the saved file into Anki.
HTML
Anki can treat text imported from text files as HTML (the language used for web pages). This means that text with bold, italics and other formatting can be exported to a text file and imported again. If you want to include HTML formatting, you can check the “allow HTML in fields” checkbox when importing. You may wish to turn this off if you’re trying to import cards whose content contains angle brackets or other HTML syntax.
If you wish to use HTML for formatting your file but also wish to include angle brackets or ampersands, you may use the following replacements:
| Character | Replacement |
|---|---|
| < | < |
| > | > |
| & | & |
Importing Media
If you want to include audio and pictures from a text file import, copy the files into the collection.media folder. Do not put subdirectories in the media folder, or some features will not work.
After you’ve copied the files, change one of the fields in your text file as follows.
<img src="myimage.jpg">
or
[sound:myaudio.mp3]
Alternatively, you can use the find and replace feature in the browse screen to update all the fields at once. If each field contains text like “myaudio”, and you wish to make it play a sound, you’d search for (.*) and replace it with “[sound:\1.mp3]”, with the regular expressions option enabled.
When importing a text file with these references, you must make sure to enable the “Allow HTML” option.
You might be tempted to do this in a template, like:
<img src="{{field name}}">
Anki doesn’t support this for two reasons: searching for used media is expensive, as each card has to be rendered, and such functionality isn’t obvious to shared deck users. Please use the find & replace technique instead.
Bulk Media
Another option for importing large amounts of media at once is to use the media import add-on. This add-on will automatically create notes for all files in a folder you select, with the filenames on the front (minus the file extension, so if you have a file named apple.jpg, the front would say “apple”) and the images or audio on the back. If you would like a different arrangement of media and filenames, you can change the note type of the created cards afterwards.
Duplicates and Updating
When importing text files, Anki uses the first field to determine if a note is unique. By default, if the file you are importing has a first field that matches one of the existing notes in your collection and that existing note is the same type as the type you’re importing, the existing note’s other fields will be updated based on content of the imported file. A drop-down box in the import screen allows you to change this behaviour, to either ignore duplicates completely, or import them as new notes instead of updating existing ones.
The match scope setting controls how duplicates are identified. When note type is selected, Anki will identify a duplicate if another note with the same note type has the same first field. When set to note type and deck, a duplicate will only be flagged if the existing note also happens to be in the deck you are importing into.
If you have updating turned on and older versions of the notes you’re importing are already in your collection, they will be updated in place (in their current decks) rather than being moved to the deck you have set in the import dialog. If notes are updated in place, the existing scheduling information on all their cards will be preserved.
For info on how duplicates are handled in .apkg files, please see the Deck Packages section.
File Headers
Anki 2.1.54+ supports certain headers that can be included in the text file to
make importing more powerful or convenient. They consist of #key:value pairs
and must be listed in separate lines at the top of the file.
| Key | Allowed Values | Behaviour |
|---|---|---|
separator | Comma, Semicolon, Tab, Space, Pipe, Colon, or the according literal characters | Determines the field separator. |
html | true, false | Determines whether the file is treated as HTML. |
tags | List of tags, separated by spaces | Adds the listed tags to every imported note. |
columns | List of names, separated by the previously set separator | Determines the number of columns and shows their given names when importing. |
notetype | Note type name or id | Presets the note type, if it exists. |
deck | Deck name or id | Presets the deck, if it exists. |
notetype column | 1, 2, 3, … | Determines which column contains the note type name or id of each note, see Notetype Column. |
deck column | 1, 2, 3, … | Determines which column contains the deck name or id of each note, see Deck Column. |
tags column | 1, 2, 3, … | Determines which column contains the tags of each note. |
guid column | 1, 2, 3, … | Determines which column contains the GUID of each note, see GUID Column. |
Some headers have further implications.
Notetype Column
Usually, all notes from a file will be mapped to a single note type. That changes, if there is a column with note type names or ids.
This allows you to import notes with different note types, and their fields will be mapped implicitly: The first regular column is used for the first field of any note regardless of its note type, the second regular column for the second field, and so on. A regular column here being a column that does not contain special information like decks, tags, note types or GUIDs.
Deck Column
Usually, any new cards created as a result of importing a text file will be placed in a single deck of your choice. If the file contains a deck column, however, new cards of a note will be placed in its specified deck instead. If the deck does not exist, a deck with the given name will be created.
GUID Column
GUID stands for Globally Unique Identifier. When you create notes in Anki, Anki assigns each note a unique ID, which can be used for duplicate checking. If you export your notes with the GUID included, you can make changes to the notes, and as long as you do not modify the GUID field, you’ll be able to import the notes back in to update the existing notes.
Please note that the GUID is intended to be created by Anki. If you are creating
your own IDs, such as MYNOTE0001, then it’s recommended that you place the IDs
in the first field, instead of assigning them to Anki’s internal GUID. When importing,
Anki is able to use either the first field or the GUID for duplicate checking, so you do not
need to make IDs a GUID in order to be able to update your notes.
One other thing to note is that the duplicate option will not work for rows that have a non-empty GUID. If a GUID is provided, and already exists in the collection, a duplicate will not be created.
Packaged Decks
Anki packages (.apkg files) enable you to import decks, notes, note types, and cards from other users. They are commonly shared on AnkiWeb.
Scheduling
Anki packages may also contain scheduling information, which is useful if you want to transfer decks between devices or profiles. However, when importing a deck shared by someone else, you typically do not want to adopt their card intervals or review history.
If you encounter imported cards with unexpectedly large intevals, the deck author may accidentally have included their scheduling information. You can use the Set Due Date feature to reset the imported cards. On Anki 23.10 and later, you can remove any scheduling information during the import process by leaving the “Import any learning progress” option unselected. This will also remove any “leech” or “marked” tags from the imported cards.
Updating
When you import an .apkg file, Anki will identify any notes in it that are already in your collection due to a previous import. If the notes in the file are newer than your local copy, the notes will be updated with the contents of the file by default.
This updating process is generally not possible if the note type is changed (e.g. if either you or the deck author do things like add an extra field to the note type). You will still be able to import any missing notes from the file, but notes you have imported previously will not be updated if the deck author has made changes.
Anki 23.10 and Later
Anki 23.10 introduced more flexibility: You can choose to unconditionally update notes and note types, always overwriting your modifications, or, on the other hand, never update existing objects.
Also, if both you and the deck author modified the same note type, you can now decide to merge the two versions. This will preserve all templates and fields contained in either one, but will require a full sync, and may mark other existing notes as modified.
Note to Deck Authors
Merging relies on template and field ids, which were introduced in Anki 2.1.67. If a template or field lacks an id, because it has been created with an earlier release, Anki attempts to find an equivalent by comparing names.
See this this add-on for why it is advantageous to share note types with field and template ids, and how to add them to existing ones.
Exporting
Exporting allows you to save part of your collection as a text file or packaged Anki deck. To export, click the File menu and choose Export.
Text Files
If you choose “Notes in Plain Text”, Anki will write the contents of the notes into a text file. Each field is separated by a tab. If you edit the resulting file and don’t modify the first field, you can later import that file back into Anki and Anki will update your notes based on your edits, provided you import back into the same note type.
If you find yourself needing to edit the first field as well, you’ll need to change the format of your note type so that the first field is an ID number rather than actual text. (You can install the Add note id add-on to make this easier.)
In order for formatting to be preserved when you import text back in, the text is exported with all the HTML formatting embedded in it.
Packaged Decks
A “packaged deck” consists of cards, notes, note types, and any sounds or images bundled up into a file ending with .apkg or .colpkg. You can use packaged decks to transfer cards between people, or for backing up parts of your collection.
There are two different kinds of packaged decks.
Collection (.colpkg)
When you export all decks with scheduling included, this is called a “collection package”. Anki will copy your entire collection into a file ending in .colpkg, and place it on your desktop. A collection package is used to back up your collection, or copy it to another device.
Collection packages created with previous versions of Anki were called collection.apkg.
When this file is later imported, Anki will delete all the current cards in the collection, and replace the collection with the items in the file. This is useful for copying your collection back and forth between devices.
Existing media in your collection is not deleted when you import a collection package. To delete unused media, use Tools>Check Media.
If you choose Anki 2.1.50+ Collection Package format, imports and exports will be faster, and media files will be compressed, but the resulting .colpkg file will not be readable by older Anki clients.
Deck (.apkg)
Deck packages contain a single deck (and any child decks it may have). They have a filename ending with .apkg, but a filename other than collection.apkg. When you import a deck package, Anki will add the contents into your collection, rather than overwriting your collection.
If some notes in the deck package have previously been imported, Anki will keep the version with the most recent modification time. So if you download an updated deck, the edits that have been made in the updated version will be made in your collection as well, but if you re-import an unchanged deck after making edits in your collection, the changes in your collection will be kept.
If you choose not to include scheduling information, Anki will assume that you are sharing the deck with other people, and will remove marked and leech tags so that they will have a clean copy of it.
Backups
Automatic backups
Anki will create automatic backups of your card data. These include the text on your cards and your scheduling information, but do not include sounds or image files.
Automatic backups can be useful to recover from mistakes, but you should not rely solely on them. Because they are stored on your local device, they will not protect you if your device breaks or is stolen. We recommend you combine them with manual backups.
Restoring
To restore from an automatic backup:
- Open Anki, and choose Switch Profile from the File menu.
- Click on the “Open Backup” button.
- Select the backup you wish to restore from.
Anki disables automatic syncing and backups when you restore from a backup. Once you’re happy that you’ve restored the correct backup, close and re-open Anki to return to normal.
Creating
Backups are created periodically. You can configure the time between backups in the preferences screen. The default is 30 minutes.
Certain operations will trigger a backup, even if the configured time has not elapsed yet:
- A one-way sync download
- Importing a .colpkg file using File>Import
- Tools>Check Database
After backups are two days old, Anki will start removing some of the older ones. You can control how many daily, weekly and monthly backups you’d like to keep.
Backups created with 2.1.50 will not be importable into older Anki versions.
Manual colpkg backups
Restoring
You can restore from a manual backup by using File>Import.
Creating
In Anki 2.1.50+, you can use File>Create Backup to trigger an immediate backup. This functions like regular automatic backups, and does not include media files.
To create a backup that includes your sounds and images:
- Select Export from the File menu.
- Ensure “Anki collection package (.colpkg)” is selected.
- Enable the “include media” option.
This will create a .colpkg file that contains all of your cards and any sounds/images they use. We recommend you store the file somewhere safe, like a different device, or a cloud-based file storage service like Dropbox or Google Drive.
AnkiWeb
Synchronising your collection with AnkiWeb provides some level of protection against your device being lost or stolen. If you need to restore your collection from AnkiWeb, you can force a one-way sync in the preferences screen, or sync from a new device, and then choose “Download”.
Deletion log
Anki logs deleted notes to a text file called deleted.txt in your profile folder. These notes are in a text format that can be read by File>Import, though please note the import feature only supports a single note type at one time, so if you have deleted notes from different note types, you’ll need to split the file into separate files for each note type first.
Managing Files and Your Collection
- Checking Your Collection
- User Data
- Program Files
- Startup Options
- DropBox and File Syncing
- Network Filesystems
- Running from a Flash Drive
- Backups
- Inaccessible Harddisk
- Permissions of Temp Folder
- Corrupt Collections
Checking Your Collection
It is a good idea to occasionally check your collection file for problems. You can do this via the Tools>Check Database menu item. Checking the database ensures the file has not been corrupted, rebuilds some internal structures, and optimizes the file.
When you check the database, your tag list is also rebuilt. When you delete individual decks or cards, Anki does not update the list of used tags, as it’s inefficient to do so. If you want to clear old tags out from the list that are no longer in use, checking your database is the way to do it.
Please note that Anki will automatically optimize your collection once every 2 weeks. This optimization ensures the collection performs well, but it does not check for errors or rebuild the tag list when automatically optimizing.
User Data
On Windows, the latest Anki versions store your collection files in your
appdata folder. You can access it by opening the file manager, and
typing %APPDATA%\Anki2 in the location field. Older versions of Anki
stored your Anki files in a folder called Anki in your Documents
folder.
On Mac computers, recent Anki versions store all user data in the
~/Library/Application Support/Anki2 folder. The Library folder is
hidden by default, but can be revealed in Finder by holding down the
option key while clicking on the Go menu. If you’re on an older Anki
version, your Anki files will be in your Documents/Anki folder.
On Linux, recent Anki versions store your user data in
~/.local/share/Anki2, or $XDG_DATA_HOME/Anki2 if you have set a
custom data path. If you are using a third-party Flatpak build,
your files will be in ~/.var/app/net.ankiweb.Anki/data/Anki2/.
Older versions of Anki stored your files in
~/Documents/Anki or ~/Anki.
Within the Anki folder, the program-level and profile-level preferences
are stored in a file called prefs.db.
There is also a separate folder for each profile. The folder contains:
-
Your notes, decks, cards and so on in a file called
collection.anki2 -
Your audio and images in a
collection.mediafolder -
A backups folder
-
Some system files
You should never copy or move your collection while Anki is open. Doing so could cause your collection to become corrupt. Please do not move or modify the other files in the folder either.
Program Files
Anki’s launcher is installed in the following locations by default:
- Windows:
%LOCALAPPDATA%\Programs\Anki - macOS:
/Applications/Anki.app - Linux:
/usr/local/share/anki
When you install/update Anki with the launcher, it downloads support files and places them in the following locations:
- Windows:
%LOCALAPPDATA%\AnkiProgramFiles - macOS:
~/Library/Application Support/AnkiProgramFiles - Linux:
~/.local/share/AnkiProgramFiles
Removing that folder will cause the launcher to behave like a fresh install.
The AnkiProgramFiles contains all the files needed to run Anki aside from
the launcher. You can copy it to a different folder or system, and start
Anki from the new location by opening AnkiProgramFiles/.venv/bin/anki (or
AnkiProgramFiles\.venv\scripts\anki on Windows). If placed in the standard location on a new computer, the launcher will also be able to re-use the existing files, provided the files were copied with modification times preserved.
See the flash drive section below for more.
Startup Options
If you have made a destructive change on one computer and have an undamaged copy on another computer, you may wish to start Anki without syncing in order to use the full sync option without first downloading the changes. Similarly, if you are experiencing problems with Anki, you might need to (or might be instructed to) disable add-ons temporarily to see if one might be causing the problem. To do both of these things at the same time, you can open Anki in safe mode by holding down the Shift key while starting Anki. Keep holding Shift down until the on-screen message informs you that Anki has started in safe mode.
It is possible to specify a custom folder location during startup. This is an advanced feature that is primarily intended to be used with portable installations, and we recommend you use the default location in most circumstances.
The syntax to specify an alternate folder is as follows:
anki -b /path/to/anki/folder
-
If you have multiple profiles, you can pass -p <name> to load a specific profile.
-
If you pass -p some-fake-name, Anki will show the profile screen on startup. If no profile is provided, the last-used profile is loaded.
-
To change the interface language, use -l <iso 639-1 language code>, such as “-l ja” for Japanese.
If you always want to use a custom folder location, you can modify your shortcut to Anki. On Windows, right-click on the shortcut, choose Properties, select the Shortcut tab, and add “-b \path\to\data\folder” after the path to the program, which should leave you with something like
"C:\Program Files\Anki\anki.exe" -b "C:\AnkiDataFolder"
You can also use this technique with the -l option to easily use Anki in different languages.
On Windows, you should use a backslash (\) not a forward slash (/).
On a Mac there is no easy way to alter the behaviour when clicking on the Anki icon, but it is possible to start Anki with a custom base folder from a terminal:
open /Applications/Anki.app --args -b ~/myankifolder
Alternatively, you can define the environment variable “ANKI_BASE”. On Windows, you can define the environment variable with:
set "ANKI_BASE=C:/path/to/AnkiDataFolder"
On Linux and macOS, you can use:
export ANKI_BASE="/path/to/AnkiDataFolder"
DropBox and File Syncing
We do not recommend you sync your Anki folder directly with a third-party synchronization service, as it can lead to database corruption when files are synced while in use.
If you just want to synchronize your media, you can link external folders into services like DropBox. Please see DropboxWiki: Sync Folders Outside Dropbox (archive.org) for more info.
If you wish to keep your collection in sync as well, it is strongly recommended that you create a script that copies your files from your synced folder to a local folder, launches Anki, and then copies the files back when Anki is closed. This will ensure that the files are never synchronized while they are open.
Network Filesystems
We strongly recommend you have Anki store your files on a local hard disk, as network filesystems can lead to database corruption. If a network filesystem is your only option, regular use of Tools>Check Database to detect corruption is recommended.
Running from a Flash Drive
On Windows, Anki can be installed on a USB / flash drive and run as a portable application. The following example assumes your USB drive is drive E; adjust as necessary.
WARNING: The drive letter must be the same on all devices. If you set this up for drive E, it won’t work for a flash drive mapped to drive D for example.
WARNING: Media syncing with AnkiWeb may not work if your flash drive is formatted as FAT32. Please format the drive as NTFS to ensure media syncs correctly.
- Download the latest Anki launcher, and install it in a custom location:
E:\Anki\Launcher. NotE:\Anki\Launcher\Anki. - When the launcher appears, close it without installing.
- Put the following in a file
E:\Anki\Anki.bat:
@echo off
echo Starting Anki...
set USB_ROOT=%~dp0
set ANKI_LAUNCHER_VENV_ROOT=%USB_ROOT%\AnkiProgramFiles
set ANKI_LAUNCHER=%USB_ROOT%\Launcher\anki
set ANKI_BASE=%USB_ROOT%\AnkiData
start /b %ANKI_LAUNCHER%
- Double-click on the .bat file you created, and install Anki as normal.
- You can now double-click on the .bat file to run Anki from other machines.
Tools>Upgrade/Downgrade will continue to function, but only when your machine has access to the internet.
Backups
Please see this section.
Inaccessible Harddisk
If Anki can’t write to files in the Anki folder, a message will be displayed on startup saying that Anki can’t write to the harddisk, and Anki will close. If you’re unsure how to fix the permissions, please contact someone near you who is knowledgeable about computers and can help you out.
Permissions of Temp Folder
Anki uses the system’s temporary folder to store temporary data. If the permissions of this folder have been changed from the default settings by a rogue app or buggy antivirus app, Anki will not function properly.
If you’re on a Windows 7 machine, the general steps to fix the problem are listed below. As this is somewhat complicated, please ask someone knowledgeable about Windows if you are not sure.
-
Click on the start bar, and type in %temp% (including the percents), then hit Enter.
-
Go up one folder, and locate the temp folder. Right click on it, and choose Properties.
-
In the security tab, click on Advanced.
-
Click on the Owner tab. If you’re not listed as the owner, click the button to take ownership.
-
On the permissions tab, ensure that you have full control. On a default W7 install the control will actually be inherited from c:\users\your-username.
Corrupt Collections
Anki uses a file format that is robust against program and computer crashes, but it’s still possible for your collection to become corrupt if the files are modified while Anki is open, stored on a network drive, or corrupted by a bug.
When you run Tools>Check Database, you will receive a message if Anki detects the file has been corrupted. The best way to recover from this is to restore from the most recent automatic backup, but if your backup is too old, then you can attempt to repair the corruption instead.
On Linux, make sure sqlite3 is installed. On a Mac, it should be installed already. On Windows, download http://www.sqlite.org/sqlite-3_6_23.zip.
Next, create a backup of your collection.anki2 file, in case something goes wrong with the steps below.
Linux/macOS
Open a terminal, change to the folder your collection is located in, and type:
sqlite3 collection.anki2 .dump > dump.txt
Open the resulting dump.txt file in a text editor, and look at the final line. If it reads “rollback;”, change it to “commit;”
Then run the following in a terminal:
cat dump.txt | sqlite3 temp.file
Make sure you use temp.file - do not put collection.anki2 on the right, or you will blank out the file. When you’re done, proceed to the final step.
Windows
Copy the sqlite3.exe program and your deck to your desktop. Then go to
Start>Run and type in cmd.exe.
If you’re on a recent Windows, the command prompt may not start on your desktop. If you don’t see desktop displayed in the command prompt, type something like the following, replacing “administrator” with your login name.
cd C:\Users\Administrator\Desktop
Then type:
sqlite3 collection.anki2 .dump > dump.txt
Open the resulting dump.txt file in a text editor, and look at the final line. If it reads “rollback;”, change it to “commit;”
Then run the following in a terminal:
type dump.txt | sqlite3 temp.file
Make sure you use temp.file - do not put collection.anki2 on the right, or you will blank out the file. When you’re done, proceed to the final step.
Final Step
Check that you didn’t get an error message, and that temp.file is not empty. The procedure optimizes the collection in the process, so it’s normal for the new file to be somewhat smaller than the old one.
When you’ve confirmed the file is not empty:
-
rename the original collection.anki2 file to something else
-
rename temp.file to collection.anki2
-
move collection.anki2 back into your collection folder, overwriting the old version
-
start Anki and go to Tools>Check Database to make sure the collection has been successfully restored.
Card Info, Graphs and Statistics
Card Info
You can display information about a card by using the Cards>Info menu item, by right-clicking on the card and then selecting Info, or by pressing I on the study screen.
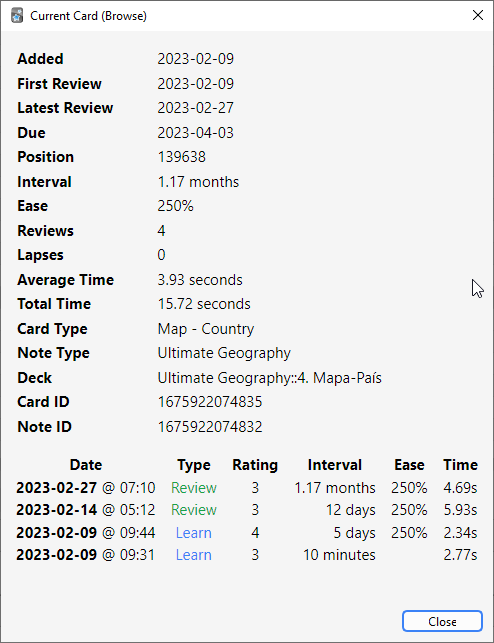
A few notes:
Position
It shows the order the card will appear
in relative to other new cards. The position can be changed in the
browser. Once a card has been studied, the position is not used, unless
the card is manually reset to new again.
Interval
The delay from one review to the next. Times are abbreviated; “0s, 1m,
3h, 4d, 5mo, 6y” refers to seconds, minutes, hours, days, months and
years respectively.
Ease
The approximate amount the interval will grow when you answer a review
card with the “Good” button.
The bottom section shows the review history for the card. Rating denotes the button (1 = Again, 4 = Easy). When cards are manually rescheduled using the “reset” or “set due date” actions, the type will be listed as Manual and the rating as 0.
Statistics
The statistics window is accessed by clicking on Stats button at the top of the main window, or by pressing T.

Selecting Decks / Collection
Deck
By default, the statistics window will show statistics from the currently selected deck and any subdecks it may contain, but you can select any deck from your collection by typing its name in the text box at the top of the screen or (from Anki 2.1.61), by using the deck selector at the bottom.
Collection
If you select this checkbox, statistics will be shown for your entire collection. You can also display graphs for arbitrary searches by adding filters in the search box at the top (2.1.28+).
History
By default, Anki shows you statistics for the last 12 months. You can change this to all history scope or deck life scope at the top. (The “today” section at the top remains of course unaffected by this selection.)
More
-
Clicking on “Save PDF” at the bottom will save a PDF document of the statistics to a file on your desktop to make it easy to share your statistics with others.
-
When you delete notes, their review history is maintained in Anki. It will not be included when looking at statistics for a specific deck (as Anki has no way of knowing which deck the deleted cards belonged to), but will be included when you look at statistics for the whole collection.
-
Anki 2.1.28+ introduced redesigned graphs. The old graphs are still accessible with a Shift-click on the Stats button.
Today
At the top of the statistics window is a brief list of textual statistics about the reviews that you have completed today. A “review” in this context is “one answering of a card”, so a card might count as multiple reviews if it needed to be seen multiple times, and a learning card answered also counts as a “review.” A couple of the stats whose meaning may not be immediately obvious:
Again Count
This is the number of reviews that you have failed (i.e., pressed Again on). The correct percentage listed afterwards is the number of cards you did “not” fail divided by the total number of cards you studied.
Learn, Review, Relearn, Filtered
The number of reviews that were learning cards, review cards, relearning cards, or studied in a filtered deck when not due.
The stats for the current day are not a good overall indicator of your learning progress; everyone has bad days and good days, and seeing that you got a lower percentage correct on a particular day should not be cause for concern. The remainder of the stats, which take longer periods of time into account, will give more useful information if you wish to try to change your study habits or scheduling settings based on your performance.
The “today” statistics are unaffected by the time period selected at the bottom of the window.
The Graphs
Future Due
This graph shows an estimated number of reviews that will be due on a given day in the future if you learn no new cards and fail no cards. The bars and the left axis show the number of cards due on each day if you study all cards each day, while the gray shaded region and the right axis show the number of cards due on that day if you don’t study at all until then. Note that the forecast graph does not count reviews that are currently overdue, so if you have a large backlog, the overdue cards will not be displayed.
Daily load is an estimate of the average number of cards to be reviewed daily. If you don’t have a backlog, daily load should be approximately equal to your number of due cards.
It is calculated as follows:
$$ \frac{1}{I_1} + \frac{1}{I_2} + \frac{1}{I_3} + \dots + \frac{1}{I_n} $$
Here, \(I_n\) is the interval of the n-th card. If the interval is less than one day, the summation term is 1. This prevents cards with short intervals from unrealistically skewing the value of daily load.
Example: you have a card with an interval of 10 days and a card with an interval of 50 days. Daily load = \(\frac{1}{10} + \frac{1}{50} = 0.12\), meaning that, on average, you will have 0.12 due cards per day.
Calendar
This graph shows past card review activity. Hovering the mouse over a specific item allows you to view the number of revisions made that day. Click on a day of the week to make that the starting day.
Reviews
This graph counts the number of card reviews you have done. The bars may correspond to days, weeks, or months, depending on the time period you’ve selected at the bottom of the screen. The differently colored blocks show how many of the cards you answered on each day were mature, young, relearning, or learning cards. There is also a separate group for cards answered in a filtered/cram deck while they were not due. The gray shaded region and the right axis shows the cumulative total for each type of review as time progresses across the graph (so at 0 days, it would display the number for the entire time period displayed on the graph).
Card Counts
This pie chart shows what percentage of your deck or collection consists of mature, unseen, young/learn, and suspended cards. If you wish to calculate a more precise percentage, the key shows the exact number of cards in each section, and the total number of cards is displayed to the side.
Review Time
This graph works exactly like Review Count, except that it deals with the amount of time you spent on each card rather than the number of cards answered.
Review Intervals
This graph displays the number of cards that have a given interval (the delay between two reviews). The gray shaded region and the right axis tell you what percentage of your cards have an interval of less than or equal to the time below that point. The time scope has a different effect on this graph than other graphs: rather than changing which cards or period of studying is included, it limits how far out the intervals are displayed to (so 14-month intervals are not displayed at all on a 1-year graph).
Card Ease
This graph shows the number of cards that have a specific ease factor. Average ease of the selected deck / collection is also displayed here.
Card Stability
Only shown if FSRS is enabled. Stability is defined as the amount of time required for the probability of recall to decrease from 100% to 90%.
Card Difficulty
Only shown if FSRS is enabled. Difficulty determines how quickly a card’s interval grows after each review.
Card Retrievability
Only shown if FSRS is enabled. “Retrievability” is synonymous with “probability of recall”.
Estimated total knowledge is the total number of cards you are likely to currently remember, calculated by multiplying average retrievability by the number of cards that have been reviewed at least once.
Hourly Breakdown
This graph shows the percentage of total reviews you have passed during given hours.
- x-axis (bottom): Time of day (at given hour).
- y-axis (right): Amount of cards studied.
- secondary y-axis (left): Success rate in percent.
The blue bars thus show you the number of reviews you’ve made at that hour (so that you know how significant the results are). The gray shaded region shows the percentage of the total reviews you have passed (i.e., not pressed Again on) at that hour.
Answer Buttons
This graph shows how many times you’ve chosen the Again, Hard, Good, or Easy button while studying learning/new, young, and mature cards. Anki also displays the percentage of correct reviews for each type of card.
True Retention Table
This table shows your retention across different cards and different time frames. A card is defined as “mature” if its interval is ≥21 days. Only one review per day - the first one - counts. Again counts as “Fail”; Hard, Good, and Easy count as “Pass”. This table can be used to check how well Anki’s spaced repetition algorithm is working for you.
If you are using FSRS, your true retention is expected to be close to your desired retention. Please keep in mind that data for a single day is noisy, so it’s better to look at monthly data. If your true retention doesn’t match your desired retention very well, here are some general recommendations:
- Optimize your FSRS parameters.
- Use different presets with their own parameters for different material.
- Suspend/reformulate leeches.
- Make sure you are using the answer buttons as intended.
Manual Analysis
If you’re interested in getting information from your statistics other than what Anki provides, it is possible to access the data directly. Because of the complexity involved, this is not something we can provide any support for.
One option is to write an add-on that adds another graph or more details to the statistics window. There are several add-ons of this sort on AnkiWeb already, which you can look at to get an idea of how it works.
A more powerful and more complex option is to extract the review log information directly from Anki’s database and analyze it in an external program. Anki uses a database format called SQLite. There are many tools available for working with SQLite databases; one of the easiest to start with is called SQLite Browser, which will allow you to look around the database as well as export a CSV version of tables for import into another program.
The most important table for statistics is the “revlog” table, which stores an entry for each review that you conduct. The columns are as follows:
id
The time at which the review was conducted, as the number of
milliseconds that had passed since midnight UTC on January 1, 1970.
(This is sometimes known as “Unix epoch time”, especially when in
straight seconds instead of milliseconds.)
cid
The ID of the card that was reviewed. You can look up this value in the
id field of the “cards” table to get more information about the card,
although note that the card could have changed between when the revlog
entry was recorded and when you are looking it up. It is also the
millisecond timestamp of the card’s creation time.
usn
This column is used to keep track of the sync state of reviews and
provides no useful information for analysis.
ease
Which button you pressed at the end of the review (1 for Again, 4 for
Easy).
ivl
The new interval that the card was pushed to after the review. Positive
values are in days; negative values are in seconds (for learning cards).
lastIvl
The interval the card had before the review. Cards introduced for the
first time have a last interval equal to the Again delay.
factor
The new ease factor of the card in permille (parts per thousand). If the
ease factor is 2500, the card’s interval will be multiplied by 2.5 the
next time you press Good.
time
The amount of time (in milliseconds) you spent on the question and
answer sides of the card before selecting an ease button.
type
This is 0 for learning cards, 1 for review cards, 2 for relearning cards,
and 3 for early “cram” cards (cards being studied in a filtered deck when they
are not due).
Media
Anki stores the sounds and images used in your notes in a folder next to the collection. For more on the folder location, please see the file locations section. When you add media within Anki, either by using the paperclip icon in the editor or by pasting it into a field, Anki will copy it from its original location into the media folder. This makes it easy to back up your collection’s media or move it to another computer.
If your media filenames contain spaces or other special characters such
as percentage signs, the way the filenames appear in the HTML editor will
differ from the way the filenames appear on disk. For example, a file called
hello 100%.jpg will appear as hello%20100%25.jpg in the HTML editor.
Internally, Anki still uses the original filenames, so if you would like to
search for the file or modify the filename with Find&Replace, you will
need to use the name as it appears on disk, not as it appears in the
HTML editor. Exporting to a text file is another way to see the underlying
representation.
Checking Media
You can use the Tools>Check Media menu option to scan your notes and media folder. It will generate a report of files in the media folder that are not used by any notes, and media referenced in notes but missing from your media folder. It also allows you:
- To delete unused media files.
- To tag notes that refer to missing media files.
- To empty your trash folder.
- To restore the deleted files back to your media folder.
This tool does not scan question or answer
templates, which is why you can’t place media references to fields in
the template. If you need a static image or sound on every card, name it
with a leading _ (e.g., _dog.jpg) to tell Anki to ignore it when
checking for media. If you delete media using the unused media check,
Anki will move it into your operating system’s trash folder, so you can
recover if you accidentally delete media that shouldn’t have been
deleted.
Manually Adding Media
When you add media via Anki’s interface, Anki takes care of ensuring the filenames are encoded in a way that should work across different devices, removing characters that won’t work on certain operating systems, and truncating very long filenames.
If you manually add files to your media folder, you should use Tools>Check Media afterwards, to ensure the filenames are encoded correctly. If you skip this step, any filenames that are not compatible will be skipped when syncing.
Anki doesn’t follow symbolic links in the media folder when syncing. If you rely on symlinks for including fonts, stylesheets, or other resources, these files may appear to work on desktop but fail on mobile. To ensure files sync properly, copy the actual files into the collection.media folder instead of using symlinks.
Supported Formats
Anki uses a program called mpv (and mplayer as a fallback) in order to support sounds and videos. A wide variety of file formats are supported, but not all of these formats will work on AnkiWeb and the mobile clients. MP3 audio and MP4 video seems to be the most universally supported.
Math and Symbols
MathJax
MathJax is a modern, browser-based typesetting system, useful for mathematical and chemical equations. It does not require the installation of any extra software, so it is easy to use, and it is recommended for most users.
MathJax is supported out of the box on Anki 2.1+, AnkiMobile, and AnkiDroid 2.9+.
To try it out:
-
Type the following in a field:
\sqrt{x} -
Select the text you just typed.
-
Click the rightmost button in the editor, and choose “MathJax inline” from the menu. Anki will change the text so it reads:
\(\sqrt{x}\) -
Click the Cards… button. You’ll see a preview of how the equation will appear when the card is reviewed.
$$ \sqrt{x} $$ Anki’s MathJax support expects content in TeX format. If you’re not familiar with TeX formatting, please see this cheatsheet. Please note that point 1 does not apply in Anki - Anki uses
\(and\)for inline equations, and\[and\]for display equations.
If you want to use newlines in a MathJax expression, please use Shift+Enter instead of just Enter, as a normal newline will prevent MathJax from working correctly.
Anki includes built in support for mhchem for rendering chemical equations. Please see the “chemical equations” section and the following sections for more information: https://mhchem.github.io/MathJax-mhchem/
Customize MathJax
Anki’s bundled MathJax support is loaded before card content, so if you wish to customise MathJax you’ll have to do so in a specific way. An example is provided here.
<script>
MathJax.config.tex['macros'] = {
    R: '{\\mathbb {R}}',
};
if (typeof is_already_run == 'undefined') {
  is_already_run = true
  MathJax.startup.getComponents();
}
</script>
Note that Anki has special logic for cloze deletions that might not work if you change the standard delimiters for MathJax equations.
LaTeX
LaTeX is a powerful typesetting system, useful for entering mathematical formulas, chemical formulas, musical notation and so on. Anki provides some support for LaTeX, allowing you to enter LaTeX code in your notes. When you review a card, Anki will call LaTeX and display the generated image instead.
LaTeX is more work to set up, and images can only be generated with the computer version of Anki - though once generated, the images can be displayed by mobile clients. Because of the extra complexity LaTeX brings, it is only recommended for users that need more features than MathJax provides.
Security Warning
LaTeX code can contain malicious commands that can read or write non-Anki data on your computer. For this reason, recent Anki versions will refuse to generate LaTeX images by default.
If you wish to use LaTeX on your own cards, you will need to enable the Generate LaTeX images option in the preferences screen.
We strongly recommend you do not enable this option if you use shared decks, or think you will import shared decks in the future, as you are potentially giving any shared deck author access to your computer.
You do not need to enable this option for shared decks. If a shared deck author has correctly generated all the images prior to them sharing the deck, the images should already be available.
Assumed Knowledge
Anki’s LaTeX support is not turn-key: it is assumed that you know how to use LaTeX already, and that you have it installed. If you have no experience with LaTeX, please consult one of the many guides available on the internet. If you are having trouble with markup, please ask on a LaTeX forum.
To install LaTeX, on Windows use MiKTeX; on macOS use MacTeX, and on Linux use your distro’s package manager. Dvipng must also be installed.
On Windows, go to Settings in MikTeX’s maintenance window, and make sure “Install missing packages on the fly” is set to “Always”, not to “Ask me first”. If you continue to have difficulties, one user reported that running Anki as an administrator until all the packages were fetched helped.
On macOS, LaTeX has only been tested with MacTeX and BasicTeX. If you use BasicTeX, you need to install dvipng separately, with the following command:
sudo tlmgr update --self; sudo tlmgr install dvipng
The command may not be on the path, so you may need to provide the full path, e.g /usr/local/texlive/2014basic/bin/x86_64-darwin/tlmgr.
If you are not using the above LaTeX packages, you will need to use the edit LaTeX add-on to specify the full path to latex and dvipng.
Web/Mobile
When you review a card with LaTeX on it, Anki will generate an image for that LaTeX and place the image in your collection’s media folder for future use. The web & mobile clients will display these images if they already exist, but can not generate the images on their own.
To avoid having to review all your cards at least once before you can study on the other clients, Anki can generate the images in bulk for you. To generate all the images, please go to Tools>Check Media. After that, syncing should upload the generated media to AnkiWeb and the other clients.
Example
The most general way to input LaTeX content is to surround it with [latex][/latex] tags. There’s a shortcut button for this documented in the editor section.
[latex] tags must be used inside a field - placing them in the card template will cause problems.
For example, entering the following on the front of an Anki flashcard:
Does [latex]\begin{math}\sum_{k = 1}^{\infty}\frac{1}{k}\end{math}[/latex] converge?
will produce this when the flashcard is viewed:

The formula in the example above is called a “text formula”, because it is displayed right within the non-mathematical text. In contrast, the following example shows a “displayed formula”:
Does the sum below converge?

[latex]\begin{displaymath}\sum_{k = 1}^{\infty}\frac{1}{k}\end{displaymath}[/latex]
“Text formulas” and “display formulas” are the most common type of LaTeX expressions, so Anki provides abbreviated versions of them. Expressions of the form:
[latex]\begin{math}...\end{math}[/latex]
can be shortened to
[$]...[/$]
and expressions of the form
[latex]\begin{displaymath}...\end{displaymath}[/latex]
can be shortened to
[$$]...[/$$]
For example, the two LaTeX snippets shown before are equivalent to
Does [$]\sum_{k = 1}^{\infty}\frac{1}{k}[/$] converge?
and
Does the sum below converge?

[$$]\sum_{k = 1}^{\infty}\frac{1}{k}[/$$]
respectively.
Packages
Anki allows you to customize the LaTeX preamble so you can import custom packages for chemistry, music and so on. For example, imagine you find an example file for chemtex on the internet:
\documentclass[a4paper,12pt]{report}
\usepackage{chemtex}
\begin{document}

\initial
\begin{figure}[h]\centering
\parbox{.3\textwidth}{\ethene{H}{H$_3$C}{CH$_3$}{Br}}
\hfil
\parbox{.3\textwidth}{\cbranch{H}{S}{H}{S}{C}{S}{}{S}{H}
  \xi=-200 \cright{}{Q}{C}{D}{O}{S}{OH}}
\hfil
\parbox{.3\textwidth}{\hetisix{Q}{Q}{Q}{Q}{Q}{Q}{O}{Q}{O}
  \xi=-171 \fuseup{Q}{Q}{Q}{Q}{D}{Q}{D}{Q}{D}}
\caption{Chemie mit {\tt CHEMTEX}\label{a1}}
\end{figure}

\end{document}
Firstly, follow the documentation of the package and MiKTeX/MacTeX in order to install the package. To check the package is working, you’ll want to put code like the above into a .latex file and test if you can compile it from the command line. Once you’ve confirmed that the package is available and working, we can integrate it with Anki.
To use the package with Anki, click “Add” in the main window, then click the note type selection button. Click the “Manage” button, then select the note type you plan to use and click “Options”. The LaTeX header and footer are shown. The header will look something like:
\documentclass[12pt]{article}
\special{papersize=3in,5in}
\usepackage{amssymb,amsmath}
\pagestyle{empty}
\setlength{\parindent}{0in}
\begin{document}
To use chemtex, you’d add the usepackage line in the earlier example, so it looks like:
\documentclass[12pt]{article}
\special{papersize=3in,5in}
\usepackage{amssymb,amsmath}
\usepackage{chemtex}
\pagestyle{empty}
\setlength{\parindent}{0in}
\begin{document}
After that, you should be able to include lines like the following in your Anki cards:
[latex]\ethene{H}{H$_3$C}{CH$_3$}{Br}[/latex]
Template Conflicts
As of Anki 2.1.20 / AnkiMobile 2.0.56 / AnkiDroid 2.13, this workaround is no
longer required, as {{field}} text inside fields no longer causes problems. If
you need to support older versions and want to keep using this syntax, please
make sure you place the {{=<% %>=}} string at the very top of your front and
back template, as recent Anki versions will not recognize it anywhere but the
start.
For older versions:
It’s not uncommon for {{ and }} to pop up in LaTeX code when writing mathematical equations. To ensure that your LaTeX equations don’t conflict with Anki’s field replacements, it’s possible to change the separator to something else.
For example, if you have a template:
{{latex field}}
Changing it to the following will make it unlikely that the LaTeX will conflict:
{{=<% %>=}}
<%latex field%>
Cloze Conflicts
Cloze deletions are terminated with }}, which can conflict with a }}
appearing in your LaTeX. To prevent LaTeX from being interpreted as a closing
cloze marker, you can put a space between any double closing braces that do not
indicate the end of the cloze, so
{{c1::[$]\frac{foo}{\frac{bar}{baz}}[/$] blah blah blah.}}
will not work, but
{{c1::[$]\frac{foo}{\frac{bar}{baz} }[/$] blah blah blah.}}
will (and LaTeX ignores spaces in math mode, so your equation will render the same). If you want to avoid adding the extra space into the rendered text (for example, when you are making Cloze cards for learning programming languages), another option is to use a HTML comment when editing the card in HTML mode:
{{c1::[$]\frac{foo}{\frac{bar}{baz}<!-- -->}[/$] blah blah blah.}}
You may use either workaround if you need to use the :: character
sequence within the Cloze-deleted text. The first card generated for the
following note text will read [type] in C++ is a type-safe union:
{{c1::std:<!-- -->:variant::~type~}} in C++ is a {{c2::type-safe union}}
Unsafe Commands
Anki prohibits certain commands like \input or \def from being used on cards or in templates, because allowing them could allow malicious shared decks to damage your system. (To be on the safe side, these commands are prohibited even in comments, so if you’re getting this error but don’t think you’ve used one, please double-check any comments you have in your headers, templates, and cards.) If you need to use these commands, please add them to a system package and import that package as described in the previous section.
Leeches
Leeches are cards that you keep forgetting. Because they require so many reviews, they take up a lot more of your time, compared to other cards.
Anki can help you identify leeches. Each time a review card “lapses” (is failed while it is in review mode), a counter increases. When this counter reaches 8, Anki tags the note as a leech and suspends the card. The threshold, and whether to suspend or not, can be adjusted in the deck options.
If you keep failing that card, Anki will continue to alert you about the leech periodically. These warnings occur at half the initial leech threshold. For example, if you set the warning at 8 lapses, future warnings will happen every 4 lapses (at 12, 16, and so on).
Once a leech is found, there are several ways to handle it.
Editing
The most efficient method to deal with leeches is to change how the information is presented. Maybe your cards have too much information, or you’re trying to memorize something without fully understanding it. Often, it helps to follow the 20 rules of formulating knowledge, proposed by Dr Piotr Wozniak, the creator of SuperMemo. Some cards can benefit from a mnemonic. Even some well-written cards may need a boost in coherence, e.g. by adding cards for related concepts. However, it takes a lot of experience to know how to formulate the material properly, break it down into smallest possible components, and use mnemonic techniques.
Deleting
If the material you’re struggling with isn’t important enough to justify the time spent, you can simply delete the card. By selectively deleting difficult and obscure items, you can spend more time learning other material, making studying more enjoyable. If you think the card might be useful for future reference, you can leave it suspended.
Waiting
Some leeches are caused by “interference”. For example, an English learner may have recently learned the words “disappoint” and “disappear”. As they look similar, the learner may find themselves confusing the two when trying to answer. In such situations, it’s often helpful to concentrate on one idea at a time. Once that idea is firmly ingrained in your mind, you can then start learning the other idea. So, in these situations, you might want to leave one of the words suspended until you have learned the other one well, and then unsuspend it.
For a more detailed discussion, you can refer to the article “Dealing with Leeches”, written by Soren Bjornstad.
Add-ons
Anki’s capabilities can be extended with add-ons. Add-ons can provide features like extra support for specific languages, extra control over scheduling, and so on.
To browse the list of available add-ons, select Tools → Add-ons, then click on Get Add-ons.
Alternatively, open ankiweb.net/shared/addons in a web browser.
If you have downloaded an add-on that is not working properly, or if you accidentally made a mistake when editing an add-on, you can use the “Delete” option in the menu to remove it.
Add-ons use and modify arbitrary parts of Anki’s codebase, so in some cases, updating Anki can break the compatibility with older add-ons. If one of your add-ons stops working after updating Anki, please consider reporting the issue to the add-on author. If you rely on this add-on, you will need to keep using an older Anki version until the add-on gets an update.
There is a “Contact Author” button on most add-ons pages on AnkiWeb, and many authors include their email address in the add-on, so if you need to get in touch with the author, editing the add-on and looking at the top of the file may help.
To learn how to write your own add-ons, please see the add-on writing guide.
Troubleshooting
If you encounter a problem with Anki, please try the following steps in order:
1. Restart Anki
Please close Anki, then start it again.
If you are unable to close Anki because of an error message, you can either terminate Anki using your task manager, or restart your computer. Anki saves periodically, so you should not lose more than a few minutes of work in most circumstances.
If the problem does not occur again, you can skip the following steps.
2. Check add-ons
Please close Anki, then open it in safe mode by holding down the Shift key while starting Anki. Keep holding Shift down until the on-screen message informs you that Anki has started in safe mode.
If the problem goes away, that indicates an add-on is causing the problem. Remove any add-ons you don’t need, and disable half of the others. If the problem continues, try the other half. Repeat the process until you’ve figured out which add-on is causing the problem. Then please report the issue to the add-on author, using the Copy Debug Info button, and pasting that into the report.
3. Check your Anki version
You can find the version you’re using in the Help → About or Anki → About menu. If the version you’re using is not the latest version published on https://apps.ankiweb.net, please close Anki, install the latest version, and then start Anki again to see if the problem has gone away.
If you’re using Linux, please make sure you can reproduce the error using the packaged version on the Anki website, as distros often distribute broken versions.
4. Check your database
After restarting Anki, please try the Tools → Check Database menu item to make sure your collection doesn’t have any problems.
5. Restart your computer
Sometimes restarting your computer may help.
6. Change the Video Driver
Crashes and display issues can be caused by the video driver. Changing to a different video driver may help. Make sure you try all the driver options and restart Anki after each change.
If you’re using Anki version 23.10 or above, the easiest way is to open Tools → Preferences (or Anki → Preferences if you’re on a Mac) and change the driver from the dropdown menu.
If you are on an older Anki version or if you cannot access the preferences for some reason, you can use the command-line instructions instead and manually change the gldriver file:
7. Reset window sizes
Sometimes pressing reset window sizes button in the preferences screen immediately after starting Anki will help.
8. If the problem remains
If you’ve confirmed you are using the latest Anki version, and are still receiving errors when starting Anki while holding down the shift key, please report the problem, including the next error you receive in your post.
Self-Hosted Sync Server
Advanced users who cannot or do not wish to use AnkiWeb can use a self-hosted sync server instead.
Things to be aware of:
- This is an advanced feature, targeted at users who are comfortable with networking and the command line. If you use this, the expectation is you can resolve any setup/network/firewall issues you run into yourself, and use of this is entirely at your own risk.
- Newer clients may depend on changes to the sync protocol, so syncing may stop working if you update your Anki clients without also updating the server.
- Third-party sync servers also exist. No testing is done against them, and they tend to take time to catch up when the sync protocol changes, so they are not recommended.
- The messages inside Anki will use the term “AnkiWeb” even if a custom server has been configured, (e.g “Cannot connect to AnkiWeb” when your server is down).
Installing/Running
There are various ways you can install and run the server. You can use either:
- the sync server bundled with the desktop version of Anki
- a separate minimal sync server that doesn’t include Anki’s GUI dependencies. Python and Rust implementations are available.
From a Packaged Build
This uses the sync server built into the desktop version of Anki as of version 2.1.57+.
On Windows in a cmd.exe session:
set SYNC_USER1=user:pass
"\Program Files\anki\anki-console" --syncserver
Or MacOS, in Terminal.app:
SYNC_USER1=user:pass /Applications/Anki.app/Contents/MacOS/launcher --syncserver
Replace ‘launcher’ with ‘anki’ for old packaged builds prior to 25.07.
Or Linux:
SYNC_USER1=user:pass anki --syncserver
With Pip
To avoid downloading desktop Anki’s GUI dependencies, you can run a standalone Anki sync server using a Python package downloaded from PyPI instead. Make sure you have Python 3.9+ installed.
python3 -m venv ~/syncserver
~/syncserver/bin/pip install anki
SYNC_USER1=user:pass ~/syncserver/bin/python -m anki.syncserver
With Cargo
From Anki 2.1.66+, you can alternatively build a Rust implementation of the standalone sync server using the below command. Make sure you have Rustup installed.
cargo install --locked --git https://github.com/ankitects/anki.git --tag 25.02.5 anki-sync-server
Replace 25.02.5 with whatever the latest Anki version is.
Protobuf (protoc) will need to be installed.
After building, you can run it with:
SYNC_USER1=user:pass anki-sync-server
From a source checkout
If you’ve cloned the Anki repo from GitHub, you can install from there:
./ninja extract:protoc ftl_repo
cargo install --path rslib/sync
With Docker
You can find a user-contributed Dockerfile and some instructions here.
Multiple Users
SYNC_USER1 declares the first user and password, and must be set.
You can optionally declare SYNC_USER2, SYNC_USER3 and so on, if you
wish to set up multiple accounts.
Hashed Passwords
Advanced users may wish to use hashed passwords instead of plain text passwords. If you wish to do this, you’ll need to use a separate tool (such as this one) to generate a password hash. You can then tell the server to expect hashed passwords by setting the env var PASSWORDS_HASHED to 1 (or any other value).
When hashed passwords are used, SYNC_USER variables are expected to be in username:password_hash format, where password_hash is a hash of the password in the PHC Format.
Storage Location
The server needs to store a copy of your collection and media in a folder.
By default it is ~/.syncserver; you can change this by defining
a SYNC_BASE environmental variable.
- This must not be the same location as your normal Anki data folder, as the server and client must store separate copies.
- You must sync your data to the server, not manually copy files into the server folder.
Public Access
The server listens on an unencrypted HTTP connection, so it’s not a good idea to expose it directly to the internet. You’ll want to either restrict usage to your local network, or place some form of encryption in front of the server, such as a VPN (Tailscale is apparently easy), or a HTTPS reverse proxy.
You can define SYNC_HOST and SYNC_PORT to change the host and port
that the server binds to.
Client Setup
You’ll need to determine your computer’s network IP address, and then
point each of your Anki clients to the address, e.g something like
http://192.168.1.200:8080/. The URL can be configured in the preferences.
If you’re using AnkiMobile and are unable to connect to a server on your local network, please go into the iOS settings, locate Anki near the bottom, and toggle “Allow Anki to access local network” off and then on again.
Older desktop clients required you to define SYNC_ENDPOINT and
SYNC_ENDPOINT_MEDIA. If using an older client, you’d put it as e.g.
http://192.168.1.200:8080/sync/ and http://192.168.1.200:8080/msync/
respectively. AnkiDroid clients before 2.16 require separate configuration for
the two endpoints.
Reverse Proxies
If using a reverse proxy to provide HTTPS access (e.g. nginx), and binding to a subpath
(e.g. http://example.com/custom/ -> http://localhost:8080/), you must make sure to
including a trailing slash when configuring Anki. If you put http://example.com/custom
instead, it will not work.
On iOS, TLS 1.3 is not supported, so your reverse proxy will need to have TLS 1.2 enabled, or you’ll get an “error code -9836”.
Large Requests
The standard AnkiWeb limit on uploads is applied by default. You can optionally
set MAX_SYNC_PAYLOAD_MEGS to something greater than 100 if you wish to
increase the limit. Bear in mind that if you’re using a reverse proxy, you may
need to adjust the limit there as well.
Contributing Changes
Because this server is bundled with Anki, simplicity is a design goal - it is targeted at individual/family use, and PRs that add things like a REST API or external databases are unlikely to be accepted at this time. If in doubt, please reach out before starting work on a PR.
If you’re looking for an existing API solution, the AnkiConnect add-on may meet your needs.
Miscellanea
Menu Shortcuts
On Windows/Linux you can hold down the Alt key and press a highlighted letter to activate a particular menu.
Although macOS doesn’t support this feature, it does allow you instead to assign shortcuts to specific menu items. Please see https://support.apple.com/en-au/guide/mac-help/mchlp2271/mac for more information.
Debug Console
Sometimes you may be asked to use the debug console to change a setting or check something. Unless asked to enter text in the “debug console”, you will probably not need this. Advanced users may like to read more about it in the add-on writing guide.
When asked to enter text into the “debug console”, please start Anki, and in the main window, press
Ctrl+Shift+;
(the control key, shift key, and semi-colon key at the same time)
On a Mac, press
Command+Shift+;
(the command key, shift key, and semi-colon key at the same time)
On some non-English keyboards, you may need to press : or + instead of ;.
In the window that has popped up, please paste the text you were asked to paste in the top section. When you’ve done so, please press Ctrl+Return (On Mac, Command+Return), and some text should appear in the bottom section. If you’ve been asked to paste the resulting output, please copy it from the bottom area, and paste it back to the support person.
If you press Ctrl+Shift+Return instead of just Ctrl+Return, Anki will try to print the result rather than doing what you asked it to. If you are getting unexpected errors, please make sure you’re not holding down the Shift key.
Contributing
Sharing Decks Publicly
To share decks with the general public, synchronize them with AnkiWeb, then log into AnkiWeb and click on “Share” from the menu next to the deck you wish to share.
If you shared a deck previously (including with previous versions of Anki), you can update it by clicking “Share” as above. Updating a shared deck will not reset the download counts or ratings. You can delete a shared deck that you have uploaded using the Delete button on the shared deck’s page.
When updating a deck, AnkiWeb expects the deck to be at the same location as before. If you shared a deck when it was called “Korean Verbs” for example, and then renamed it to “Korean::Korean Verbs”, resharing will not be able to update the existing copy. If you have forgotten the original name, you can guess it by downloading the deck on AnkiWeb and importing it (File > Import) in a new profile (File > Switch profile > Add). Then you can copy the exact name of the deck when it was first shared. If this doesn’t work, please contact support.
When you update a shared deck, users who downloaded the deck previously will not automatically receive updates. If they download the deck again and re-import it, newly added material will be imported without altering their existing study progress, provided neither you nor the user has altered the note type since the first import.
Sharing Decks Privately
If you’d like to share decks with a limited group of people (such as a study group or class) rather than the general public, you can do so by sharing them outside of AnkiWeb.
To share a deck privately, go to the File menu and choose Export. Select a single deck (not “All Decks”), and turn off “include scheduling information”. This will produce an .apkg file which you can share with others.
You can share the .apkg file by emailing it to people, placing it on a website or shared folder, or using a free file sharing service like Dropbox or Google Drive and sending people a link.
Both the computer version and mobile clients make it easy to import from an apkg file simply by clicking or tapping on it. AnkiWeb does not have the ability to import apkg files however, so the recipients of your deck will need to have the computer version or Anki on their mobile device.
When a user imports an .apkg file, cards that already exist in their collection will be ignored and any new cards will be added. As long as they use the same note type, modified cards will also be updated. To prevent data loss, cards that have been deleted in the new apkg file will not be deleted in the user’s collection, so if you need to delete cards from users’ decks for whatever reason, you will need to contact them about it.
Sharing Add-ons
Please see https://addon-docs.ankiweb.net/sharing.html
Translating Anki
Please see https://translating.ankiweb.net
Contributing Code
Anki’s source code is available at https://github.com/ankitects/anki
Before contributing, please see contributing.md.
Frequently Asked Questions
Please see https://faqs.ankiweb.net
Resources
You can find guides, templates, custom schedulers and other resources in this resource list.